Turn the handle of the mandrel clockwise to thread it in the hole. Insert installation depth is dependent on the presence of a countersink 34 to 1-12 turns below the surface with a countersink and 14 to 12 turns below the surface without a countersink.
 Helicoil Tangfree Free Running Free Running Thread Insert Without A Tang For Metals Youtube
Installing a heli-coil insert into part can be done manually or with a power tool.

How to install a helicoil insert. Thread the Helicoil insert into the hole until it rests at least a 14 turn below the surface of the metal having the stripped threads repaired. This wire is then wound into a spiral coil which when installed into Heli-Coil tapped holes pro-vides permanent conventional 60o internal screw threads. Helicoil Drilling Data - Metric.
This damaged stripped thread repair can be done in a variety of materials a. Because of that I decided to make this quick video on how to repair. While doing the final repairs on my T-5 Transmission I needed to do some thread repair.
Heli-Coil screw thread inserts Heli-Coil inserts are preci-sion formed screw thread coils worked into a diamond shape. Tanged inserts require removal and retrieval of the tang continue to step 6. The resultant surface finish is a mirror-like 8-16 micro inches.
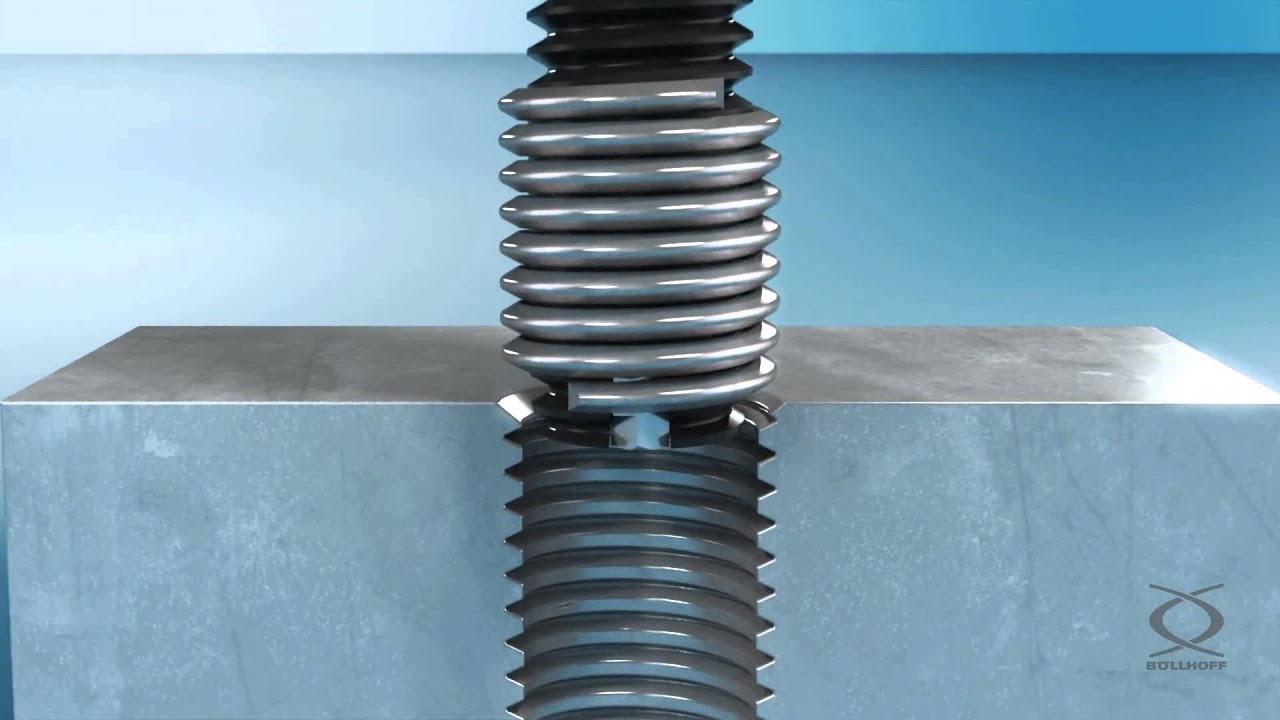
For plug Taps 516 or M8 and smaller. First you drill the hole and then the tap hole to provide a threaded track for the coil. Install the insert to the proper depth below the top surface 14 to 12 pitch for tapped holes without a countersink and 34 to 1-12 pitch for holes with a countersink.
To install the threaded insert youll first have to use the supplied drill bit to drill out and completely remove the damaged threads. Thread the Helicoil on the mandrel of the supplied Helicoil installation tool. Insert the helicoil into your freshly tapped hole With red threadlocker applied you can now insert the helicoil into your freshly tapped hole.
You can purchase the inserts individually or in kits. Liberally apply thread lock to the Helicoil insert. Set the end of the threaded insert in the tapped hole.
The coil itself is then placed on the end of the appropriate nosepiece depending on whether you are using a tanged or tangless coil insert. Installing any helicoil insert requires the same basic steps. Installing a HeliCoil insert requires drilling out the original hole to match the new coil tapping the hole for the coil installation and tang removal.
For high volume production applications using a power tool is essential. Place the Helicoil insert into the hole. Tangless CoilThread Insert installation is now complete.
F is equal to the insert nominal length Q ½ the nominal bolt diameter 5 Pitch allowing for tap chamfer countersink and maximum set-down. How To Install A HeliCoil Insert. Start to crank clockwise until the insert just.
Using a Helicoil thread repair kit to repair threads inside an aluminum fixture. Insert installation Slide the insert with the cross bent end first into the tube Follow it with the notched shaft and engage the cross bent end.