Ford Mustang Enthusiasts come to us looking to buy top quality Mustang part online. 12500 shipping.
 Amazon Com Sierra Auto Tops Convertible Soft Top Replacement Compatible With Ford Mustang 2005 2014 All Models W Heated Glass Window Sailcloth Vinyl Black Automotive
After visiting our store Mustang lovers find we also have the best selection of Mustang parts great prices and top notch service.

2007 mustang convertible top. Whether have the top down during a nice Sunday drive or are lowering the top at your home to let the interior breathe you are relying on an important part that. Fast shipping with low price guarantee. The lineup consists of V6 Deluxe V6 Premium GT Deluxe GT Premium and Shelby GT500 trim levels.
This allows debris to fall in but also results in an incomplete look. Mustang Cobra Tops see the Before and After inner pads updated and rear belt moldings painted. 2005-2007 Ford Mustang Convertible Roof Top Motor Actuator OEM NEW 8R3Z76533A00K Fits.
We even stock a nice selection of convertible light bars and styling bars plus Mustang Car Covers and Mustang Emblems and Mustang Badges for your Pony as well. 2005-2007 OEM Ford Mustang Convertible Top Motor Pump Ram Cylinders Lines S8590. Search over 93 used 2007-2010 Ford Mustang Convertibles.
Come find a great deal on used 2007-2010 Ford Mustang Convertibles in your area today. Mustangs Plus has been your classic Mustang and Restomod headquarters since 1981 as one of the top places to buy Mustang parts online. Available in coupe and convertible body styles the 2007 Ford Mustang seats four.
This Old Car Videos presents Ford Mustang 2005-2014 Convertible Top ReplacementOrder the full video and check out a complete list of videos at wwwthisoldcar. 2005 - 2007 Mustang Convertible Top Piston Hydraulic Lift Cylinder Pair LR Fits. The five piece Mustang convertible weatherstrip kit is the most popular and replaces the most commonly bad pieces.
1999-2004 OEM Ford Mustang Convertible Top Motor Pump Ram Cylinders 99-04 S8447. If you want the best Mustang convertible-top replacement for your pony car order one from us. The standard powertrain relies on a V6 engine paired with a five-speed manual transmission and rear-wheel drive.
Free shipping 83 - 93 OEM Ford Mustang Convertible Top Motor Pump Cylinders wiring Lines. V6 Deluxe 2dr Convertible 40L 6cyl 5M GT Premium 2dr Convertible 46L 8cyl 5M GT Deluxe 2dr Convertible 46L 8cyl. The Mustang convertible tops for sale on our site are built using fabrics from Haartz a leading factory supplier.
Whats better than having a sweet 2005-2009 Mustang. We carry Ford Mustang convertible-top replacements for 1983 and later models that are built to meet or exceed the quality of an OEM top. Keep that high-powered investment looking its best with 2005-2009 Mustang Convertible Top Parts.
Sierra Auto Tops Convertible Soft Top Replacement compatible with Ford Mustang 1994-2004 all models wHeated Glass Window Sailcloth Vinyl Black 44 out of 5 stars 88 33900 339. Mustang Convertible Top Boot Prevent dirt debris and other elements from entering your convertible top well with this 2005-2009 Mustang convertible top boot. Learn more about the 2007 Ford Mustang.
2007 Ford Mustang 113817. Get 2007 Ford Mustang values consumer reviews safety ratings and find cars for sale near you. Shop millions of cars from over 21000 dealers and find the perfect car.
Get the best deal for a 2007 Ford Mustang Convertible Top. When your top is in the down position the framework and well opening are exposed. 14500 1965 Ford Mustang Convertible 289 Full Restoration San Francisco CA The silver paint contrasts nicely with the brand-new black vinyl top matching boot and interior helping this car reach a sophisticatio.
The Used 2007 Ford Mustang Convertible is offered in the following styles. Mustang Convertible Top Motors 1964-2007 You may not realize it at the moment but there is a lot going on every time that you lower or raise the convertible top on your Ford Mustang. 1994 to 2004 Mustang Convertible Tops with Rear Glass Installed this 95 mustang was updated with E-Z ON Auto Top Assembly T02358-BLKG-SS Top HH2358-BLKG-SS Glass window from wwwTOPSONLINECOM Ford 2007 Mustang Saleen Tonneau Cover.
TrueCar has over 916842 listings nationwide updated daily. Get rid of leaks and wind noise and make your Mustang convertible as fun to drive with the top up as with the top down. Having a CONVERTIBLE 2005-2009 Mustang.
2007 Ford Mustang 18995.
Care should be taken when lightly cutting metallic colors to prevent disturbing the aluminum flake. In this range its completely safe to go painting single stage enamel.

Ive done a 2k single stage 21 ratio with 20 reducer paint job.

Wet sanding single stage paint. This Video explains how to Buff and Polish a Single Stage Paint Job to a Glossy Wet Look using Ultra-Cut Compound and Show Car Glaze made by MeguiarsFor mo. Todays blog is entitled Color sanding Runs From a Single Stage Paint Job. Personally I like to stay in the range of 320-360 which is a good grit to paint over.
Base coatclear coat also gives more protection over a single-stage paint after its finished in case of a minor scuff scratch etc. Sand with the shape of sculptured areas. When using a single-stage paint that has a chemical hardener you will probably need to wait only 24 hours or so before sanding.
I flat-sanded it down and wet sand then buffed it out. Do not use an automotive soap that also serves as a wax or a polish. Im still in step 1 on body panel 1 which has heavy orange peel and a few fisheyes.
Fill a regular bucket with water and a small amount of automotive soap. He goes on to say Then I sand by hand with a 3M hard-rubber sanding pad with a nice even back and forth motion and a small amount of water dripping from a clean wet rag on the area being hand. I will only do it as 23 stage with a clear coat.
Wet sanding requires a lubricant to prevent the sandpaper from burning the paint. Use a bucket of tap water and some sandpaper wrapped around a sanding block. Fill a bucket with cold water.
Clearcoating over the scratches wont make them go away. To refine the sanding job further you can repeat the wet sanding process with 1500-grit sandpaper then finish with 2000-grit sandpaper. Color-sanding its called that whether youre sanding the actual color of a single-stage paint or the clear over a basecoat can be done either wet or dry.
As the clear coat acts as an extra barrier over the color. First I will be starting out with single stage paint and in the second part of the video will be two stage. As cbyron mentioned sanding metallic.
Wet sanding and using a multi-stage buffing system will remove most imperfections in the paint bugs dirt orange peel etc. Using a bucket of water soap can be mixed in to help aid in the sanding process. Sanding between coats of paint would compromise that coverage.
How to Wet Sand and Polish Paint Step 1. Another factor to consider is you only want as many coats of paint on the surface as are needed for coverage. If youve painted something in single stage or you own something with it on it than this is for you.
Heres a question from Gavin. You can always clear over top of a single stage and sandbuff the clear. Sanding a candy color would create unevenness in the candy layer as its nearly impossible to sand perfectly even.
While the soap isnt. This is a single-stage on an SUV and have acquired paint runs from the 2nd coat up to the 3rd coat. Ill be spraying a single stage metallic paint acrylic enamel jazz blue.
After viewing 20 YouTube videosand a hundred forum threads i went and got a foam sanding block 800100015002000 grit wet paper a variable speed porter cable da and a white foam pad. Attach your wet sandpaper to the sanding block. To sand a finished enamel paint job you need to use at least 1000-grit sandpaper.
The hardener allows the paint to dry faster and more crisply so sanding will be more effective earlier on in the process. When used as a single-stage urethane paint this coating may be wet-sanded and polished for increased depth and gloss like any other urethane topcoat. I have to plan on wet sanding and polishing as Im no pro and I cant lay it perfectly from the gun.
Frequently wet the paper by dipping the sanding block into the water. Eastwood Customer Vehicles Painted with Our Single Stage Urethanes. Fill a bucket with water and a small amount of automotive soap.
Sanding in straight lines is better than circles. Some people even paint over 280 grit-sanded surfaces. To ensure that you do not damage any of the underlay use light and short sanding stokes.
Rinse the area removing. Dip the wet sandpaper into the bucket. You can actually go even more coarser if youre doing a single stage enamel.
Contact a reputable and licensed supplier for glass repair. This is because the repair process is the same regardless of the shape of the crack or chip.
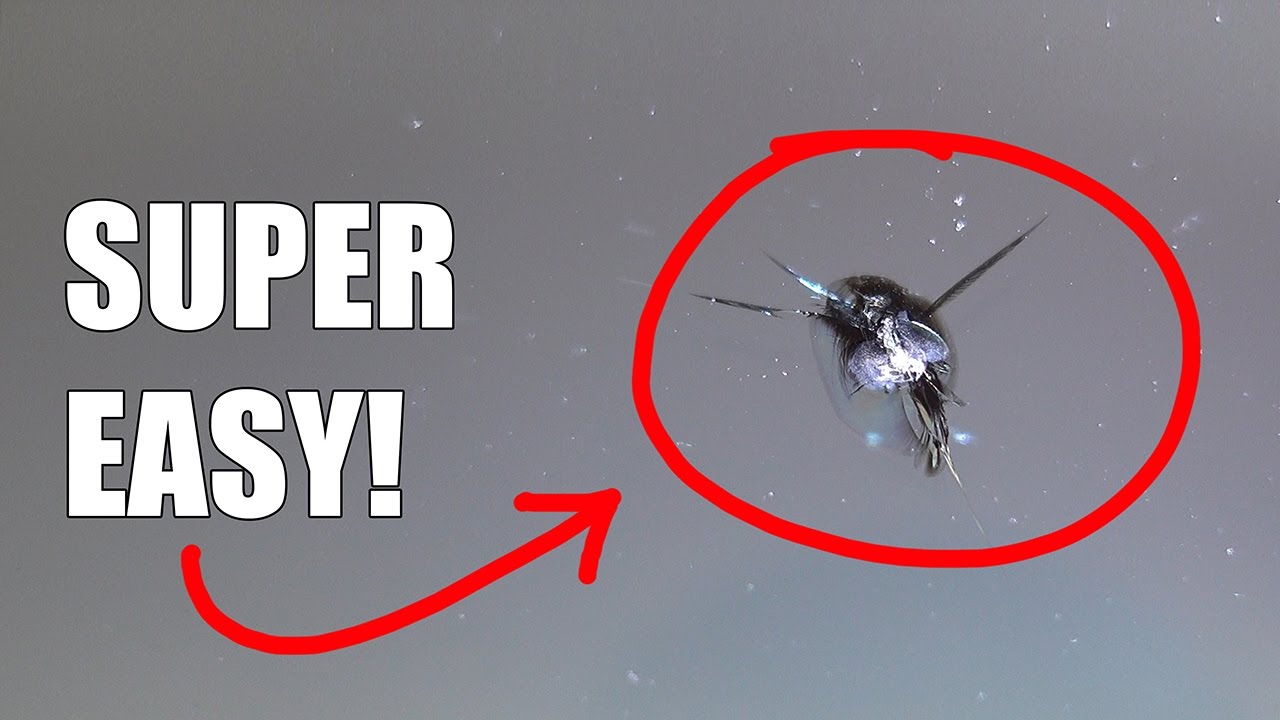 How To Fix A Windshield Rock Chip The Easy Way Youtube
To repair your chipped window and get you back on the road your local Glass Doctor will.
How to fix a stone chip on windshield. If you do not do this as soon as possible the chip can turn into a crack overnight. Apply the Patch and Pedestal. Httpamznto2oDXlxqIn this video I show you the method I used to repair a rock chip in my windshie.
Ross suggests taking the following steps if you notice a stone chip in your windshield. Bullseye half moon star break theyre all types of windshield chips and each type has a specified repair limit. Thoroughly wash and dry the windshield.
It just might be possible to repair it instead of replacing the entire windshield simply by injecting an epoxy or acrylic compound into the chip to act as an adhesive or filler. The good news is that smaller stone chips and cracks can usually be repaired by the professionals at Elite Auto Glass for a reasonable price. Repair Small Windshield Chips and Cracks.
Mix your resin if necessary. Just give us a call or log into the GEICO Mobile app and well make all the necessary arrangements. As tested this kit can only be used once and cannot be.
We repair before going any further We prefer repairing than replacing your windshield to regain its original strength. Peel off the paper backing on the adhesive patch to expose one side of the adhesive. Because your windshield accounts for 30 of your vehicles structural strength it plays a crucial role in ensuring your safety.
Pour the liquid resin into the pedestal filling it all the way up to the top. Use the Included Epoxy Resin. This is a how to fix your chipped windshield.
Be aware of insurance fraud scams. Have the damage professionally repaired. Whether you need to fix a small chip or ding or replace the whole windshield Elite Auto Glass has you covered.
Assessing the type of windshield damage incurred is essential to determine if your chipped windshield can be repaired. Use a special tool that attaches to the surface of the glass to inject a repair resin. How to Fix Windshield Cracks Clean the Area.
Take a Look at the Chip. Debris and dust are removed from your chipped windshield by either cleaning or drilling. Technically there are different names for the types of chips in a windshield.
When you see stone chips or cracks in your windshield it is just the outside layer that is damaged. Repair kits will specify the type and. Its windshield repair kit comes with a 18 fl-oz tube of resin liquid and can repair chips and cracks of up to 125 inches in diameter.
These chips and cracks can be repaired using resin that minimizes the appearance of the damage and repairs its structural integrity. Stop even the slightest chip from becoming bigger Cracks start off as a chip in 90 of the cases. Take the paper backing off the patch and line it up with the damaged area of your.
How to Repair a Windshield in 10 Steps. A bullseye has a separated cone-shaped crater in the glass. The chip cant be any larger than the circular cutout in the.
And size and location will be the two most important factors that a technician will examine before advising a windshield chip repair or a replacement. Talk to your insurance company and find out if the repair is covered. Once a smooth line is created a resin is injected cured and buffed to restore your vehicles glass to a clean transparent appearance.
Repairing the windshield protects its structural integrity says Little. To Repair or Replace. Never give your insurance information to anything less than a reputable repair shop with a long standing presence.
Many have mobile services and they will come to you. If you have a small chip nick or crack in your windshield we can send a professional repair technician to your home or office. It should not cost you more to repair a star chip compared to a crack or clean chip on your windshield.
One of the first steps of how to fix windshield chip is to clean the glass around the area. As such if money is a factor in your decision to repair the windshield you do not need to take into account the type or shape of the crack or chip. Method 1 of 3.
Prepare the chipped area by clearing the space with a drill. Permatex Windshield Repair Kit Clean the surface of the windshield with a small amount of acetone Make sure the surface you are working with is completely dry and near room temperature Examine the chip and its size to determine which repair kit will work best.
This is NOT a paid promotion. If you spill oil on concrete try to.
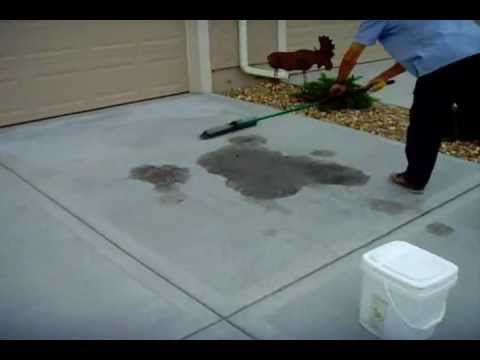 How To Remove Oil Stains From A Concrete Driveway Www Sealgreen Com 800 997 3873 Youtube
A sure way to remove oil from concrete.
Removing oil stains from concrete. How to Remove Dried Automotive Oil Stains on Driveway Concrete or BricksIn this video I will show you a really easy method on how to remove dried automotiv. Use a concrete and driveway cleaner 10 Walmart formulated for use with a pressure washer. After you carefully mix the acid solution follow these steps.
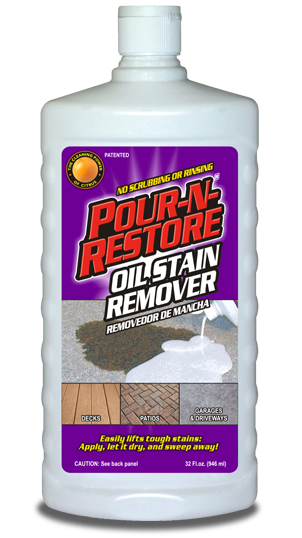
It works the first time by penetrating oil on contact. Flush the entire area with fresh water after the solution has stopped fizzing about ten minutes. This super clean degreaser has a powerful concentrated formula to remove the deepest concrete stain and oil.
Pro Tips to Remove Oil Stains From Concrete Oil stains arent as serious as missing persons reports time is of the essence. After the litter absorbs the oil walk on the litter to grind it into the ground like a scrub brush. Soak up as much of the oil as you can with paper towels.
Then scrub with a stiff nylon brush and rinse with a hose. Pour the solution over the area and work it in using a nylon scrub brush or stiff-bristle broom. How to remove oil stains from driveway or concrete for 5 or less.
If you dont own a power washer check your local hardware store or home improvement retailer for rental options. Mix one cup of TSP trisodium phosphate in a gallon of hot water then pour the solution over the blemish. How to Remove Oil Stains with a Poultice.
To remove oil stains from concrete driveways and garages spread a generous amount of kitty litter on the stain and allow it to sit for a few hours. These agents draw crude oil to the surface of the pavement. A poultice will help remove stubborn motor oil stains from concrete.
Goof Off Concrete Cleaner and Oil Stain Remover cuts through the toughest concrete grease oil and dirt satisfaction guaranteed. Toss the paper towels in the trash. Let it soak in for at least 30 minutes and then scrub with a stiff nylon brush.
Wearing eye protection and rubber gloves pour the TSP onto the oil stain and let it soak in for 20 to 30 minutes. Concrete Driveway Oil Stains Remover Recipe 1 cup hydrated lime powder ½ cup turpentine Paint scraper Plastic wrap Tape 1-gallon warm water 1 tablespoon liquid dish soap Scrub brush Water hose Rubber gloves Large bucket. To start out you should try and soak up as much of the spilled oil as you can by laying out rags.
How to Remove Oil Stains From a Driveway With WD-40. Degreaser usually does the trick but if it doesnt there are special products that use bacteria and other organisms to. Here are some of the most popular ways to remove oil stains from concrete.
Allow the degreaser to saturate the stain for a few minutes and scrub or wipe away according to the manufacturers instructions. As with most cleaning tasks you should expect to put a fair amount of elbow grease into the oil removal process. These solutions are applied directly to concrete- and asphalt-based oil stains.
Removing oil stains from concrete with soap can require concentrated amounts. Power washing is another method for cleaning oil stains on a driveway. The four best ways to remove oil stains from concrete are.
Granulated cat litter gets a lot of thumbs up. When youre done breaking it up sweep up and discard the dry litter. I am NOT an affili.
Add 1 cup of phosphate-free TSP trisodium phosphate also called TSP-PF to a gallon of hot water and mix thoroughly. Be careful not to. Its especially effective if you cover the stain while its still.
Most soaps are commonly used in a diluted form for most day to day tasks but youll likely need something stronger for tough oil stains especially if theyve been left to soak in the concrete for a while. The liquid can be water the degreaser we talked about above or a solvent like acetone xylene lacquer thinner or MEK. You can make a poultice by either using granular cat litter diamotaceous earth or powdered laundry detergent and a liquid.
If that cleaner stains the concrete try something else. If for some. A poultice is a solution that consists of a chemical solvent and a drawing agent.
Wash away the oil with a strong detergent and a scrub brush or sponge Use a concrete cleaner or degreaser to loosen and remove the oil Apply a poultice that will break down the oil and suck it from the concrete Let special single-celled. Soak up as much of the material as possible with a spill absorbent then spray the stain with a degreaser.
The white plastic bases come with adhesive-back tape strips and installation fasteners for a quick and simple repair. The proper strike plate can add years to your door and to your hardware.
 Restorers Classic Extended Lip Strike Plate 2 7 8 Inch Lip Van Dyke S Restorers
1-12 Inch Lip Strike Plate Don-Jo 9115.

Extended door strike plates. Replacement Strike plates for door knobs and levers in multiple finishes to coordinate with your home or office. Extended Height Latch Hole to Accommodate for Fluctuations in LatchHeight Locations. Free Shipping by Amazon.
44 out of. Prime-Line Door Strike Accommodates 5-12 in. Find strike plates at Lowes today.
43 out of 5 stars 9. 1-34 Inch Lip Strike Plate Don-Jo 9175. Schlage 1 34 Diameter Circular Replacement Strike Plate with 1 732 Lip.
43 out of 5 stars 448. These strike plates are individually packed and include two mounting screws. Door Thickness Specifications Emtek Products Inc.
Baldwin 5510E214 Estate Extended T-Strike 2-14 Inch Available in 14 Finishes 14 Finishes. Don-Jo 2 14 Inch High Extended Lip Strike Plate. T interior door and another for a 1-34 in.
- First Watch AdapterTrim Plates - 2 PACK Satin Nickel 479. 48 FREE 2-Day Shipping for Select Finishes. Kwikset Extended Lip Strike Plate.
Kwikset Satin Chrome Standard Strike Plate Item 372797. Take this time at home and knock out some home improvement tasks. First Watch Security Polished.
Stone Harbor Hardware 50175-10B Extended Lip Strike Plate with 175 Lip Oil-Rubbed Bronze. The Don-Jo Extended Lip Strike Plates are the perfect solution for thicker door jambs. We stock 6 different widths and 5 finishes.
The kit includes a strike plate for use with a 1-38 in. For the best site experience we suggest turning off compatibility mode or using an updated browser. Get Full Details Compare.
1-16 of 82 results for extended door strike plate Skip to main search results Eligible for Free Shipping. Spec Sheet for 1-12 Extended Lip Strike. Width measure is from center of screw hole to end of lip.
Hole Centers Steel Satin Nickel Plated 43 Model U 10385 7 33. Door Armor Mini - Door Security Reinforcement Kit For Jamb Frame Strike Plate - DIY Home Security White. Security Strike Satin Nickel 125 x.
Solid Brass Extended Lip Door Strikes Deltana SPE2. Get great deals on Strike Plate Door Plates. 2 Inch Lip Strike Plate Don-Jo 9102.
Shop our selection of Door Strike Plates in the Hardware section of True Value receive free shipping to a local True Value store. Don-Jo 2 34 Inch High Extended Lip Strike Plate. Deltana 2-14 Extended Lip Strike Plate - EACH Satin Nickel 600.
Don-Jo EL104-DU RC 4 12 Overall Extended Lip Strike Plate in Oil Rubbed Bronze. Strike plates are available in many finishes and styles. A 3-inch strike plate has an overall width of about 35 inches.
Designed for Use with Standard 4-78 ASA and Mortise Strikes. The overall width is slightly larger. Extended Full Lip Strike Plate with Radius Corners.
Door strike plates reinforce the area of the door where a door latch will sit when the door is closed. Deadbolt Security Door Jamb Latch Strike Plate 275 In x 1125 In. Get free shipping on qualified Residential Strike Plates or Buy Online Pick Up in Store today in the Hardware Department.
City of Industry CA 91744 Tel. Find Full lip strike strike plates at Lowes today. Extended Lip Brass Plated Strike.
Extended Lip Stainless Steel ANSI Strike Plate. The size of the lip strike is the distance from the center of the mounting holes to the edge of the lip see diagram below. 4 X WESCO fastec S8602BSN Extended Strike Plate Satin Nickel Door Lock Striker.
Deltana SPE250U15 2-12 x 2-14 Extended Lip Strike Plate. They help the latch stay put protect the door jamb from friction and keep the door opening and closing smoothly. Strike plate width is measured from center of screw holes to leading edge of strike plate.
Extended Lip Strike Plates Round Corner. 47 out of 5 stars 112. Easy to install only a screwdriver is needed.
Door Pulls Push Plates Hinges Kick Plates Mortise Locks Multi Point Lock Trim. This kit can be used to easily repair a door that fails to latch when it is closed.
3 in35 in4 in 76 mm89 mm101 mm Flange ID. Youll find it in the engine - normally inside a dark plastic box that has a plastic tube sticking out.
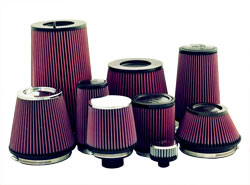 Washable Air Filter Technology For Automotive And Motorcycle Applications
Cleaning your air filter isnt very hard at all.
Washable car air filter. The Beck Arnley 042 cabin air filters are made using waterproof foam. Dispense a small amount of liquid dish soap about the size of a nickel into a bucket and fill with warm water. Clean your air filter only every 30000 to 50000 miles under normal driving conditions.
How washable air filters stack up to their conventional counterparts depends on how you look at price. Cartman Universal Clamp-On Engine Air Filter. The reason behind this is to prevent moisture accumulation.
The air purifier with a washable filter is your choice if you dont want to worry about changing the filter and spend extra money to purchase the new one. 51 in 130 mm Height. A-Team Performance Air Filter Element Air Cleaner High Flow Replacement Washable and Reusable Round Cotton Fiber Compatible with Buick Chevrolet GMC Ford Mopar Oldsmobile Pontiac 14X3 48 out of 5 stars54.
Soak it good for about ten minutes making sure not to let it dry on the filter. Make sure the filter is compatible with cleaning. Using a reusable product can help prevent unnecessary wasteover 100 million disposable filters end up in landfills every year.
This filter will last the life of your vehicle and cost less than regularly replacing disposable filters. Washable and Reusable Designed to be washed and reinstalled. You can clean your car or home air filters yourself but be aware that hiring a professional to replace it for you lessens the possibility of error.
It provides excellent filtration from harsh elements that can contaminate your engine. Washable Car Air Filter - Manufacturers Factory Suppliers From China. How To Clean a Reusable Car Air Filter.
Cut these lightweight filter rolls to the size you need. 6 in 152 mm. This means they cant trap small particles such as bacteria viruses or pet dander.
KNs line of washable replacement cabin air filters are designed to filter incoming air using state-of-the-art filtration technologyhelping protect your vehicles occupants interior and HVAC system from pollutants that can cause unpleasant odors. 473 in 120 mm Top Red. Its a wise decision to invest in an air purifier with a permanent filter.
Mildew-ResistantReusable Air Filter Rolls. They are washable reusable and resist mildew growth. KN clamp-on universal air filters are washable and reusable.
A performance air filter may cost more initially but it will more than pay for itself over the long haul with the elimination of replacement costs. KN Washable Air Filter KN Washable Air Filters are the gold standard in reusable engine air filters. Our company since its inception always regards product quality as enterprise life continuously improve production technology improve product quality and continuously strengthen enterprise total quality management in strict accordance with the national standard ISO 9001.
Price may vary by color. Moisture tends to condense when passing through plastic filters and the heat produced by your engine makes it conducive for mold growth. Washable air filters have lower MERV or Minimum Efficiency Reporting Value ratings than disposable filters so theyre not as effective.
Once you have it out of the car thump it a few times to knock the heavy stuff off then spray KN Air Filter Cleaner over both sides of the filter. Rinse the air filter thoroughly under running warm water. This engine air filter is washable and reusable which saves you having to buy a new filter.
Includes inserts to fit three different flange diameters. Its easy to install as its designed to fit into any vehicle factory air box. It is reusable and can be affordable in the long-run.
Designed to increase horsepower and acceleration. Clamp-on washable and reusable air filter. For instance disposable air filters should be replaced not cleaned whereas permanent filters may be washable.
The first thing you need to do in order to clean your air filter is to locate the air filter in your car. High air flow with excellent filtration. These filters are often made of cotton or nanofibers and some are washable and can be cleaned and lubricated with a special oil and then reused with at least one brand guaranteeing they will last.
61 in 155 mm Base. All of our performance air filters are washable and reusable so the day you buy one is the last day youll ever have to buy a new air filter for your vehicle. At 35 or more a single reusable filter does cost much more than a disposable one.
You will not have to replace the filter every few months. Swish the air filter gently in the water. The KN 33-2129 is economical and safe to use.
Engineered to be washable reusable and durable this is the last cabin air filter youll ever have to buy for your car. However if you purchase air filters frequently they can earn back that initial investment in a few months. Product Specifications Air Filter Large End Diameter.
Hydraulic clutches are generally not adjustable in the same way that a cable clutch is. The only adjustment is in the height and free play of the pedal itself.
![]() Adjusting The Clutch How A Car Works
Adjusting The Clutch How A Car Works
Note the position of the wear indicating tab on the clutch.

How to adjust a hydraulic clutch. The locknut and the adjuster nut are at the end of the outer cable next to the cable stop. Then remove the crossmember. Extrapolated over the 13 re-adjustments a manual-adjust clutch will typically require the maintenance savings alone can be significant.
There may be an issue with your clutch master cylinder or with your clutches sticking. Then unplug the plugs from the side of the transmission and disconnect the clutch fluid line. There are three key factors to this equation.
With a hydraulic system it is all in the placement of the master cylinder push rod on the clutch pedal. In the hydraulic clutch system slacken the lock nut with two spanners then turn the adjusting screw. Being that it is a hydraulic clutch there is no adjustment.
Something similar happens in cars with a hydraulic system and a manual gearbox. Install them in the 4 cover holes and turn them finger-tight. While theres a popular belief that all hydraulic actuated clutch systems are non-adjustable or self-adjusting there are some designs that let you make adjustments to compensate for the typical wear and tear of your clutch discs friction material.
Hydraulic clutch system to replace the traditional mechanical clutch linkage. Wedge the clutch pedal in the fully raised position with a block of wood. Press the clutch and measure its position.
An additional option available when the truck is equipped with the hydraulic clutch system is an air assist system that reduces pedal effort when. Thats because hydraulic clutches self-adjust offer better modulation than cable-actuated clutches and provide a more consistent feel. Does it look like what I circled in pic 1.
You may prefer it more or less high. The only way to adjust a hydraulic clutch is by adjusting the length of the slave-cylinder pushrod. And thats assuming an operator is taking the vehicle in for a clutch adjustment whenever its needed - something thats trickier to do when a hydraulic linkage is paired with a manual-adjust clutch.
If your pushrod is not adjustable you may be able to find a suitable replacement at a junkyard that you can install. There us no adjustment for your hydraulic clutch. In this case the pedal needs to be pushed lower to actuate the clutch.
This can be adjusted typically using a nut at the top of the clutch pedal lever. Well to start you need to remove the shifter from the transmission. Hydraulic clutch systems have been used for years by motorcycle magnates KTM Husqvarna Husaberg and Beta.
A simple inspection will show if adjustment is needed - as is the case in the photo above. If the tab is near the REPLACE position the clutch should be replaced. Mark the height of the clutch pedal without depressing it at all.
The distance of the clutch can be a matter of personal taste. Being that it should still be under warranty we suggest telling your service department to come pick it up. They are also popular in factory racing circles such as HRC Honda.
Pedal length pick up point to fulcrum length and master cylinder bore. Then remove the driveshaft. Locate the clutch cable and find where the outer cable is seated against its cable stop on the edge of the bell housing.
Set a block of wood down next to the clutch pedal. Locate four 4 38 x 16 x 1 14 UNC hex head machine screws. Your first step in adjusting a hydraulic clutch is to locate the slave-cylinder pushrod and determine if it is adjustable or not.
Mark the height of the clutch pedal at the location where you feel the clutch engage. This system is standard on the 2010 ProStar and LoneStar and optional on the TranStar and WorkStar. Support the Clutch during the removal of the 8 mounting bolts.
The higher the pickup point is on the pedal closer to the fulcrum of the lever the easier it is to push the pedal. I know the system is sold as a unit and not as individual components so I have a feeling you got the wrong part. Press the clutch pedal several times.
Hydraulic clutch systems arent designed to be adjustable in the same way you would adjust a mechanical cable clutch. In cable operated clutch systems the brake and clutch pedals should be at the same height.
Removes window and door trim without damaging retaining clips or the vehicle body. Simply insert the tool behind the handle and press in to grab the C-clip and pull out.
 C3 Corvette 1956 1979 Window Crank Removal Tool Corvette Mods
Dorman - HELP Window Handle Removal Tool 5.

Window crank removal tool. Model A Ford Inside Door Handle Window Crank Pin Removal Tool 28-56531-1. Buy online pick up in-store in 30 minutes. Using the window crank removal tool.
Next look for trim mounting screws inside the screen track. Extended the crank has a 2-34 in. Related Parts Electrical Lighting Brakes Traction Control Batteries Starting and Charging Suspension Steering Tire and Wheel.
Your order may be eligible for Ship to Home and shipping is free on all online orders of 3500. If your vehicle is equipped with power windows then this tool will not be required. Unscrew them to remove the casement cover and access the crank innards Photo 4.
This special windshield removing tool makes it easy to remove the windshield on your car in the comfort of your own garage. Projection and when folded it has a 58 in. Never fear grab your bread.
Dorman 76951 Window Handle Removal Tool. Dormans window handle remover safely and effectively removes the clips that secure manual window handles to inner door panels. The first step is to disconnect the crank arm from the guide track.
The folding design is often used to replace normal crank handles to avoid interfering with window blinds. 47 out of 5 stars 339. I show you an easy way to remove a w.
45 out of 5 stars 377. FREE Shipping on orders over 25 shipped by Amazon. Order Window Film - InstallationRemoval Tools for your vehicle and pick it up in storemake your purchase find a store near you and get directions.
Ive had one like them for decades and have used it hundreds of times. Window Handle Remover Tool safely removes clips that secure window handles Ideal for upholstery glass stereo electrical and paintbody jobs. The window crank removal tool is designed to remove the retainer pin that holds many manual window crank handles to the drive shaft.
46 out of 5 stars140. Add to cart. Sign in to check out Check out as guest.
Get it as soon as Mon Feb 8. Replacement retainer clips are also available for most applications. Have you ever had a problem removing a window crank because you dont have that special tool.
Replacement retainer clips are also available for most applications. Ideal for upholstery glass stereo electrical and paintbody jobs. All you need is a couple of flat head screwdriversMightyMecha.
This professional-grade set of tools helps you remove windows and door trim without damage to your vehicle. Free In-Store or Curbside Pick Up. The blue plastic pry bars from ebay work for prying up trim and door panels with snap in clips.
This is a universal diecast folding crank This is a universal diecast folding crank handle that will fit most casement operator crank spindles. 1-year accident protection plan from SquareTrade - 599 1-year accident protection plan from SquareTrade - 599 Opens an information Overlay. Pull handle provides additional leverage.
Window Handle Removal Tool. Check here for special coupons and promotions. SKU 721258 5.
The windshield door trim tool set includes a 3-in-1 clip spring remover auto trim pad remover a molding release tool and a door handle clip remover with a black oxide finish. Amazons Choice for window crank removal tool. More Buying Choices76918 new offers OEMTOOLS 25311 Automotive Window and Door Clip Remover and Installer Remove Door Handles Window Cranks with this Window Door Clip Tool Works on GM Ford and any vehicle w C type clip.
Both of those from Amazon will work for removing the window cranks and door handles. Another common tool for releasing the C-clips that hold the door handles in place looks more like a pliers but rather than having a pliers type end it has flat hooked shaped blades on the end. Here is a quick video on how to remove a manual roll down window handle with no special tools.
Dormans Window Handle Remover safely and effectively removes the clips that secure manual window handles to inner door panels. Save on Performance Tool DoorWindow Handle Tool W80646 at Advance Auto Parts. Add to Watchlist Unwatch.
I have the same set got them at Harbor Freight around 5. Lisle 18600 Window and Door Clip Remover. Take out the screen and crank the window open until the plastic guide bushing aligns with the guide track notch Photo 2.
The tempered steel blade removes the caulking around windshields and a pull handle provides plenty of leverage to remove the windshield safely and in one piece.
Actual Honda Civic IX 2011-2015 diagrams schemes fuse box diagrams layouts location diagrams wiring diagrams etc may vary depend on the model version. This Fuse Box Cabin Coupe EX Fits 98 99 00 Honda Civic OEM should fit all of the vehicles and years listed below in the compatible vehicle section.
 I Need A Fuse Box Diagram For A 98 Honda Civic Ex Or At Least Know Which Fuse To Pull To Change The Fuse For The Wind
For the fuse descriptions of the under-hood fuse box go here.
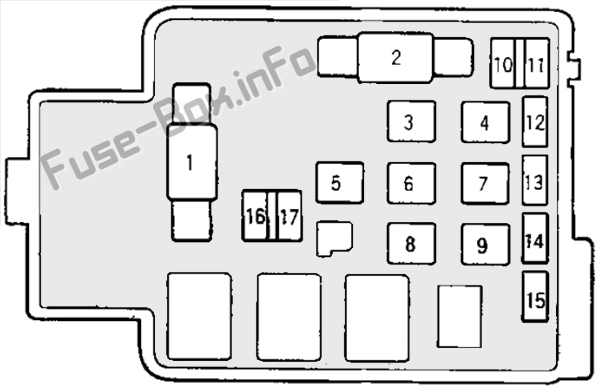
98 honda civic fuse box. Honda Civic 1996 2000 fuse box diagram. Electrical components such as your map light radio heated seats high beams power windows all have fuses and if they suddenly stop working chances are you have a fuse that has blown out. If your Civic is experiencing electrical problems you should always check the fuses first because they are relatively easy to check and cheap to change.
Fuses located in-between the battery are the electrical components your car draws. Open the hood and look for the fuse box which is located near the passengers side. 1996 1997 1998 1999 2000.
Set the cover aside. 2006 2007 2008 Honda civic fuse box w all working fuses. Fuse box diagram fuse layout location and assignment of fuses and relays Honda Civic Mk6 EJEKEM 1996 1997 1998 1999 2000.
Remove the cover on the fuse box by pulling the tabs outward and lifting up. Honda Accord Fuse Box Diagram Honda-Tech inside 1998 Honda Civic Fuse Panel Diagram image size 756 X 392 px and to view image details please click the image. This Fuse Box Cabin Coupe EX Fits 98 99 00 Honda Civic OEM is in overall good condition.
We have accumulated numerous photos ideally this photo works for you as well as assist you in finding the solution you are seeking. Honda Civic LX 1998 Fuse PanelBoard Fuse Symbol Map Related diagrams. Fuse box diagram location and assignment of electrical fuses for Honda Civic 1996 1997 1998 1999 2000.
Some Hondas have multiple interior fuse boxes including in the trunk - the video above will show you where the interior fuse box of your 1998 Civic is. Fuse Box Cabin Coupe EX Fits 98 99 00 Honda Civic OEM. Then the tenth generation 2015 present sedan got unveiled on youtube in 2015 civic coupe was released at the 2015 los angeles auto.
For the Honda Civic fifth generation 1991 1992 1993 1994 1995 model year. In this article we consider the tenth-generation Honda Civic available from 2016 to the present. Here is a picture gallery about 1999 honda civic fuse box complete with the description of the image please find the image you need.
The fuse box is located on the driver side of the dash below the steering column. 1992-2000 Honda Civic Del Sol Fuse Box Diagram with regard to 1999 Honda Civic Fuse Box image size 502 X 660 px and to view image details please click the image. 1996 civic 1997 civic 1999 civic 1998 civic 2000 civic.
Under-Dash FuseRelay Box 1996-2000 16L Honda Civic. Here is a picture gallery about 1998 honda civic fuse panel diagram complete with the description of the image please find the image you need. For the fuse descriptions of the under-dash fuse box go here.
From the moonroof to the daytime running lights this guide breaks down the fuse box components to help you quickly find that faulty fuse. The cover contains a diagram of the fuses which tells you what each fuse is used for and the amperage. All Honda Civic IX info diagrams provided on this site are provided for general information purpose only.
By Pizzaman711 - February 24 2015 This article applies to the Honda Civic 1992-2000. Here you will find fuse box diagrams of Honda Civic 2016 2017 2018 and 2019 get information about the location of the fuse panels inside the car and learn about the assignment of each fuse fuse layout. Passenger compartment Honda Civic fuse box diagram.
Under dash fuserelay box 1996 2000 16l honda civic. Under-Hood FuseRelay Box 1996-2000 16L Honda Civic. Diagramfuse Boxwhich Numbered Slot.
Honda Civic 2008 fuse box diagram Year of production. Step 1 Locate and open the fuse box. Honda Civic LX 1989 Interior Fuse BoxBlock Circuit Breaker Diagram Honda Civic LX 1992 Fuse BoxBlock Circuit Breaker Diagram Honda CRV 22L 2005 Component Fuse BoxBlock Circuit Breaker Diagram Honda Accord Sedan 2008 Underhood Fuse BoxBlock Circuit Breaker Diagram.
98 honda civic fuse box - welcome to my web site this post will certainly discuss concerning 98 honda civic fuse box. The part has normal wear from use which might be seen from the product photos. The fuse box is located on the passenger side of the engine compartment next to the strut tower.
2008 Engine Compartment Fuse Box Number Ampere rating A Circuits protected 1 100 Main Fuse 70 EPS1 2 80 Option Main 50 Ignition Switch Main 3 30 ABSVSA Motor 30 ABSVSA FS 402 4 50 Headlight Main 40 Power Window Main 5 Not Used. This part attaches to the of the brakes of the vehicle.
This should also work with any second generation 2000 to 2005 Dodge NeonAmazon Affiliate Link to Pressure Regulator. Where is the fuel filter located on a 2002 dodge neon - Answered by a verified Dodge Mechanic.
 Fuel Filter Location So I Can Replace It
There are physical signs that you can feel when your Neons fuel filter is clogging.
2002 dodge neon fuel filter. 2002 Dodge Neon Fuel Delivery. By continuing to use this site you consent to the use of cookies on your device as described in our cookie policy unless you have disabled them. This is a test.
Before taking anything apart check to see if your engines computer has any trouble codes saved in it. Bring your vehicles fuel system back to its top shape with this top-notch part. Order Oil Filter for your 2002 Dodge Neon and pick it up in storemake your purchase find a store near you and get directions.
Bring your vehicles fuel system back to its top shape with this top-notch part. 2002 Dodge Neon Internal Engine. Httpsamznto2XeoaNS This Dodge Neon.
2002 Dodge Neon Filters And PCV. 2002 Dodge Neon Gaskets. 2002 Dodge Neon Ignition Tune Up And Routine Maintenance.
Free In-Store or Curbside Pick Up. Skip to main contentus. I have a 2001 Dodge Neon and I am having a fuel delivery problem.
This should also work with any second generation 2000 to 2005 Dodge NeonAmazon Affiliate Link to Pressure Regulator. Dodge Neon Fuel Filter. Fuel filter location in 2002 neon.
Your order may be eligible for Ship to Home and shipping is free on all online orders of 3500. Already tried fuel injector cleaner but didnt help at all. I got underneath the car and tried to find it thinking it was along t read more.
We use cookies to give you the best possible experience on our website. Think it is going to be part of the fuel pump module which is in the gas tank. My next step is to try the fuel filter but Im not sure where it is loca.
Duralast Fuel Filter FF875DL 23. Dodge Neon USA Built 2002 Fuel Filter Kit by Mopar. 2002 Dodge Neon Powertrain.
Cart Hello Select your address Best Sellers. Your order may be eligible for Ship to Home and shipping is free on all online orders of 3500. 1-1 of 1 Results.
Asked by workingmanfree Aug 03 2012 at 0858 PM about the 2003 Dodge Neon SE Sedan FWD. Dodge Neon 1999-05Check out My Amazon Auto Accessories Store. Check if this fits your vehicle 23.
DIYSAVE10 Online Ship-to-Home Orders Only. 2002 Dodge Neon Interior. Lets make that Weekend job less Painful.
Account Lists Account Returns Orders. The engine may throw a P0087 trouble code. Order Air Filter for your 2002 Dodge Neon and pick it up in storemake your purchase find a store near you and get directions.
Dodge Neon Typical Fuel Filter. Dodge Neon USA Built 2002 Fuel Filter Kit by Mopar. Where is the location of the fuel filter in a 2002 dodge neon.
Designed as a direct-fit replacement of your worn-out or malfunctioning part it will provide easy. This trouble code detects that the fuel railsystem. Httpsamznto2XeoaNS This Dodge Neon.
Shop millions of cars from over 21000 dealers and find the perfect car. 1-1 of 1 Results. Check here for special coupons and promotions.
All Hello Sign in. Dodge neon fuel regulator. Check here for special coupons and promotions.
Dodge Neon Fuel Filter. Fuel Pressure RegulatorFilter combo Change. Asked by jslck in Beverly Hills CA on.
Designed as a direct-fit replacement of your worn-out or malfunctioning part it will provide easy. Where is the fuel filter on a 2001 dodge neon 4 Answers. 2002 Dodge Neon Suspension Steering Tire And Wheel.
The average price of a 2002 Dodge Neon fuel filter replacement can vary depending on location. Hi I have another question regarding the fuel filter on the 96 Dodge Neon SOHC 20 Where is the fuel filter located on this car. Signs of a Bad Fuel Filter.
Radiator air valves come in a variety of sizes that provide different rates of airflow. There are two different kinds of steam radiator systems one pipe and two pipe.
 How To Change Radiator Valves Living By Homeserve
Got your own plumbing or heating problem.

How do you change a radiator valve. Switch off heating system and shut off water. Some people discover that their old valves do not connect properly to the inlets of their new radiator anymore. Radiator not working -- Valve change without draining.
If you want to regulate the amount of heat your radiator generates in a steam system youll have to install a thermostatic radiator valve on each radiator to do it. Protect the floorCover the floor area around the radiator under the valves you are going to replace with the towels and. Unscrew the union nut that attaches the valve to the radiator then unscrew the valve from the pipe.
This fine-tuning allows you to balance the heating system so that radiators get the right amount of heat for the rooms they serve. Remove the old valve. Assuming nothings leaking yet open both the rad valves.
Changed my radiator valve without draining the system. Insert a simple hex tool into the hole and then use an adjustable spanner to loosen the part. Look carefully to be sure it will fit.
Now wrap a PTFE around the new insert push it into the radiator and tighten it up. Once the valve is turned it essentially pushes or pulls the wax around it that is in connection with the pin. Prepare the radiator valvesStart.
But other radiator valves are the gate type valve that will either fully close - or not. By adjusting the airflow to an individual radiator you can affect how quickly the radiator heats up. Remove the old.
This drain off is usually located at the lowest point in the house. Locate the drain off. Now you need to vent the radiator of air to break the vacuum inside and allow the water to flow out of the control valve.
By doing this it can change the amount of water that is running through the fitting and into the radiator. The old nut and olive should be fine to use but if you want to change those just pull the nut off and use a pair of grips to pull the olive. Jan shows how to fix that radiator valve in 2 minutes.
Another reason you might need to buy new radiator valves is because you need to replace the old ones. Youll need a hose at. Grip the body of the valve with one adjustable wrench.
Take the old valve to a plumbing and heating supply store to find an exact replacement. As its filling open the radiator bleed valve to ensure all the airs removed and let the radiator fill. Turn the heating and water offTurn the heating off and allow the radiators to cool completely for at least an hour.
Before you start any work on your central heating system youll first need to drain it. Hold it steady while you use another wrench to gently loosen the nut that connects the radiator valve to the radiator fig. Remove the old.
You also may need to replace the short pipe that emerges from the radiator. There are times where the radiator valves leak and affect the overall performance of the central heating system as a result. Check for leaks as water starts to fill the new radiator tightening any connections as needed.
- then gently re-tighten the packing nut enough to be sure theres no leakage around the valve stem Note that even fully closed depending on the type of radiator valve the radiator may not be 100 Off if the valve stem stop washer for stop type valves is damaged or missing. How to replace a radiator valve 1. Unbungreopen the FE tank supply unseal the vent pipe.
Place the dry cloth under the valves in order to catch any water left in the system. To fix that requires removal and disassembly of the valve. Once the radiator valve is in place it is possible for the valve to be turned and altered.
I removed a broken TRV thermostatic radiator va. How To Change A Radiator Valve Step 1. This method is perfect for combi boiler systems but if you have a.
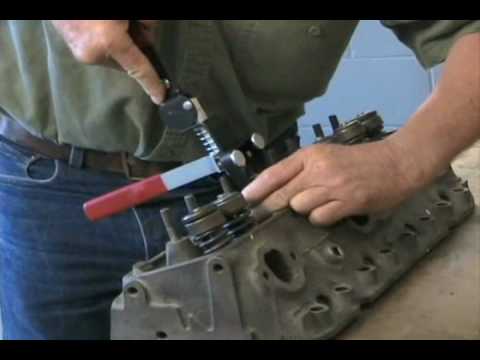
In order to remove the intake and exhaust valves the small coil spring or springs that holds each valve in place must be compressed. Save on Powerbuilt Tools Kit 6 Valve Spring Compressor Kit 648615 at Advance Auto Parts.
 Lisle Valve Spring Compressor 16750 Youtube
Compressor fork pushes on retainer as the holding pin keeps the valve in position.
How to use valve spring compressor. Valve spring compressor tools are available in several designs some of which work while the cylinder head is still on the engine in the vehicle while others only work with the head on the work bench. How to use a valve spring compressor Step 1. USA Link for Spring Compressor Kit here httpamznto22tSjSNCanadian link for Spring Compressor httpsamznto2Ifnts0How to Use a Spring compressor safel.
The valve spring compressor has an opening adjustability between 75 - 165mm - and a throat clearance of 150mm. 3mirrors 67605 Valve Spring Compressor Tool Compatible with 48 53 57 60 62 LS1 LS2 LS3 LS6 Chevy LSX Camaro Corvette Trans am GTO G8 CTS V GM Trucks 1 Best Seller Stens 750-174 Valve Spring CompressorBlack. Its not the recommended method to compress a spring but it will definitely make.
Compressor installs onto the spring and retainer assembly and is tightened to compress spring. The LSM Valve Spring Compressors are simply the best quality and easiest to use. Once the spring is reduced in height which is usually only around 316th of an inch the two-piece collar often referred to as keepers that fits around the groove surrounding the top of the valve stem can be released the spring retainer lifted off and the valve removed from the cylinder head by sliding it down the valve guide.
With this tool you can generally take a. Valve spring tool works with the cylinder head on or off. The air powered type has two buttons you use to compress and release the spring.
V-8 cylinder head apart in less than a couple of minutes. USA Link to get a Spring Compressor httpsamznto2NgSnUOCanadian Link to get a Spring Compressor httpsamznto312rLivWhen working with any type of spri. This type of spring compressor is also available in a heavy duty version for removing high performance valve springs.
This shows how to remove the valve spring assembly by using an overhead spring compressor. How to use Valve Spring Compressor. Buy online pick up in-store in 30 minutes.
It makes changing valve springs a fast safe and simple one-man job. This universal overhead valve compressor allows you to remove and install overhead valve springs on most cars without taking off the cylinder head. This is a great DIY for those who dont have access to a Spring Compressor.
Then just release the overhead valve compressor and take the spring out. Meant for use on heads which are removed from the block. It is possible to do this job without removing the cylinder head f.
All LSM on head Valve Spring Compressors have a tapered flange retainer housing that can fit springs as small as 800 and up to 1. Simply attach this valve compressor without removing the cylinder or continue to replace springs with the cylinder off before using this overhead valve spring compression tool. Before removing the valves ensure you have a method of identifying where each valve came from.
Can be used with heads installed on motor. Remove and replace worn or broken valve springs. Valve springs are held in place by their own tension so they have to be compressed before the retainers and locks can be removed.
The offset jaws compress the spring allowing you to pull out the keepers.
The tiny brush strokes. The most important part of repairing stainless steel is rubbing in the same.
 Heal The Heartbreak Of Scratches On Stainless Everyday Cheapskate
How to remove deep scratches and metal gouging from a stainless steel gun frame.

Fixing scratches on stainless steel. Using Commercial Scratch Removers 1. Gently scrub the cleaner into the surface of the appliance. Fine scratches can usually be rubbed out with a cleaning product or an.
Water and a cloth This is the least risky option when it comes to cleaning stainless steel. Plain warm water will work in the majority of the situations. HOW TO REMOVE FINE SCRATCHES IN STAINLESS STEEL If youre using a powdered stainless steel scratch removal compound add enough watera few drops at a timeto create a.
Here are some stainless steel scratch removal techniques for you to try. Wipe the sink dry with a clean lint-free towel and take note of where the scratches are located. For super-fine scratches use a cleaner such as Ajax Comet or a Powdered Stainless Steel Cleaner.
In a house full of kids husband included a pristine stainless steel fridge or dishwasher can go from fab to drab think water stains and sticky fingerprints in a matter of minutes. The key on how to remove scratches from stainless steel is to start with the finest grit paper or pad and zigzag a stream of sanding fluid on it. Stainless steel is a great look until you scratch it.
Apply the remover to. They can be applied with a cloth or sponge. Use a scratch remover for deeper scratches.
Remove Scratches From Stainless Steel With Vinegar and Olive Oil. Stainless steel appliances look amazing for the first 10 seconds that is. There are a few compounds and cleaners that can be used to fill and smooth.
Make sure to go with the grain. When removing scratches from stainless steel always go with the grain and start in an inconspicuous area. Sanding with wet sandpaper is recommended for deeper scratches.
Mix powdered compounds with. If the scratch wont come out after sanding for a few minutes move up to the next coarsest grit. Apply a small amount of the scratch remover compound to a microfiber cloth and then very gently rub it back and forth.
Clean lint-free cloths Soft-bristled toothbrush Non-abrasive commercial cleanser liquid or powder Whitening toothpaste Wetdry sandpaper in various grits Sanding block Stainless steel polish. Choose a non-abrasive compound or cleaner. Best Ways to Remove Stainless Steel Scratches.
Stainless steel is often found on appliances and scratches in stainless steel can usually be buffed out with a soft-bristled toothbrush and whitening toothp. Pour a small amount of a liquid abrasive cleaning product onto a soft scouring pad. Its inexpensive and versatile and.
Sandpaper comes in various grits so. Dry with a cloth or towel to prevent any water spots. First clean the stainless steel surface.
Identify the direction of your sinks grain. Remove Scratches from Stainless Steel Franks Appliance recommends a soft abrasive cleaner such as Revere Copper and Stainless Steel Cleaner to gently buff stainless steel clean from minor marks on the surface. Determine the direction of the grain.
As soon as the scratch is gone buff with the cloth in the direction of the grain and while the paste is still wet. Buffing Light Scratches 1. The 6-piece kit contains everything you need including coarse medium and fine abrasion pads applicator tool stainless steel cutting blending lube and a microfiber cloth.
Then it looks awful. How to Repair a Deep Scratch on a Brushed Stainless Steel Frigidaire Stainless Steel Gauges. If youre a mom then you know exactly what were talking about.
Dish soap Mix warm water and dish soap and rub the solution onto the marks bit by bit in small sections going with the grain. The first thing to do is identify the grain of the stainless steel. If you have the manufacturers instructions these should tell you the.
Or buy a stainless steel repair kit and get everything you need. But you can sand out the scratches with sandpaper 400 to 600 grit and a sanding block an abrasive pad or with a rubbing compound. These cleaners are powders and mixed with water to become a cream.
For fine scratches cleaners such as Comet and Revere Stainless Steel and Copper Cleaner are non-abrasive cleansers that. Apply the paste with a dry microfiber cloth and wipe in a circular direction. Then sand the scratched area photo.
Durable and classic stainless steel is a popular choice. Then use a metal polisher to get scratches off your coated stainless steel appliance.