2001 ford taurus misfire have replaced plugs and wires coil pack twice runs well for a couple of weeks then starts missing again. How much SHOULD it cost to get a Tune Up for a 2005 F-150 Lariet.
 How To Change Ignition Coil 2002 Ford F150 Youtube
Dont drive around with an inferior performance and replace your Ford F-150 ignition coil with one from AutoZone if there are issues.

2002 f150 coil pack. DG508 Ignition Coil Pack High Engine 8 PCS Ignition Coil Curved Boot for Ford E150 E250 E550 F150 F250 F550 46L 54L 68L V8 V10 Lincoln Mercury Compatible PartDG508 DG457 DG472 DG491 F523 43 out of 5 stars 62. Plugs were changed 20K ago so indications are its the cylinder 2 Coil Pack Coil Assy - Igniti. RockAuto ships auto parts and body parts from over 300 manufacturers to customers doors worldwide all at warehouse prices.
Your order may be eligible for Ship to Home and shipping is free on all online orders of 3500. The Ford 54-liter V-8 uses an individual coil for each spark plug. Easy to use parts catalog.
No obvious vacuum leaks. This improves efficiency by doing away with spark plug wires which are relatively perishable. The best part is our Ford F-150 Ignition Coil products start from as little as 2399.
V8check engine lightspark plugs an ignition coil I have a 2002 Ford F-150 V8-281 46L SOHC. Code reader indicated miss fire cylinder 2. I recently had the check engine light come on and was told the code of P0303 Cylinder 3 Misfire Detected.
Good luck diagnosing the problem. Feel free to leave a comment below if there is anything that you would like to add. CarBole 8 Pack Curved boot Ignition Coils Black 15 More Energy for Ford F-150 F-250 F-350 46L 54L V8 DG508 DG457 DG472 DG491 46L 54L V8 Lincoln Mercury Crown Victoria Expedition Mustang Motorcraft Set of 8 Ignition Coils DG-511 8 Spark Plugs SP-515 PZH14F.
Put the probes on the coil sides to test the secondary resistance which should be around 543K ohms set the multimeter to 20k ohm and you should get around 54 Some coils have read higher or lower at 542. We currently carry 15 Ignition Coil products to choose from for your 2002 Ford F-150 and our inventory prices range from as little as 2399 up to 17999. VIEW CART AND CHECKOUT.
Order Ignition Coils for your 2002 Ford F-150 and pick it up in storemake your purchase find a store near you and get directions. Cost to replace coil pack and plugs 2002 F150. Bad Coil Packs Ford F150.
Whether youre tackling a project for work or a personal project at home your Ford F-150 is going to be beneficial in more ways than one. Be aware that almost all symptoms of a bad coil pack in your F150 could also be other issues with the ignition system as well. Home 2002 Ford F150 Auto Parts 2002 Ford F150 Ignition Tune Up And Routine Maintenance 2002 Ford F150 Ignition Coil And Related Components.
On top of low prices Advance Auto Parts offers 10 different trusted brands of Ignition Coil products for the 2002 Ford F-150. Find 2002 FORD F-150 54L330 Ignition Coils Coil pack Coil Style and get Free Shipping on Orders Over 99 at Summit Racing. 2003 F-150 54 V8.
If you have determined that one or more of your coil packs have gone bad replacing them is not difficult to do yourself. Find 2002 FORD F-150 HARLEY-DAVIDSON EDITION Ignition Coils Coil pack Coil Style and get Free Shipping on Orders Over 99 at Summit Racing. Duralast Multi Pack Coil On Plug Ignition OEM Standard Ignition Coil 8 Pack C1417-8.
8 Ignition Coil Pack For Ford F-150 Expedition 54L 46L Crown Victoria Explorer Fits. If it reports OL throw it away it is bad open lead. Check here for special coupons and promotions.
When it comes to your Ford F-150 you want parts and products from only trusted brands. You have 0 Items In Your Cart. Here at Advance Auto Parts we work with only top reliable Ignition Coil product and part brands so you can shop with complete confidence.
1999 99 PONTIAC GRAND AM SE SPEEDOMETER CLUSTER ODOMETER GAUGE OEM 16211672 CAR Fits. Improve your vision and your vehicles appearance.
1999 Pontiac Grand Am
Shop millions of cars from over 21000 dealers and find the perfect car.
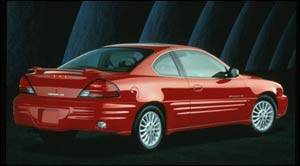
Pontiac grand am se 1999. See pricing for the Used 1999 Pontiac Grand Am SE Sedan 4D. It was based on the GM A platformProduction of the Grand Am was canceled in 1980 when it was replaced by the Pontiac 6000The Grand Am was reintroduced in 1985 when it replaced the Pontiac Phoenix. Free shipping on many items.
Details about USED 1999 Pontiac Grand Am SE Speedometer ClusterDriver s Quality Be the first to write a review. Learn more about the 1999 Pontiac Grand Am. Easy to use parts catalog.
RockAuto ships auto parts and body parts from over 300 manufacturers to customers doors worldwide all at warehouse prices. Designed with state-of-the-art CAD CAM cutting technology used for precision patterns to ensure a perfect fit and the finest quality this Brushed Suede cover is a. Dash Designs Sedona Suede Dash Cover.
Autotrader has 6 Used Pontiac Grand Am cars for sale including a 1999 Pontiac Grand Am GT Coupe a 1999 Pontiac Grand Am GT Sedan and a 1999 Pontiac Grand Am SE Coupe. Previously2003 Pontiac Grand Am SE1 34L V6 with. Pontiac Grand Am 1999 Brushed Suede Dash Cover by Dash Designs.
Shop millions of cars from over 21000 dealers and find the perfect car. Right when we got the car it had a radiator problem It coast 1200 to. 1999 Pontiac Grand Am SE SE1.
Find your perfect car with Edmunds expert reviews car comparisons and pricing tools. Get KBB Fair Purchase Price MSRP and dealer invoice price for the 1999 Pontiac Grand Am SE Sedan 4D. 6 Cyl 34 L.
Nissan of Las Cruces has a wide selection of exceptional used vehicles to choose from including this 1999 Pontiac Grand Am. 5 I have a white for door GT. 1999 Pontiac Grand Am SE Review.
From 1973 to 1975 and again from 1978 to 1980. 158404 miles Body Type. 1999 Pontiac Grand Am 2994.
Black housing clear lens. USED 1999 Pontiac Grand Am SE Speedometer ClusterDriver s Quality Item Information. Get 1999 Pontiac Grand Am values consumer reviews safety ratings and find cars for sale near you.
View all 37 consumer vehicle reviews for the Used 1999 Pontiac Grand Am SE 4dr Sedan on Edmunds or submit your own review of the 1999 Grand Am. 2005 Pontiac Bonneville SLE 38L with. By Pontiac kid 2001 from Isabel KS.
1st owner purchased on 073098 and owned in PA until 010403 2nd owner purchased on 010403 and owned in NC until 071516 3rd owner purchased on 071516 and owned in NC until 012621. Let us sing in praise of a thing well done the 1999 Pontiac Grand Am SE2 an affordable well-styled exceptionally well-built family sedan that ranks as one of the best overall. Used 1999 Pontiac Grand Am SE with FWD Fog Lights Alloy Wheels 15 Inch Wheels Sport Seats and Cloth Seats.
Trans-go Shift Kit Updated Trans mount. Pontiac Grand Am 1999 Black Halo Projector Headlights with Parking LEDs by Spyder 1 Pair. Aftermarket Twin Post Mirrors semi-aftermarket chrome rim swap blacked-out chrome window trim rear disc brake swap red painted calipers GT muffler and pipes 35 and 20 tinted windows Stock air intake 30th Anniversary Leather Seat swap.
Save money on one of 34 used 1999 Pontiac Grand Ams near you. The Pontiac Grand Am is a mid-size car and later a compact car that was produced by PontiacThe Grand Am had two separate three-year runs in the 1970s. 1999 Pontiac Grand Am SE1 SE1 4dr Sedan.
HB4 9006 low beam included H1 high beam included. View local inventory and get a.
2003 Hyundai Tiburon - Road Test Specs. 2003 Hyundai Tiburon Hyundai Tiburon 2003 Base Specs Trims Colors Change Trim.
 Road Test 2003 Hyundai Tiburon Gt V6
GT V6 2dr Coupe 18599.

2003 hyundai tiburon gt horsepower. 2003 Hyundai Tiburon GT V6 Road Test Specs. Use our free online car valuation tool to find out exactly how much your car is worth today. All new for 2003 the Hyundai Tiburon features sleek styling quality components and an affordable price tag.
Additionally find 2003 Hyundai Tiburon warranty and reliability information such as limits on bumper-to-bumper coverage and major components. Compare prices of all Hyundai Tiburons sold on CarsGuide over the last 6 months. Read reviews browse our car inventory.
TURNING CIRCLE 358 ft. 170 hp 6000 rpm. HORSEPOWER 170 hp 6000 rpm.
Find the engine specs MPG transmission wheels weight performance and more for the 2003 Hyundai Tiburon Coupe 2D GT. The latest pricing and specifications for the 2003 Hyundai Tiburon V6. The basic idea of performance parts is to optimize your Hyundai Tiburons chassis and engine to operate at its fullest potential.
I thought it would be a boring slow uneconomical 2 door but it isnt until you live with it do you understand. Detailed features and specs for the Used 2003 Hyundai Tiburon including fuel economy transmission warranty engine type cylinders drivetrain and more. Research 2003 Hyundai Tiburon Coupe 2D GT prices used values Tiburon Coupe 2D GT pricing specs and more.
CARiD offers an entire line of high-quality 2003 Hyundai Tiburon performance parts that can upgrade your car to deliver the power handling and braking you want. Showing the 2003 Hyundai Tiburon Base 2dr Coupe. Its available with a five-speed manual or four-speed automatic transmission.
Under the hood the Tiburon comes equipped with engines ranging from a 134 horsepower 20-liter inline 4-cylinder to a 170 horsepower 27-liter V6 with your choice of manual or automatic transmission depending on the model. See 2003 Hyundai Tiburon Coupe 2D GT new car specs and performance at the official site of NADA Guides the recognized authority on vehicle values since 1933. Tiburon 15999 is powered by a 20-liter four-cylinder engine producing 134 horsepower.
It also powers. Based on thousands of real life sales we can give you the most accurate valuation of your vehicle. The Hyundai tiburon GTV6 is a car that I overlooked when I was still in Oregon.
The base engine is the previous Tiburons 20-liter DOHC inline four that makes 140 horsepower at 6000 rpm and 133 pound-feet of torque at 4800 rpm. 2003 Hyundai Tiburon Specs Safety The table below shows all 2003 Hyundai Tiburon specs by style including MPG fuel economy transmission details and interior and exterior dimensions. Find specifications for every 2003 Hyundai Tiburon.
Double overhead cam dohc Cylinders. There are just three option. 5892-8784 Current Listing.
Gas mileage engine performance warranty equipment and more. 2003 Hyundai Tiburon GT V6 Road Test. In regards to engine performance the parts you can get for your engine range from something basic like a cold air intake to a more complex system such as a turbo kit or super charger kit.
5 years ago 641 views. How To Remove Install Front Door Panel 1996-2000 Honda Civic.
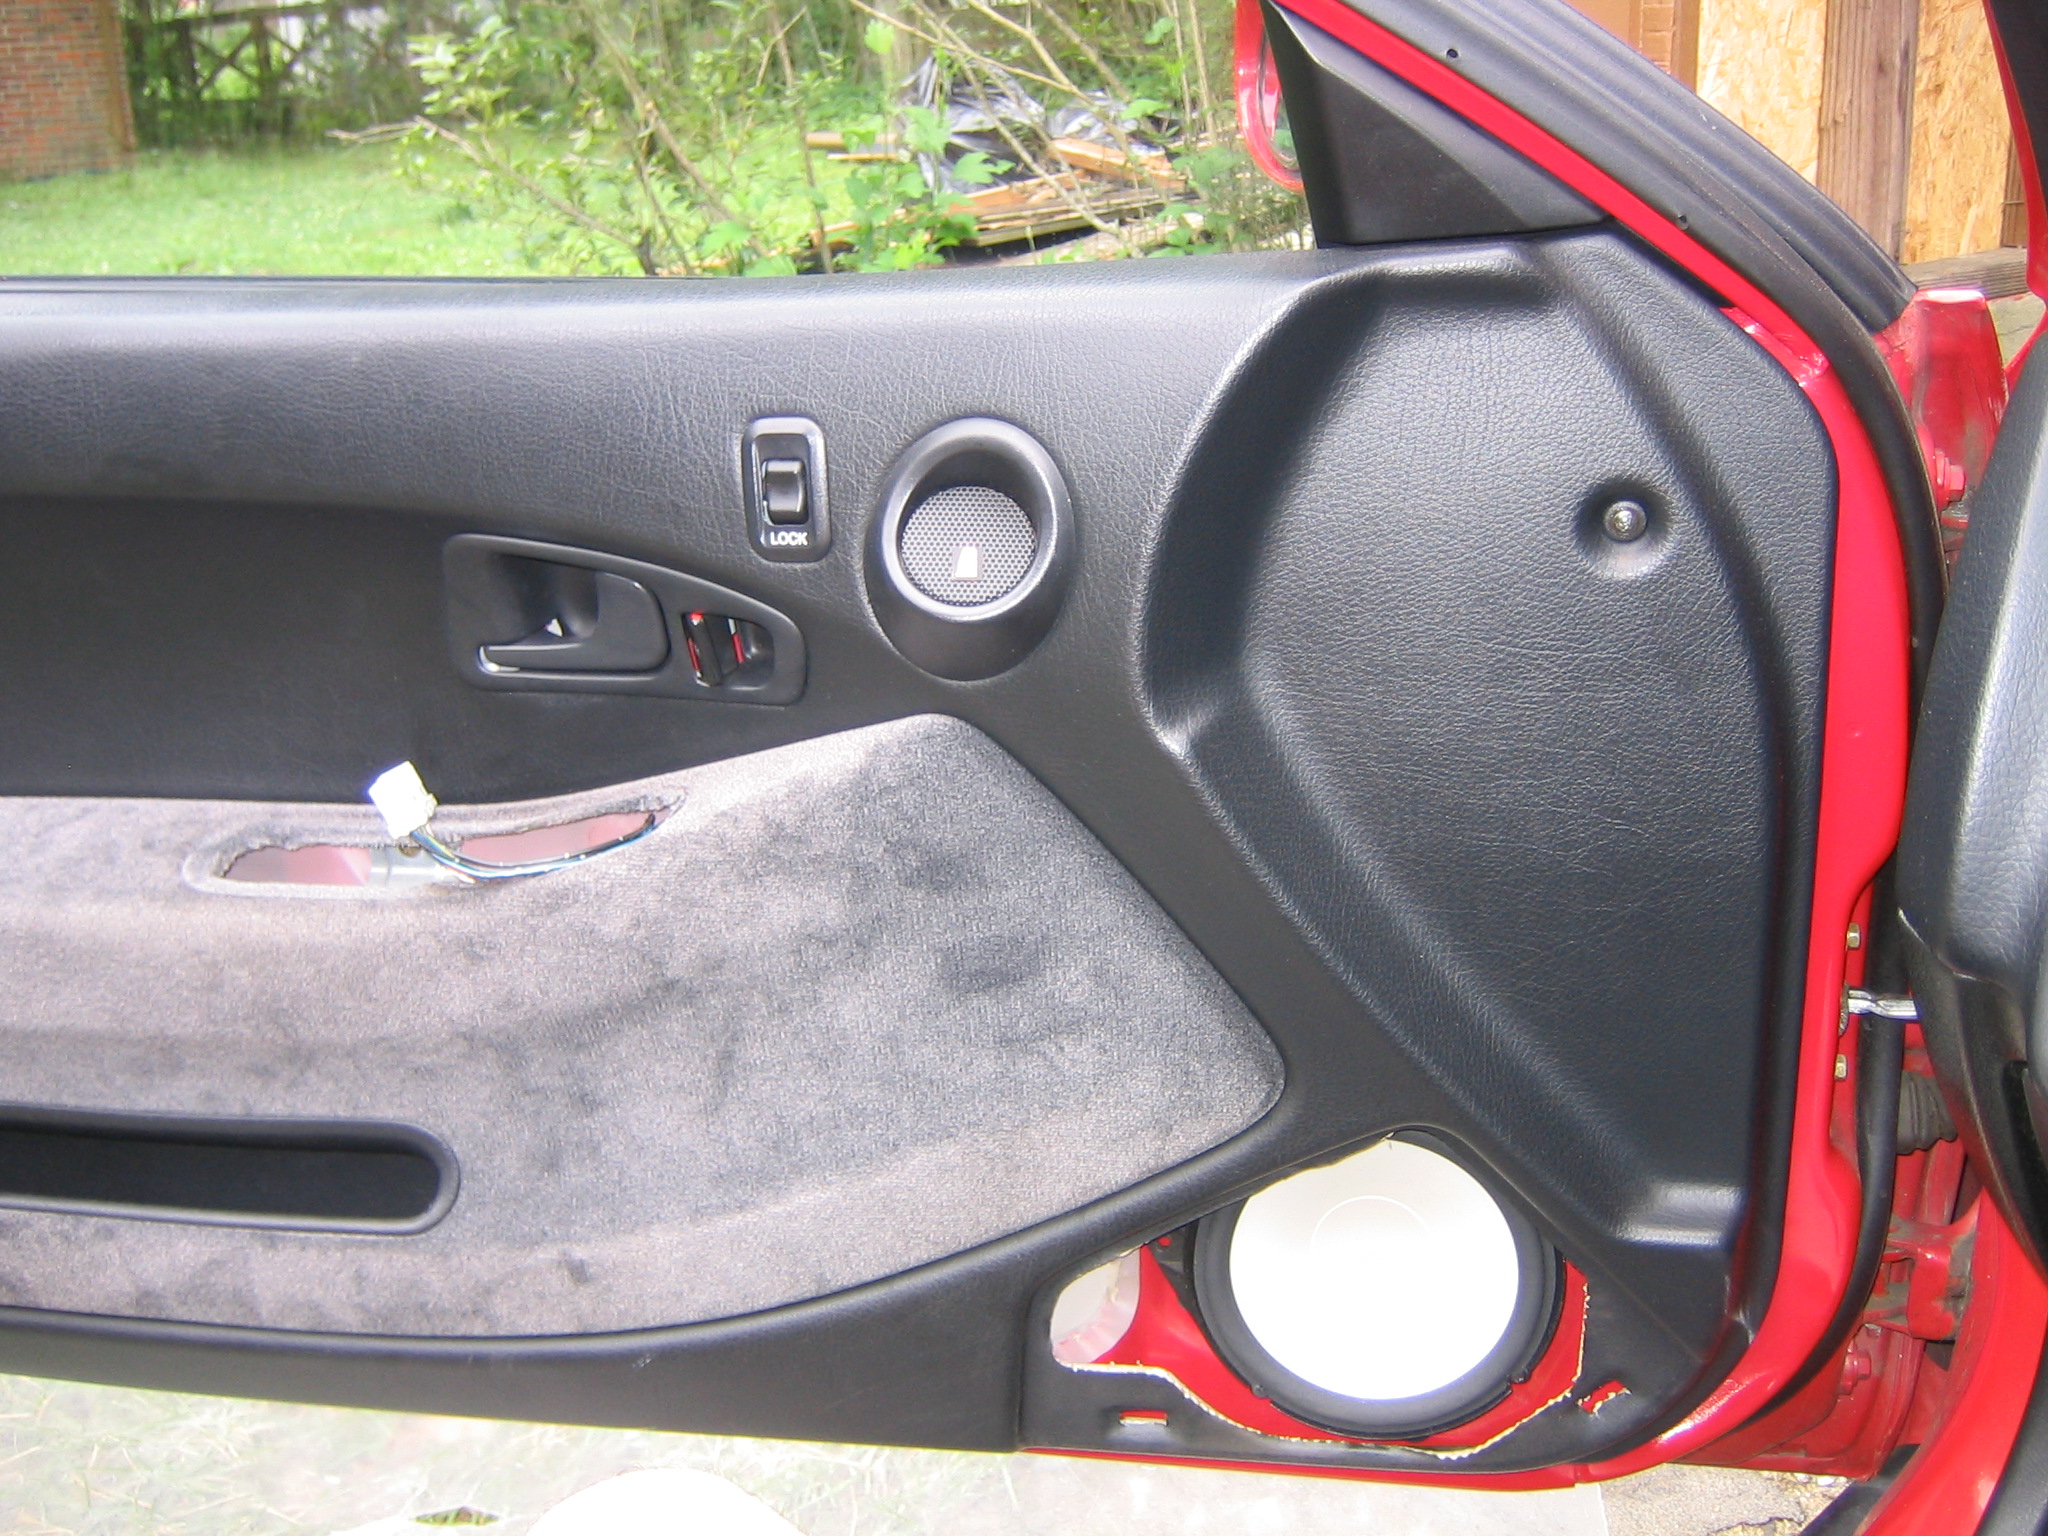
 How To Remove Door Panel Honda Civic 2006 2007 2008 2009 2010 2011 Youtube
Yeah the audio control has speaker level inputs so you just run off the rear speakers or in my case the subwoofer speaker line on my touring and it outputs line-level output to your amp RCA I got the Lc2i already and i see it has 2 channel.
Civic door panel removal. 8 8 product ratings - 1998 Honda Civic DX Coupe Door Panel Gray 1996-2000 Hatchback CX manual Window. Remove the interior door panel on a 1996 1997 1998 1999 or 2000 Civic. OEM 96-00 USDM Honda Civic EK sedan driver door master power window switch panel Fits.
1998 Honda Civic 5 out of 5 stars 1 1 product ratings - OEM 96-00 USDM Honda Civic EK sedan driver door master power window switch panel. The video is applicable to the 08 Honda Civic List of tools used. Keep your vehicle running longer and looking brand-new with factory-grade OEM Honda parts.
Step by step how to remove the front door panel on a 2006 2007 2008 2009 2010 2011 Honda Civic 4 doorPlastic Pry Tool ---- httpamznto2iwGPy5Clip Tool -. Diy door panel removal 97 civic ex remove a 2002 honda civic ex door panel 96 civic door panel removal from rear door panel removal diy warning image how to change the interior door handle Uk 2003 Hatchback Driverside Door Panel Removal Honda Tech Forum Discussion92 95 Civic Door Panel Removal InstructionsHonda Civic Front Door Read More. Step by step how to remove a door panel from a 2012 - 2015 Honda Civic.
Door Interior Trim Panel Retainer 91562TBA003 by Honda OE. 1992-1996 Toyota Camry Front brakes remove and install. To show you how to install your door glass back into the window track.
Driver side door latch mechanism how to fix honda civic manual windows 99 civic drivers side window hard to how to fix a broken car window 2004 honda civic door panel removal How To Fix Honda Civic Manual Windows My Pro StreetHow To Fix Honda Civic Manual Windows My Pro StreetHow Can You Remove A Read More. This door panel was removed from 2009 Honda Civic. This includes removing the door speakers which are mounted directly to the door.
There are nine plastic clips like the grey one shown here that fasten the door panel to the metal door frame. I did this to fix a problem that causes a sticky residue to accumulate on the insi. So how you tapping it for signal.
In the video 1A Auto shows how to remove and reinstall the front door panel. This door panel was removed from 2009 Honda Civic. Removing the panels should take approximately 10 minutes per door.
How To Remove Install Front Door Panel 1996-2000 Honda Civic. How To Honda Civic door panel removal. These parts are made for your specific year make and model which means theres.
Lock actuator honda civic 92 95 honda civic door panel removal 2016 honda civic interior door side mirror on honda civic 2001 2005 civic door removal sedan rear deck Uk 2003 Hatchback Driverside Door Panel Removal Honda Tech Forum Discussion92 95 Civic Door Panel Removal InstructionsHonda Civic Front Door Panel Removal 027Door Panel Removal Mb3 Read More. They make a scary popping noise but pulling them hard will pop them out and release the door panel from the metal frame. If you ever want to work on the inside of the door you have to remove the panel.
The door panels on a Honda Civic help protect the internal components of the door from damage. This is a common problem with this year r.
There is no way in hell you are going to remove that chrome. DO NOT use a urethane or anything else use an epoxy.
 How To Paint Over Chrome Black Out Your Ride Youtube
How to Paint Over a Chrome Surface.
Painting over plastic chrome. Let the chrome parts soak overnight in either chemical and it will be dissolved away back to clean plastic. A pit in the chrome left alone will pop out in no time and ruin your paint. Wash the chrome piece with basic soap and water and dry it thoroughly.
Epoxy would be the perfect primer for that. You must get below any damaged spots. If using a brush or foam applicator brush paint on in light coats lengthwise up and down and keep an eye out for any.
Step 4 Apply a coat of colored paint to the sanded and prime chrome areas of your furniture. Then wipe down the chrome surface with wax and grease remover so its clean when you paint it. 1-16 of over 8000 results for plastic chrome paint Skip to main search results Eligible for Free Shipping.
A pit in the chrome left alone will pop out in no time and ruin your paint. Apply 5 to 6 coats if using a spray can. We sand the chrome down with 80 grit on a da.
2 Sand the entire piece with 220- to 320-grit paper and use 120- or even 60-grit for specific areas if you have deeper scars rust or pits. The paint wont stick very well to the chrome. To paint over a chrome surface start by sanding it so the paint is able to stick to it.
Sand the entire piece with 220- to 320-grit paper and use 120- or even 60-grit for specific areas if you have deeper scars rust or pits. Dual action sander. The best bet is to strip them in some bleach or amonia.
Step 9 If using a spray primer shake the container frequently spray from about a foot away and work in sweeping side-to-side. Krylon K01010A07 Premium Metallic Spray Paint Resembles Actual Plating Original Chrome 8 oz. How do you paint plastic chrome trim.
Paint a coat of primer with a paintbrush onto the sanded chrome areas. Most spray guns have a nozzle of 14mm to 2mm spray cans are about 04mm so spray cans apply a lot less paint on the job Wait 10 minutes between coats. Apply three or four coats of clear to the dried paint on the part.
Spray four thin coats of paint on top of the primer and allow each to dry. If you are not careful it is also easy for the base coat to show through. Most new cars come with a heap of chrome parts like grill mirror covers ectThe basic process is to sand prime an.
44 out of 5 stars 2545. You may even need to use a grinder if the 60-grit paper will not get you below the damage. All customers get FREE Shipping on orders over 25 shipped by Amazon.
FREE Shipping on orders over 25 shipped by Amazon. Free Shipping by Amazon. Place masking tape and paper around the trim pieces to keep paint overspray from getting on the surrounding surface of.
Apply 3 to 4 coats of your colour if using a spray gun. Let the coat of primer dry for at least 24 hours before adding your first coat of colored paint. Before you apply any paint add 2 coats of two-part epoxy primer allowing the primer to dry after each coat.
I own a shop and this is what we do with really good luck. Let em dry for a bit and paint them we havent had any problems with paint peeling. I would do just as you thought sand it with 400 prime it and paint it.
You can do this at home in your garage or at work in your shop which is one advantage. Here is the big difference be sure to EPOXY prime it. 1-16 of over 4000 results for chrome paint for plastic Skip to main search results Eligible for Free Shipping.
Allow the primer to dry between each coat. 1 Wash the chrome piece with basic soap and water and dry thoroughly. Wash them off with some soap and water and you are good to go for painting.
In this video I paint all my chrome bits. A cheap option is to use chrome spray paint. More Buying Choices 739 6 used new offers Ultimate Mirror Chrome Aerosol.
Then i put a few coats of some selfetching primer in there. Spray primer on the part using three thin coats. Spray three to four thin coats of paint on the trim pieces.
A disadvantage of using chrome paint for plastic is that it appears more like silver spray paint than a true chrome finish. Sand the plastic trim pieces using 400-grit sandpaper. You must get below any damaged spots.
Amazons Choice for plastic chrome paint. Pretty easy way to remove chrome from plastic on Hot Wheels Models etc.
Your tread wears down as you drive so checking it. A rib refers to the raised portion of tread that spans the.
 Check Tire Tread Depth With The Penny Test Mega Dealer News
If you always see the top of Lincolns head your treads are shallow and worn.
Penny test on tires. If part of Lincolns head is always. Grab a clean penny to perform the test on your tires. Use the penny test to see if your tires are worn down and need to be replaced.
Tires become unsafe and n. One easy way is the penny test. If Lincolns head is completely visible the tread is worn out and your tires should be replaced.
Simply insert a penny into your tires tread groove with Lincolns head upside down and facing you. If this is the case your tires need to be replaced. It will tell you if the tread is too low and needs to be replaced.
If you can see all of Lincolns head your tread depth is less than 232 inch and its time to replace your tires. Fortunately 216s of an inch is the exact distance on a quarter from the top of Washingtons head to the edge of the quarter. Coins can be substituted as a tire tread depth gauge to measure the critical final few 32nds of an inch of remaining tread depth.
If you see that the depth is 432 inches it may be a good idea to start tire shopping and not wait until it worsens. When to Replace Your Tires. Do the penny test every month to make sure your tires are safe.
Penny Test for Tire Tread Wear Measurement Insert a penny into your tires tread groove with Lincolns head upside down and facing you. How to Tell if You Need New Tires. The penny test is a simple exercise that you can perform on your own tires.
You take the coin stick it into your tires tread head-first and if you can see the top of the presidents head then you need new tires. In other words your penny should be going into the tread headfirst. If Lincolns head is buried your tires still have more than 232 of tread.
Heres how it works. Place a penny into several tread grooves across the tire. You should replace your tire once its tread is worn down to around 232 of an inch.
If you can see all of the head your tire tread depth is less than 232 inch and its time to replace your tires. Take a penny and place it upside down into several tread grooves on a tire. Performing the Test 1.
The penny test for tires and the quarter test for tires both work the same way. Repeat the penny test in several grooves of your tires. Place a penny between the tread ribs on your tire.
If you can see the top of Abes head your tread is shallow. Take a penny and place it between the tire tread blocks with Lincolns head upside down and facing you. The penny test is an easy and accurate way to measure tire tread depth.
Place the penny into your tires tread depth with ol Honest Abe facing toward you. If it does your tread is still above. Turn the penny so that Lincolns head points down into the tread.
So your best bet is to use a quarter to measure tread depth. The Penny Test Place your penny into a tread groove upside down. Oddly enough pennies make the perfect measuring tool.
Insert a penny between your tires tread blocks with Lincolns head upside down towards the tire. Some sources state that the penny test may not be an accurate method of testing out the depth of a tire tread. After taking the penny test a tires tread can be visually inspected to spot other issues.
Quarter Test for Tire Tread Wear Measurement. With this easy test a penny can buy you peace of mind when it comes to your tires and safety. A penny is obviously smaller than a quarter though and so is the distance from the edge of the coin to the top of the head.
Examine the part of the penny thats showing. Dig around in your wallet purse or coin jar for a clean. Okay thats not entirely truebut for ages the penny test has been a go-to measurement for determining if rubber tires have worn down too far.
Rotate the penny so Abes head is. Simply hold a penny upside down making sure Abraham Lincolns head is facing the ground. Except the penny test isnt as accurate as it once.
There are several popular ways to check your tire tread depth. The penny test tread depth check doesnt hold water. They suggest using a quarter instead.
The Penny Test Checking tire tread with a penny is one of the oldest and most reliable techniques for measuring tread depth. Barring any irregular or unsafe wear patterns the usual life of a tire is most often determined by the amount of tread left on it. Keep reading to find out what we mean by the penny test and how simple it is for you to measure your own existing tire tread levels.
Place a penny head first into several tread grooves across the tire. See if the top of his head disappears between the ribs. The penny test is a little outdated and to be safe you really should replace your tires when your tread depth gets below 216s of an inch.
Your tires need to be replaced if the head is visible.
Fuel Pump Reviews - 2000 Honda Accord Replacement 906-501 The black rubber piece that goes on the bottom of the fuel pump was too thick so the white plastic pump bracket wouldnt latcso i used original rubber pieceThe shipping and the fuel pump is awesome turned the key over three times and the car fired right upParts geek is awesome. No parts for vehicles in selected markets.
 Honda Civic Questions I Smell Gas Fumes And Am Loosing Gas But No Apparent Leaks What Could Cargurus
Fuel pump and parts.
2000 honda accord fuel pump. No problems as of yet. A damaged pump lacks the power to push gas from the fuel tank to the engine. 2000 Honda Accord fuel system problems with 38 complaints from Accord owners.
2000 - 2002 Honda Accord SE 4 Cyl 23L. Fuel pump strainers are made of durable materials designed to OEM specification for direct replacement and provide lasting protection against premature pump failure. 1-4 of 4 Results.
Airtex Electric Fuel Pump Without Fuel Sending Unit. Purchased on Apr 30 2020. Shop Honda Accord Fuel Pump.
Contains Filter Electric Or Mechanical. If your car starts sputtering or bucking this is a sign of a possible problem with your Honda Accord fuel pump. Your order may be eligible for Ship to Home and shipping is free on all online orders of 3500.
Hi Guys and welcome to another episodeif you have any questions please let as knowThanks for watching and dont forget to SubscribeGratitude httpswwwpa. 2001 - 2002 Honda Accord Value Package 4 Cyl 23L. Free shipping for many items.
Autobest fuel pumps are tested at many points during manufacturing to ensure superior quality and durability and optimal fuel pressure and volume. Shop AutoZone for 2000 Honda Accord Fuel Pump. When it comes to your Honda Accord you want parts and products from only trusted brands.
Showing 1-15 of 52 results. If your vehicles fuel. Multi-Point Fuel Injection Ignition System.
2000 Honda Accord Fuel Pump Customer Reviews. The fuel pump is an essential component for any car motorcycle or anything with an internal combustion engine as it allows sends fuel from the fuel tank to the engine. We currently carry 6 Fuel Pump products to choose from for your 2000 Honda Accord and our inventory prices range from as little as 4599 up to 23899.
Fuel Pump Gasket Seal. An improperly or non-functioning Honda fuel pump is usually the cause of problems like engine stalling start-up failure or sluggish acceleration. The best part is our Honda Accord Fuel Pump products start from as little as 2999.
DriveMotive Electric Fuel Pump Without Fuel Sending Unit. Get the job done with the right Genuine OEM Fuel Pumps for Honda Accord at the lowest prices. Honda Accord 23L 30L 2000 In-Tank Fuel Pump by Autobest.
Electric Your Honda Accords fuel pump removes gas from the tank and pressurizes it for use by the engine. Free shipping on many items Browse your favorite brands affordable prices. Fuel Pump Circuit Opening Relay.
The average price of a 2000 Honda Accord fuel pump replacement can vary depending on location. The worst complaints are pressure regulator and pcm computer wont start and clogged intake valve. Honda Accord 23L 30L 2000 Fuel Pump Strainer by Agility.
Honda Accord Fuel Pump Removal Sending Unit TestingDisclaimerThis video is not meant to be a definitive how toAlways consult a professional repair manual b. Find a high-quality fuel pump replacement for Honda Accord at your local AutoZone and restore your daily drivers performance. 4900 ULEV-rated engine available in California and parts of the Northeast.
Shop by warranty for Lifetime No Warranty 6 Month more to find exactly what you need. Electronic wImmobilizer 148-hp 5700148 lb-ft. Here at Advance Auto Parts we work with only top reliable Fuel Pump product and part brands so you can shop with complete confidence.
2000 Honda Accord Fuel Pump. Order Fuel PumpStrainer for your 2000 Honda Accord and pick it up in storemake your purchase find a store near you and get directions. Check here for special coupons and promotions.
1-4 of 4 Results. HONDA 2000 ACCORD 30L V6 Fuel Air Fuel Pump. Fuel System Repair Manual.
Electric Fuel Pump OE Type. Bosch 1 PFS 1 Spectra Premium 1 US 1 This is a test. Older models may use a mechanical fuel pump that is driven by the camshaft but newer models use an electric pump that is located in the fuel tank.
Buy online and pick up in store or get fast free delivery on qualified orders. On top of low prices Advance Auto Parts offers 5 different trusted brands of Fuel Pump products for the 2000 Honda Accord.
1998 Dodge Dakota Overdrive Switch Wiring Along with 2001 Dodge Ram. Switched 12V RedWhite.
 Durango Ignition Wiring Diagram Wiring Diagrams Database Variation Delivery Variation Delivery Pisolagomme It
1998 Dodge Neon Radio Wiring 2004 Ram 1500 Harness Rcba Cable Losdol2 Jeanjaures37 Fr.

1998 dodge durango wiring diagram. A wiring diagram is a streamlined conventional photographic depiction of an electric circuit. 1999 dodge durango radio wiring diagram 2004 stereo harness 1998 dakota up for 2000 car audio schematic full magnum ram bmw 9f5694 2006 trailer engine neon a fuse box 2002 98 stratus 96 intrepid diagrams d0853 ford f 150 color 2008 3 way switch 2018 bypass infinity amp pcm. It shows the components of the circuit as streamlined shapes and the power and also signal connections between the tools.
2000 DODGE NEON 4DR SEDAN wiring information. If you run into an electrical problem with your Dodge you may want to take a moment and check a few things out for yourself. It shows the components of the circuit as simplified shapes and the power and also signal links in between the tools.
1998 dodge durango wiring diagram. Whether youre a novice Dodge Durango enthusiast an expert Dodge Durango mobile electronics installer or a Dodge Durango fan with a 1998 Dodge Durango a remote start wiring diagram can save yourself a lot of time. Also review the notes section in the compatibility chart for additional.
BlackYellowCar Stereo Dimmer Wire. Lowest price guarantee on accessories for your Dodge Durango and the fastest shipping available. Car Radio Battery Constant 12v Wire.
1998 Dodge Durango Engine Diagram. 1998 dodge durango wiring diagram Dodge Durango Wiring Diagram Posted by blogger at 232 AM 2000 dodge durango wiring diagram wiring diagram is a simplified welcome pictorial representation of an electrical circuitit shows the components of the circuit as simplified shapes and the facility. FULLSIZE DODGE VAN 1998 VAN wiring information.
A wiring diagram is a simplified traditional pictorial representation of an electrical circuit. 1998 dodge grand caravan fuse box diagram. Dodge Durango Wiring Diagram 2004-2009 Download Download Now Dodge Durango 2000 Service Factory Workshop Manual Download Download Now DODGE DURANGO 1998-2003 SERVICE REPAIR MANUAL Download Now.
RedWhiteCar Radio Ground Wire. 1998 DODGE DAKOTA 2DR PICKUP wiring information. DODGE RAM 1998 2DR PICKUP wiring information.
Dodge Durango Fuse Box Diagram as Well 2002 Dodge Durango Ac Lines. Best Dodge Durango Wiring Diagram Ideas Everything You Need to. 1998 dodge neon engine diagram.
1998 Dodge Durango Stereo Wiring. 1998 dodge ram 1500 fuel filter location. NACar Stereo Amp Trigger Wire.
Listed below is the vehicle specific wiring diagram for your car alarm remote starter or keyless entry installation into your 1998-1999 Dodge DurangoThis information outlines the wires location color and polarity to help you identify the proper connection spots in the vehicle. Diagram Stereo Wiring 99 Dodge Durango Full Version Hd Quality Uxdiagram Neoplasiematologiche It. 1998 dodge ram 1500 fuel pump wiring diagram.
Variety of 1998 dodge dakota headlight switch wiring diagram. Before you dive in with a multi-meter you will want to obtain a free wiring diagram for your specific modelYou may need to locate a specific color wire and its exact location. OrangeCar Stereo Antenna Trigger Wire.
1998 dodge ram. 1998 dodge durango wiring diagram car radio stereo audio 2001 infinity 1996 dakota forum 99 ram 2005 neon 2004 replacement 487 mercury tracer 1999 schematics 2002 2000 layout 02 blog 2018 avenger full system 2008 slt chrysler engine 98 1500 speaker abs module harness 1990 van 94097f 2007 fuse box. 1998 DODGE NEON 2DR SEDAN wiring information.
Complete installation instructions and lifetime technical support on all Trailer Wiring purchases. Hi thereCheck this on 1998 Dodge Durango Car Audio Wiring Diagram. 1998 dodge ram 1500 alternator wiring diagram.
Automotive wiring in a 1998 Dodge Durango vehicles are becoming increasing more difficult to identify due to the installation of 1998 Dodge Durango Car Audio Wiring Diagram Read. NACar Radio Illumination Wire. Constant 12V RedBlue.
05092018 05092018 6 Comments on 1998 52 Dodge Spark Plug Wiring Diagram Results 1 - 48 of Ignition Coil for Chrysler Dodge Jeep Plymouth L L L UF97. Whether your an expert Dodge Durango mobile electronics installer Dodge Durango fanatic or a novice Dodge Durango enthusiast with a 1998 Dodge Durango a car stereo wiring diagram can save yourself a lot of time. RedBlueCar Radio Accessory Switched 12v Wire.
Assortment of 1999 dodge durango wiring diagram. Dodge Durango Radio Wiring Diagram wiring diagram is a simplified all right pictorial representation of an electrical circuitIt shows the components of the circuit as simplified shapes and the capacity and signal connections amongst the devices. 1998 DODGE INTREPID 4DR SEDAN wiring information.
NACar Audio Front Speakers Size. GreenCar Stereo Amplifier Location. Call 800-298-8924 to get Expert Service ordering a Trailer Wiring for your 1998 Dodge Durango.
1998 Dodge Durango Engine Diagram. Wiring Diagrams Dodge. 1998 dodge ram 1500 fuse box diagram.
1998 dodge ram 1500 interior fuse box diagram. 1998 DODGE STRATUS 4DR SEDAN wiring information. The automotive wiring harness in a 1998 Dodge Durango is becoming increasing more complicated and more difficult to identify 1998 Dodge Durango Remote Vehicle Starter Wiring.
This range does not include taxes and fees and does not factor in your unique location. What else should I check.
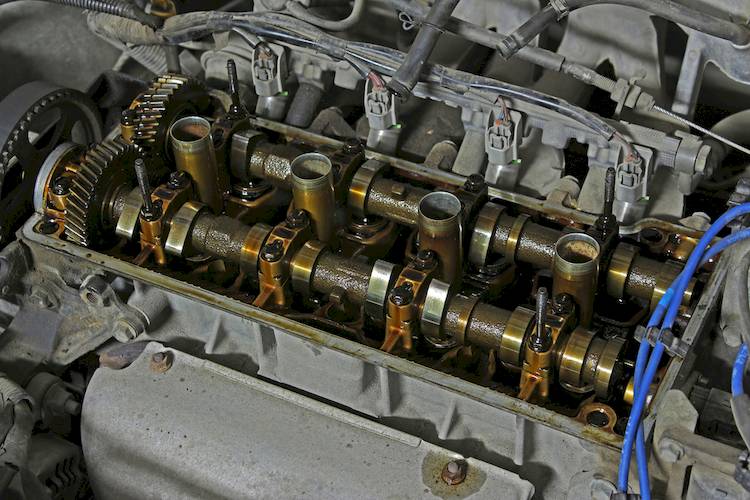
 Valve Cover Gasket Shot Bmw 3 Series And 4 Series Forum F30 F32 F30post
One of the BMW valve cover leak symptoms is low engine oil.
Bmw valve cover gasket leak. BMW cars notoriously leak oil from someplace or another but most typically the valve cover gasket. Burning oil smell from an oil leak. I ended up replacing the Valve Cover itself it had a small crack that I later realized so if you want to be safe replace The Valve Cover as wellI wi.
10 coupon applied at checkout Save 10 with coupon. The average cost for a BMW 328i valve cover gasket replacement is between 571 and 702. This can build up excessive heat inside the motor and cause serious engine damage.
Peel off the old gasket and clean the valve cover with brake cleaner and clean rags. Elring is good one. Leaks or seeps can occur even with a new valve cover but are more common on older cars.
FREE Shipping by Amazon. Pull the wiring connector loose from the Valvetronic motor on right side of valve cover. Get it as soon as Wed Jan 6.
Confirm It Right Now. Show example BMW X1 Valve cover gasket is leaking Inspection prices Valve cover gasket is leaking Inspection Service Typically made from rubber or cork a valve cover gasket helps seal the gap between the valve cover and the top of the engine. I replaced valve cover with new one.
Leaks from the valve cover gasket are common in many BMW engines. Regardless of model or year BMWs always seem to find a way to leak oil out of the motor and it isnt so uncommon that this may happen several different times for several different reasons over the life of the car. A low level of engine oil leads to a drop in its capacity to accurately oil the internal engine mechanism.
There could be oil falling onto the exhaust pipes or cylinder head causing the oil to burn excessively. According to RepairPal valve cover gasket leaks are common after 60000 miles. When this happens frequently it can cause the Engine Oil Light to appear on your dashboard.
Valve covers sit at the top of the engine to protect the valves and rocker arms. Tighting nuts more wont change anything. HttpsyoutubewIzK4grQZ8QMy BMW Fanatic Amazon Website.
If the engine oil is low it will reduce its ability to properly lubricate internal engine components. The gasket prevents motor oil from leaking out as it travels around the camshafts rockers and valves. A gasket leak will cause the oil to escape from the valve cover and leave the oil pan triggering the Engine oil light to become visible on the dashboard.
I put everything back right. In a worst-case scenario leaking oil from a damaged valve cover or valve cover gasket can lead to engine failure or even a fire under the hood so its important to bring your BMW to a certified BMW specialist if you experience any of the following signs and symptoms. My customer brought his car because he replaced left valve cover gasket and oil was leaking from valve cover.
Next clean the gasket mating surfaces on the engine. Dirty valve cover from leaking oil. As oil leaks from the valve cover gasket it leaves the oil pan.
BMW Valve Cover Gasket Leak. Some owners notice this problem only when starting the car. The covers are bolted to the engine and sealed by a cork or rubber gasket.
BMW X1 Valve cover gasket is leaking Inspection costs 85 on average. Labor costs are estimated between 495 and 625 while parts are priced between 76 and 77. If you replaced gasket AND all rubber grommets with new ones and applied tiny amount of silicon sealer on corners of VANOS then it shouldnt leak at all.
I checked spark all is good. A common cause of BMW oil leaks are the valve cover gaskets The oil pan gasket is also a likely cause of a BMW oil leak and will require removal of the front suspension in order to be replaced. Notice the oil on the end of coil number one in our BMW 530xithis is from a leaking valve cover gasket and is what was causing our misfire.
Related repairs may also be needed. When oil leaks it drips onto hot engine components to produce a noticeable burning odor. One little crack in the valve cover gasket will cause oil to leak through and fall onto other components of the engine.
If none of these are at fault the timing cover gasket or oil filter housing gasket may be the issue if a leak is coming from the left side of the engine. Catch the old RTV with a rag so it doesnt fall into the engine. Use the plastic putty knife never metal to remove any traces of old RTV from the timing belt cover-to-cylinder head.
If valve cover has failed you should seek out a replacement as soon as possibleECCPP have a large selection of valve covers for many makes and models and is affordable. Remove the electrical connection from the eccentric valve sensor mounted to the right side of the valve cover. 35 out of 5 stars 6.
Low Engine Oil When you have an oil leak in your valve cover gasket it means there will be less oil in your engine. Even low quality gasket if new will seal cover properly it jsut wont last. ECCPP Valve Cover with Valve Cover Gasket for 2007-2014 BMW 135i 335i 335is 335xi 535i 535i 740i 740iL X6 Z4 Compatible fit for Engine Valve Covers Kit.
Lower Engine Leaks Oil If you smell oil burning or see oil dripping under the car then theres a good chance your BMW has a valve cover gasket leak. This is especially common when the vehicle has more than 60000 miles. Cyl 5 6 and 7 has misfire.
My BMW N54 Valve Cover DIY.
Ford Grand Marquis TV Commercial Mexico 1998. We analyze millions of used cars daily.
 Used 1998 Mercury Grand Marquis For Sale Near Me Edmunds
Mercury models are now all based on Ford platforms.

1998 ford grand marquis. Come see this 1998 Mercury Grand Marquis GS. Learn more about the 1998 Mercury Grand Marquis. Shipped with USPS Priority Mail.
1998 Mercury Grand Marquis 45 out of 5 stars 2 2 product ratings - Mercury FORD OEM Grand Marquis REAR DOOR-Body Side Molding Right 5W3Z5425556BPTM. 8 Cyl 46 L. 1998-2011 Ford Crown Victoria Mercury Grand Marquis Dash Vent Passenger Side OEM.
The exterior trim was largely simplified deleting the chrome trim above the headlamps. While bearing a strong resemblance to the previous generation the 1998 Grand Marquis shared only the roof stamping and doors from its 1997 predecessor. Used 1998 Mercury Grand Marquis GS with RWD Tinted Windows Chrome Wheels 16 Inch Wheels Steel Wheels Independent Suspension and Compact Spare Tire.
Ford Grand Marquis 1998 Lower Power Steering Gear Pitman Shaft Seal Kit by Gates. The worst complaints are engine AC heater and cooling system problems. Designers revised the front and rear bumpers squaring off their design.
Want to get many years and miles of use from your 1998 Ford Grand Marquis. Search over 500 listings to find the best local deals. You can do it when you maintain and repair it with our replacement engine parts.
Check the GS 4dr Sedan price the LS 4dr Sedan price or any other 1998 Mercury Grand Marquis price with. Search from 10 Used Mercury Grand Marquis cars for sale including a 1998 Mercury Grand Marquis GS and a 1998 Mercury Grand Marquis LS. Every used car for sale comes with a free CARFAX Report.
Save 3340 on a 1998 Mercury Grand Marquis near you. The 1998 Mercury Grand Marquis has 181 problems defects reported by Grand Marquis owners. FORD is not the seller of the parts offered for sale on this website.
With this first-rate product from Gates youll get back the precise steering feel your vehicle had when it left the showroom. How much is a 1998 Mercury Grand Marquis. 139645 miles Body Type.
We analyze millions of used cars daily. Mercury FORD OEM Grand Marquis REAR DOOR-Body Side Molding Right 5W3Z5425556BPTM Fits. See good deals great deals and more on Used 1998 Mercury Grand Marquis.
Nuevo Grand Marquis 1998. Nuevo Grand Marquis 1998. Search over 600 listings to find the best local deals.
Definicion De Grandeza Ford Grand Marquis TV Commercial Mexico 1998. It is designed with. Save 4468 on a used Mercury Grand Marquis near you.
1998 Mercury Grand Marquis GS Prices Mercury is a division of Ford that was founded by Edsel Ford in 1939 as an entry-level luxury brand traditionally positioned and marketed between Ford and Lincoln. Get 1998 Mercury Grand Marquis values consumer reviews safety ratings and find cars for sale near you. It has an Automatic transmission and a Gas V8 46L281 engine.
Shop millions of cars from over 21000 dealers and find the perfect car. Edmunds provides free instant appraisal values. We have 5 1997 Mercury Grand Marquis vehicles for sale that are reported accident free 1 1-Owner cars and 9 personal use cars.
Find the best used 1997 Mercury Grand Marquis near you.
We present the most inventory selection of Ford Escort performance parts and accessories. From the Ford press release.
 The Ford Escort Zx2 Is A Great First Car For A Budding Gearhead
We have an excellent selection of Escort Zx2 custom parts like body kits carbon hoods custom seats and rims to name a few.

Ford escort zx2 performance. The Forgotten Ford Escort ZX2 SR Was a Parts-Bin Masterpiece Thanks to the Aftermarket Ford jumped on late-90s and early-00s tuner hype early with this plucky little coupe. Custom fabricated suspension components underdrive pulley systems and much more. FORD MUSTANG GT-COBRA-SHELBY-ECOBOOST-46L-50L-38 SUPER OBD2 PERFORMANCE CHIP Fits.
Shop Summit Racing now for performance parts suspension pieces wheels tires and moreeverything you need to help your Escort turn heads. A new Ford Escort Zx2 performance chip improves power torque and fuel economy by changing your timing fuel curves redline and even shift points where applicable. Sign up for our newsletter.
The small two-door coupe offered drivers interested in a small car a chance to own a sporty option to choose from. Sep 1 1999 Ford is taking the fun of its Escort ZX2 to a new level with the sporty limited-production ZX2 SR. The Escort later evolved into the ZX2 coupe which laid the groundwork for the popular Ford Focus model.
Search 11 listings to find the best deals. These improvements can net a substantial increase in performance with minimal effort as Ford Escort Zx2 performance chips are among the easiest modifications to install. 1998 Ford Escort ZX2 Tipico.
Ford ZX2 Parts And Accessories. The increased presence and success of tuner models from overseas in the late 90s caused Ford to create their own performance model the ZX2 SR. When you add a ZX2 performance chip in the mix you can make your compact even more of a pocket rocket.
For the growing compact performance market the ZX2 SR is the first collaboration. ENGINE ECM FITS 01-02 ESCORT 10113337 Fits. The quality is beyond no doubt.
Meant to compete with cheap factory performance compacts such as the Honda Civic Si or the Dodge Neon ACR Ford created the ZX2 SR to show that they had plenty to bring to the table. We have everything from affordable Escort Zx2 aftermarket parts to high-end Ford Escort Zx2 performance parts. Your car will be able to accelerate faster and generate a lot more horsepower and torque than before with each tip.
The 1998 Escort ZX2 replaced the Ford Probe as Fords sport compact car. The ZX2 was a much lower-slung and rakish car than both the Escort sedan and wagon aimed squarely at the youth market as a replacement for the Escort GT although lacking the its rear disc brake setup and was built exclusively at Fords Hermosillo Sonora Mexico. When the Ford ZX2 was introduced back in 2001 it had the potential to be a cool affordable four-cylinder performance coupe.
Make your engine come to life give it a new feel. 1998 Ford Escort Performance Parts Reviews. At Andys Auto Sport we carry a huge selection of Ford Escort Zx2 parts.
If you drive the Ford Escort make sure that you upgraded it completely. CARiD Facebook Array CARiD YouTube Channel CARiD Pinterest CARiD Instagram. Massive Speed System offers Hardcore Performance Parts for your Ford Mustang Focus Trucks.
Debuting a year after the current Escort sedan and wagon the ZX2 coupe fills the slot once occupied by the hatchback pushing the vehicle slightly upscale in prestige and styling to address. To stay up-to-date on our promotions discounts sales special offers and more. Unique ZX2 SR Exterior Badging.
1996-2004 FORD ESCORT ZX2 PERFORMANCE CHIP - ECU PROGRAMMER - P7 - PLUG N PLAY Fits. But by the early 2000s sporty coupes werent nearly as popular as. The Midwests best source for Hardcore performance parts.
They are designed with care and attention to details. The key feature of the car is a 4-cylinder 110-horsepower engine. The Ford ZX2 is a small car that was built by The Ford Motor Company between 1997 and 2003 as part of its Focus series.
You wouldnt want to miss this unbelievable deal. Showing the 2000 Ford Escort ZX2 2dr Coupe. 3495-3495 Current Listing Price.
This perfect car needs the best and our store can offer such solutions. Performance Struts and Springs. Save 247 on Used Ford Escort ZX2 for Sale.
SFX Performance has been supplying customers with quality performance parts wheels and accessories since 1997 and with over 20 years in the business and experienced techs and sales reps with years of automotive performance motor sports and racing experience our technical advisors can assist you with any. Find the engine specs MPG transmission wheels weight performance and more for the 2002 Ford Escort Coupe 2D ZX2. The durability is guaranteed.
BTU Calculator Heat Loss Calculations For Your Home. 1 BTU is the equivalent of 1055 joules or 293 watts.
 How To Calculate Your Heating Needs Blog Rointe Uk
Once youve inputted the height width length and other details about your room simply click calculate and youll have your required BTU measured at Delta-T 50C.
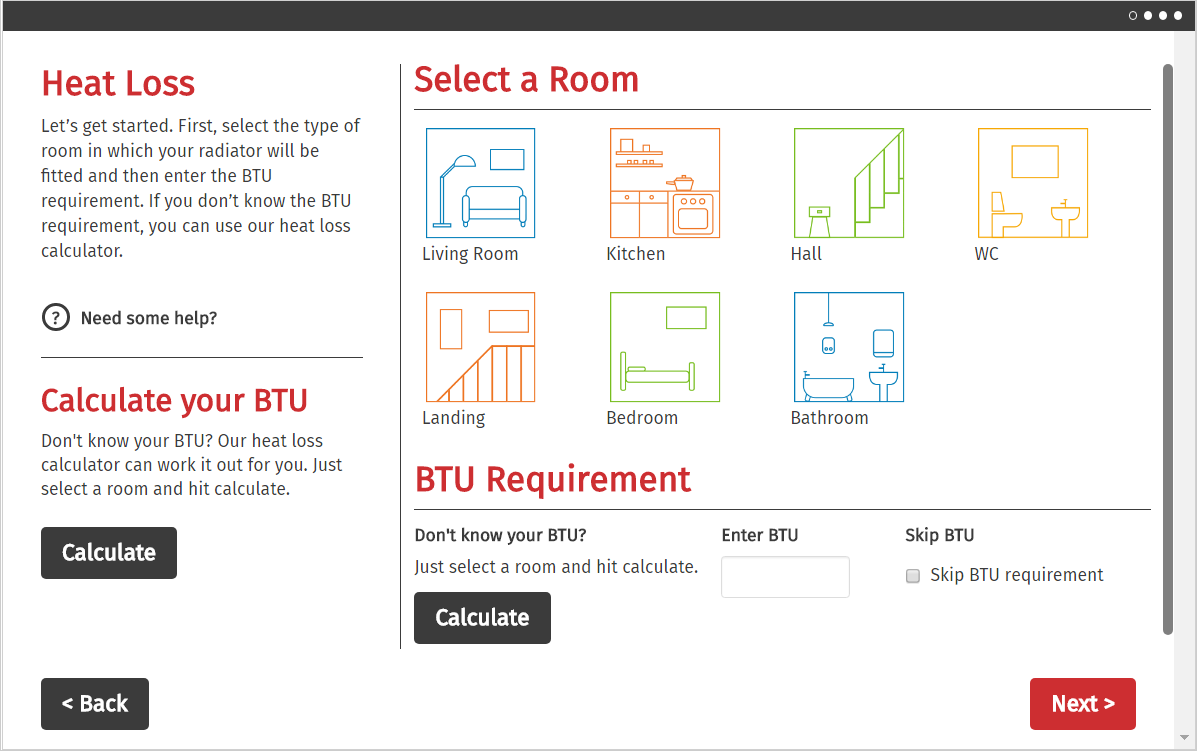
How to calculate btu of a radiator. Calculate the square footage of one section of the radiator. 48m L x 48m W x 24m H 553 x 135 allowance for double glazed windows 7465 BTU. The heat output or BTU British Thermal Unit calculator is a great way to work out how much radiator power you need.
A British Thermal Unit or BTU is a unit of measurement of energy. Window Area X² Calculate this by multiplying window height by window length. HOW TO CHOOSE THE RIGHT CAST IRON RADIATOR.
There are several factors which can affect this such as room dimensions heating levels and types of window which are all covered in our radiator BTU calculator. Divide the number of BTUs by 341. If you are looking for a vertical radiator divide the BTU per hour number by the height of the wall space.
Multiply the square feet of the one section by the number of sections. For example too large a radiator will increase bills unnecessarily and too small a radiator wont provide enough heat and will be constantly running at maximum. Please note this is a guide only.
The first step is you need to measure in metres or feet your room dimensions and write them down. Find your BTU per hour measurement from earlier. Step 3 Select the width you need.
How to Find How Many BTUs Your Furnace Should Be. How to Use Our BTU Heating Calculator. Alternatively if you have a BTU measurement and would like to find out the heat output of your radiator in Watts all you would need to do is divide the BTUs by 341.
For example if you divide 2898 BTUs by 341 the result is about 850 watts. BTUs are British Thermal Units the unit in which radiator efficiency is measured. The British Thermal Unit BTU is the amount of energy needed to heat a single pound of water by 1F.
Calculate your rooms BTU requirement. Calculate the heat output your radiator can provide. So thats the width of the room in metres or feet the height of the room walls in metres or feet and length of the room in metres feet.
Calculate the required BTU output of your room. You need an 850-watt radiator to produce the 2898 BTUs per hour needed by the. Equals the cast iron radiators total.
Step 2 Select the height of your new radiator. This will make sure you avoid over or under spending on radiators which are not suitable for the room you want to heat. A radiator with insufficient output may never raise the temperature to that required.
Factors such as room dimensions windows and wall type are used to calculate the required outputs of radiators in order to adequately heat a room. Enter your room details below along with a name and save it to your Wish List to keep it for easy reference. A specific radiators heat output is measured in BTUs to work out the amount of energy required to heat one pound of water by one degree Fahrenheit.
Put the higher the BTU output the hotter the radiator or heated towel rail is going to be. Divide it by the length of your wall space. Double bedroom with double glazed window.
Height m. To effectively calculate what the BTU output for any room is you have to start by getting a tape measure and measuring the height of the room the width of the room the length of the room and then finally the size of the window area thats the length by width of a window in m². We often refer to the British Thermal Unit as a BTU but the rating is actually the BTUs per hour or BTUh.
BTU otherwise known as the British Thermal Unit measures the appropriate amount of energy and therefore heat your radiators need in order to properly heat any room of your house. 1 BTU is the energy needed to heat 1 pound of water by 1 Fahrenheit. T Measure height of section t Measure width of section t Find square feet of section in Chart 1 for COLUMN or Chart 2 for TUBE type radiator Step 2.
The length tends be longer than the width. All that you need to remember is that 1 Watt of energy is equivalent to 341 BTUs. 1 BTU is equivalent to 1055 joules.
To calculate your BTU all you need is a tape measure or laser measurement tool. Choosing the right radiator can help reduce your energy bills. Length m.
Metric metres Imperial feet Width m. You will require 2 x radiators with a BTU output of at least 3733 BTU. Step 4 Calculate the required BTU Output.
Step 1 What type of boiler do you have. Heat Output Calculator What are BTUs. Something like the Salvador anthracite grey double horizontal radiator 600 x 1000 would be ideal.
Our BTU calculator can help you get the right heating products for the size of your room.
The digital books are most often used by dealership. 39L Magnum V6 MT.
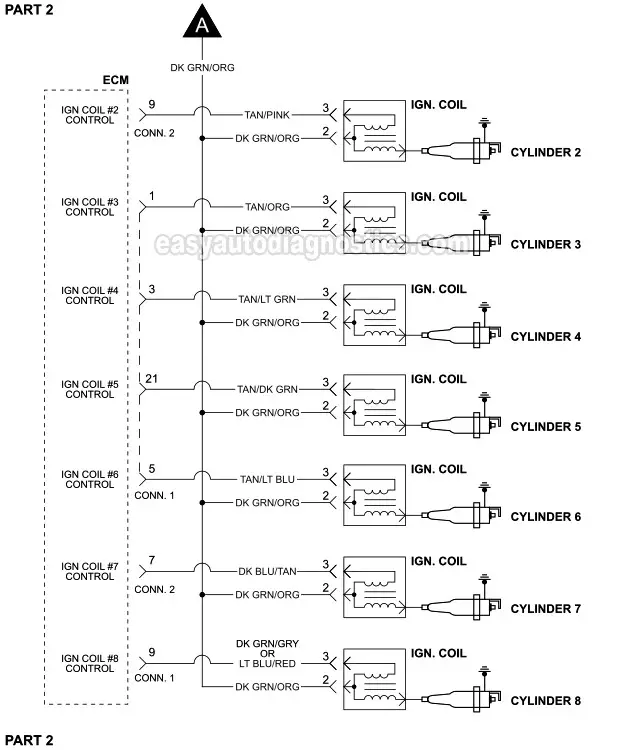 Ignition System Wiring Diagram 2000 2001 4 7l Dodge Dakota
We offer parts from 43 brands trusted to make quality Tools Fluids Garage products for your Dodge Dakota.

2000 dodge dakota engine diagram. To make sure your vehicle stays in top shape check its parts for wear and damage at regular intervals and replace them in time. When you are in need of a reliable replacement part for your 2000 Dodge Dakota to restore it to factory like performance turn to CARiDs vast selection of premium quality products that includes everything you may need for routine maintenance and major repairs. Genuine 2000 Dodge Dakota Parts from Factory Chrysler Parts in Bartow FL.
Live Chat or 1-888-511-3595. The first Dakota was introduced in late 1986 as a 1987 model. 1998 Dakota 59L Engine Schematic.
2000 dodge dakota wiring diagrams 2003 diagram light best ignition 2001 4x4 schematic truck durango trailer 2008 1988 transmission abs er motor system engine for neon ram 2500 speaker turn signal 30 radio starter fuse box 1994 01 tail replacement chrysler full size trucks 1997 97 part 1 1996 1999 2 5l pcm of a 3 9 v6 layout 4 7. Select a 2000 Dodge Dakota Driveline 25L Power Tech I4 MT. Our list of 15 known complaints reported by owners can help you fix your 2000 Dodge Dakota.
1961 dodge lancer wiring diagram 1961 dodge light duty pickup wiring diagram 1962 dodge 880 wiring diagram 1962 dodge v8 engine dart and polara 500 wiring diagram 1965 dodge coronet wiring diagram 1 1965 dodge coronet wiring diagram 2 1965 dodge polara 880 or monacco front side wiring diagram 1965. 2000 Durango Er Wiring Diagram Auto Power Series Plus Haus It. Dodge OEM 2000 Dakota Parts from Thunder CDJR.
Each part should be set and linked to other parts in particular manner. Download Dodge Dakota repair manuals also termed Dakota service manual or Dakota shop manual is an electronically transmitted instruction book that is transferred from one computer to another over the Internet. From its introduction through 2009 it was marketed under the Dodge brand.
Dodge Vehicles Diagrams Schematics and Service Manuals - download for free. Problem with your 2000 Dodge Dakota. 2000 Dodge Dakota Wiring Diagram 2000 dodge dakota dash wiring diagram 2000 dodge dakota headlight wiring diagram 2000 dodge dakota ignition wiring diagram Every electrical arrangement is made up of various distinct parts.
We use cookies to give you the best possible experience on our website. I have a 2002 dodge dakota its a sxt 39 6 cylinder. I need a engine diagram for a 2000 47L i need to know where cylinder 8 is located and a full diagram - Answered by a verified Dodge Mechanic.
The Dodge Dakota known as the Ram Dakota for the final two years of production is a mid-size pickup truck from Chryslers Ram formerly Dodge Truck division. Fuse box diagram fuse layout location and assignment of fuses and relays Dodge Dakota 1996 1997 1998 1999 2000. 1998 Ram 39L52L59L Except Heavy Duty Engine Schematic.
Access our Chrysler Full-Size Trucks 1997-2000 Wiring Diagrams Repair Guide by creating an account or signing into your AutoZone Rewards account. 59L Magnum V8 AT. As you may know people have look numerous times for their favorite novels like this dodge dakota engine diagram but end up in malicious downloads.
Before you buy take some time to read through customer reviews. Dodge Dakota engines 52 liter V8 318 In 1996 the 52-liter. Our inventory holds 277 aftermarket and OEM Tools Fluids Garage products for your Dodge Dakota ranging from 099 to 57499.
Dakota Sport 2000 Dodge Dakota 2006 2008. Fuse box diagram fuse layout location and assignment of fuses and relays Dodge Dakota 2000 2001 2002 2003 2004. The e-manual is a handbook with detailed information telling how to fix or mend the Dodge Dakota back to factory specifications.
39L Magnum V6 AT. Easy to use parts catalog. If not the arrangement wont work as it ought to be.
2000-2001 DODGE DAKOTA FACTORY SERVICE DIY REPAIR MANUAL Free Preview Complete FSM Contains Everything You Will Need To Repair Maintain Your Vehicle DODGE DAKOTA REPAIR MANUAL DOWNLOAD 2000 ONWARDS. The Dakota was sized above the compact Ford Ranger and Chevrolet S-10 but below the full-sized. RockAuto ships auto parts and body parts from over 300 manufacturers to customers doors worldwide all at warehouse prices.
1997-98 Dakota 25L39L52L Engine Schematic. Dodge Dakota 3 9 Engine Diagram you are welcome to our site this is images about dodge dakota 3 9 engine diagram posted by Ella Brouillard in Dodge category on Nov 22 You can also find other images like wiring diagram parts diagram replacement parts electrical diagram repair manuals engine diagram engine scheme wiring harness. Dodge Dakota Engine Diagram Thank you for reading dodge dakota engine diagram.
Fuse box diagrams location and assignment of electrical fuses and relays Dodge Dakota 1996 1997 1998 1999 2000. Rather than enjoying a good book with a cup of coffee in the afternoon instead they juggled with some harmful bugs.
Whether youre looking for a suspension performance boost or looking for OE-replacements for damaged or worn links Summit Racing carries thousands of sway bar end links from the industrys top suspension companies. Get it as soon as Fri Jan 29.
 How To Replace The Rear Sway Bar Links On A Volvo C30 S40 V50 C70 Youtube
Moog Sway Bar Link.
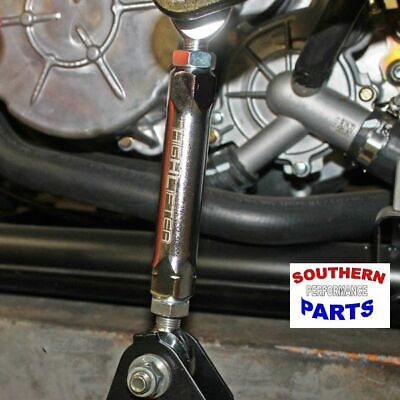
Rear sway bar links. Moog Set Of 2 Rear Sway Bar Links Pair for Bravada Envoy Trailblazer 02-05. A sway bar is connected via rubber bushings to the car body or frame in the middle. MOOG Problem Solver products incorporate proven design and engineering features to ensure like new steering ease of installation and longer life.
Compatibility list on eBay listing is not a complete list and it is a known issue that there are errors on it. Only 2 left in stock - order soon. In certain cars the rear end will also have stabilizer bar links.
Hotchkis 2285 Sport Sway Bar Set for Corvette C5. Rear Left Sway Bar Link For 2002-2006 GMC Envoy XL 2003 2004 2005 W912JC. The sway bar linkage usually consists of a straight rod with bushings around the sway bar and control arm or a Z-shaped bar with studs or bushings on both ends.
Get the job done with the right Rear Sway Bars for Hyundai Tucson at the lowest prices. 1 Year Warranty Please check above compatibility list to make sure it fits your vehicle. Pickup in Store not currently available.
Jeep tj sway bar disconnects jeep tj track bar jeep tj steering stabilizer jeep tj accessories. The stabilizer bar links attach to the lower control arm at the front end of most domestic and foreign cars and trucks sold in the United States. They keep it connected to your rides suspension so that the sway bar can provide the stability your vehicle needs to be operated safely.
FREE Shipping on orders over 25 shipped by Amazon. Get it as soon as Thu Jan 28. The sway bar aka the anti-roll bar is what prevents excessive body lean as inertia shifts your vehicles weight when you round a corner.
The sway bar linkage connects the sway bar to the control arm and helps keep a vehicle balanced and stable when it turns and corners. 47 out of 5 stars 5. 97-04 Corvette C5 Front or Rear Sway Bar End Link 26036823 Pair.
LSAILON 2pcs Rear Sway Bar End Links Rear Sway Bar End Links Kit Fit for 2007-2013 for Nissan Altima 2009-2014 for Nissan Maxima 2009-2014 for Nissan Murano. Sway bars are an important part of your suspensions performance and your sway bar end links are what connects your sway bar to the rest of your suspension system. Established in 1919 MOOG is a leading developer of steering and suspension parts for the automotive aftermarket.
Hellwig Sway Bars are an extremely effective handling upgrade you can make to your vehicle. Suspension Stabilizer Bar Bushing Kit Rear Moog K200768. 2018-2021 Polaris RZR RS1 Front and Rear Sway Bar Links Sky Blue by Race-Driven.
We apologize that this item is not available for pickup in store at this time. Zone Offroad J5200 Rear Sway Bar Links 2-3 Inch Lift Kit for Jeep Wrangler TJ. The sway bar links are the pieces located at the outer ends of the bar.
Get it as soon as Fri Feb 5. Shop by part type for Stabilizer Sway Bar Stabilizer Sway Bar Bushing Stabilizer Sway Bar Link more to find exactly what you need. MOOG OE REPLACEMENT SWAY BAR LINKS.
However this item may be purchased online to be shipped to home or may be purchased in person by visiting a NAPA store. Free shipping for many items. FREE Shipping by Amazon.
MOOG is the preferred steering and suspension parts brand of professional technicians and NASCAR Crew Chiefs. Only 2 left in stock - order soon. 48 out of 5 stars 6.
Please check actual stock part size before purchasing replacements. Hellwig sway bars offer quick bolt on installation that are engineered to perform. For your money the best aftermarket investment you can make.
Restore smooth easy handling to your ride with the secure fit and lasting sturdiness provided by MOOGs OE replacement sway bar links. However the ones that cause the most damage are in the front and located directly behind your left and right front tires. The part that connects the outer ends of the sway bar to the suspension component is called a sway bar link.
42 out of 5 stars 9. Qty 2 x Rear StabilizerSway Bar Link Kit. Rear Sway Bar Kit.
Arrives before Valentines Day. Rear Sway Bar GM 64-72 A-Body Factory Style Rear Sway Bar Part Number. Its also what prevents understeer front wheels going outside of your intended direction or oversteer rear wheels fishtailing as you round a corner.
Outer ends of the sway bar are connected to the parts of the vehicle suspension that holds the wheel struts or control arms. Scitoo 2pcs Suspension Kit 2 Front Sway Bar End Links Stabilizer Bar fit 1996-2002 Toyota 4Runner 2000-2002 Toyota Tundra 2005-2015 Toyota Tacoma 47 out of 5 stars 20 2488 24. Engineered to OE requirements for precise secure fit.
Going to hook it to the free lawnmower I recently got to make a 12v generator. Vehicles older than a 1960 model may require all of the connections of the alternator except ground to be connected to positive and negative terminals of.
 Alternator Connection How To Connect Plug And Output Wire Youtube
Most 1-wire alternators have a charging point set around 1200rpm or higher.
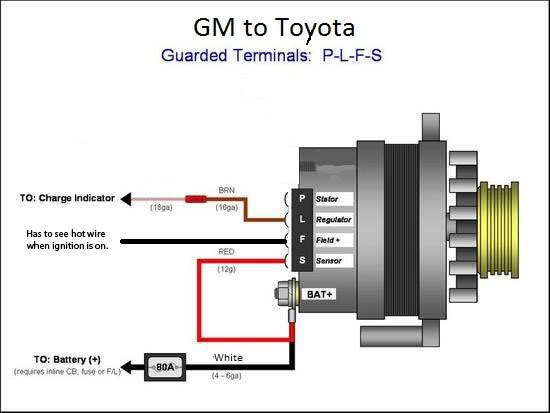
How to wire a alternator. The alternator has a rotor that spins when the engine cranks. One wire alternator wiring diagram You will need an extensive professional and easy to comprehend Wiring Diagram. Buy Here One Wire Alternator Wiring Diagram.
The AC Delco 3 wire alternator was used in most General Motors products and many types of heavy equipment for a long time which makes it readily available. If installing a 1-wire alternator see wiring instructions at upper right. If you are having trouble hooking the alternator up i just uploaded a video explaining how to do it sorry i got a little ahead of myself in this videoif car.
Alt Wire Diagram Alternator Wiring And Out The Dash Warning Light 12 Volt Alternator Wiring Diagram. These guidelines will likely be easy to grasp and apply. This alternator has the advantages of high output compact design and ease of use.
The first is the large lug that connects to the battery. Make sure the mounting holes and wire connectors are in the same place and that the two parts are the same size. Compare the new alternator to the old one.
As its name implies the 3-wire alternator has three electrical connections to it. 11 - Reconnect the ground cable start the engine and using a VOM meter verify that the. The resistor or directly to the key switch itself switched side.
If the you had an OE externally regulated alternator then use a conversion wiring harness part 150. This wiring configuration will excite the alternator to start charging when the engine is running at low RPMs. This video shows you how to wire a Single Wire Alternator on TractorsWe are showing this example on an MF 35 Deluxe Tractor but the same wiring will work on.
Its supposed to assist all the typical user in developing a suitable method. The headlights dashboard lights radio and interior lights all rely on the alternator to keep the battery charged and the car operating. ALL MY VIDEOS are in 1080p so check that outplease use this video as a guide on hooking up a 3 wire GM alternatoralternator is a 55 amp from a 79 monte c.
One-wire alternators are also used by people in the performance car field to help make the car lighter as there are fewer wires to add weight to the vehicle. The indicator light wire from the stock wiring harness has to be connected to this terminal of the one wire alternator. 9 - If installing an alternator with OEM wiring connections reconnect alternator wires and battery ground cable.
Today we focus on how to wire it up. This is the speed where the internal sensory circuit connects the battery voltage to the regulator thereby turning the alternator on. This rotor spins past wire coils causing a magnetic field.
Got a free 3 wire alternator. Always mark each wire that you remove from an old alternator if necessary to ensure you can easily replace the wires in the correct connectors when you install the replacement alternator. There are two smaller terminals usually spade.
Wiring Diagram arrives with several easy to stick to Wiring Diagram Directions. Charge wire connects from the alternator to the battery through the. This is the main current feed that charges the battery and powers the car when the engine is running.
An alternator works with the battery to supply electricity to components of a vehicle. Installing a one-wire GM alternator makes the process of adding an alternator to a vehicle originally equipped with a generator very simple. With the proper brackets this alternator can be adapted to any vehicle or.
Before installing the new alternator set it down on a table next to the old one you just removed. Most cars originally came with a 3-wire alternator. With this kind of an illustrative guidebook youll have the ability to troubleshoot stop and total your projects easily.
10 - Make sure battery is fully charged before starting engine.
The problem can limit engine power and let drivers shift out of park or start the engine without a foot on the brake pedal. Many older vehicles used single-reservoir master cylinders.
 What Problems Can Occur With A Power Brake Booster
Upgrading your classic to power brakes is smart--and safer.
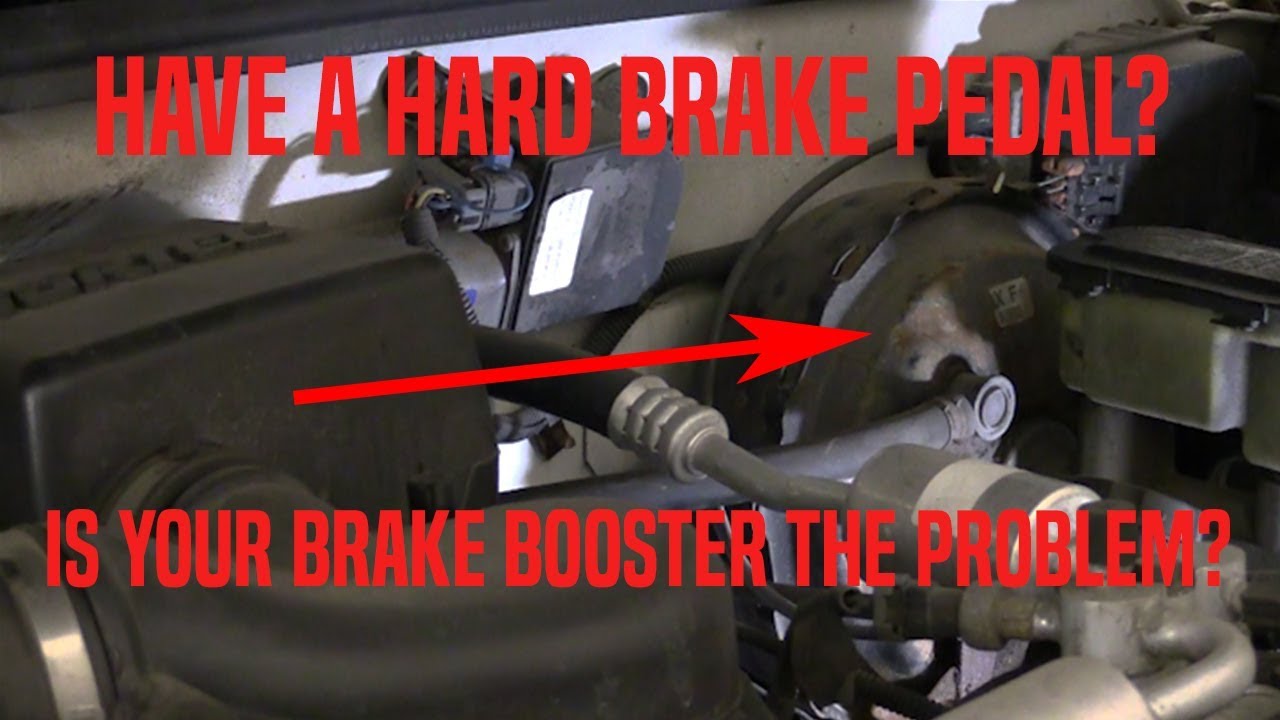
Brake power booster problem. A brake booster is designed to provide power-added assistance to help apply the brakes. Is your brake booster correct for weight of the vehicle. But my first guess would be a faulty power-brake booster.
Order Power Brake Booster for your vehicle and pick it up in storemake your purchase find a store near you and get directions. 2 2 product ratings - New Brake Master Cylinder Chevy Olds S10 Pickup Chevrolet GMC 18042802 18060793. The circuit is controlled by the PCM to adapt various braking situations and adjust the pressure to assist brake pedal operation.
Technician A says the cause could be a leaking power brake booster diaphragm. Master Powers electric vacuum pump is a small efficient pump that creates the vacuum needed to add that boost to a power brake system leaving the camshaft to pull all the air it needs. The purpose of the brake booster pressure sensor circuit is to monitor the amount of pressure vacuum applied to the power brake booster.
The booster is essentially a power steering unit that supplements the drivers input. Your order may be eligible for Ship to Home and shipping is free on all online orders of 3500. Cardone 54-74818 Remanufactured Vacuum Power Brake Booster without Master Cylinder Cardone 54-73709 Remanufactured Vacuum Power Brake Booster without Master Cylinder A-Team Performance 4-Port Cast Iron Corvette Style Master Cylinder DiscDrum DiscDisc 916 and 12 Ports Compatible With GM Chevy Chevrolet.
Because of low vacuum at high RPM reports of unintended acceleration are often accompanied by complaints of failed or weakened brakes as the high-revving engine having an open throttle is unable to provide enough vacuum to power the brake booster. Its mainly due to the job of a brake booster that a vacuum-assisted system is called a power brake booster. With the brakes applied on a vehicle with power brakes the pedal moves down slightly when the engine is started.
Master Powers vacuum pump kit includes everything needed to complete the installation with OE style components and connectors. Find Summit Racing SUM-760197 Summit Racing Power Brake Conversion Kits and get Free Shipping on Orders Over 99 at Summit Racing. The purpose of a brake booster is to provide power assistance to the braking system meaning you do not have to put a lot of force on the brakes for them to actually engage.
Many older vehicles in the 50s used a pedal ratio of 11. Its the second recall for the same problem. The recall covers certain Pathfinders from the 2013 through 2015 model years.
When you think Brake Masters think more than just an oil change and brake repair - think complete automotive repairWe offer oil change coupons and free inspections like any other auto shops out there but what sets Brake Masters apart is our highly-trained ASE Certified Auto Mechanics that will properly diagnose and fix your problem right the first time. Im new to this sight and hope someone can offer advice regarding a brake issue. This simple guide briefly explains how the conventional power brake vacuum booster found in most gasoline engine vehicles works.
Check here for special coupons and promotions. These systems can be mysterious to the untrained technician because part-swapping will not solve some brake issues. Using too small a brake booster on a heavy vehicle will give a hard pedal.
The brake booster is located between the brake pedal and master cylinder and uses a vacuum to overcome the fluid pressure in the brake system. Power Equipment NA In-car Electronics NA Overall Reliability Verdict 2000 2001 2002 NA 2003 2004. This problem is exacerbated in vehicles equipped with automatic transmissions as the vehicle.
Before you condemn the booster though you need to confirm that the device has failed. There are three reasons why a vehicle may be equipped with hydro-boost instead of a vacuum boosterAdvertisementClick Here to. The hydro-boost uses the hydraulic pressure from the power steering system to provide the driver assist in applying the brakes.
The booster is essentially a power steering unit that supplements the drivers input. Technician B says the cause could be a stuck closed residual check valve in the hose from the intake manifold to the power brake booster. The guide will then explain a series of simple tests you can apply at home in a few minutes to save some time and money in.
If theres a delay in getting power to the wheels that can feel like a brake problem. The automaker says a stop lamp relay can get stuck in the on position. First the car information.
This will not work on cars equipped with a vacuum brake booster. Have problem P0556 Jetta Hybride 2013 USA and the breake presure pump was. On a power brake system it is recommended that your ratio be 41.
Its also common for a hydraulic-powered brake booster to also be associated with the term power brake booster. Hydro-boost power assist was introduced in 1973 by Bendix as an alternative to the vacuum booster. I has drum brakes in the front and back.
I have a 1954 Bel-Air with a 1968 327 Muncie 4-speed and posi rear end. Faulty brake booster may be causing brake lock. Hydro-boost brake boosters use the pressure of the power steering pump to power the brake booster.
These systems can be mysterious to the untrained technician because part-swapping will not solve some brake issues. Summit Racing power brake conversion kits create more stopping power. Hydro-boost brake boosters use the pressure of the power steering pump to power the brake booster.
A master cylinder with booster from a late model Mustang was installed on the firewall. Our conversion kits feature dual reservoir cast iron master cylinders.
The generator and air power specialists at Gen-Tech can help you troubleshoot and repair problems with your portable power generator. Read the manual and check the equipment.
 Troubleshooting Rv Generator Problems Hitch Rv Blog
Is your generator starting but not running smoothly.

How to troubleshoot a generator. Shut the machine off and locate the voltage regulator. Start the generator enginelet it stabilize and warm up. Fuel quality is very important for the smooth running of the generator and should always be checked.
Portable generator runs but fails to produce electricity. A likely cause is from the loss of residual magnetism. If the coolant is in low amounts then a refill is in order.
Note that the fuel filter may be the root cause of the problem if cleaning the carburetor didnt resolve the problem especially if you had sludge-like fuel in the generator tank. Find the most common problems that can cause a Generac Generator not to work - and the parts instructions to fix them. My UST 5500 watt generator stopped generating electricity the last time I was off grid.
Turn off the choke and spray the cleaner directly into the hole allowing it to get to the carburetor. Try this Fast Fix first before taking your g. When this happens you can connect the generator to a 12-volt battery or plug in a drill and use the motion of the drill to generate an electrical current that will restore the magnetism within the generator.
Check the Circuit BreakerThe first thing you should do in this situation is to ensure the circuit breaker is working. Honda generators are extremely robust and designed to withstand tough working conditions. 80 of generators failures to start are due to faults in the sets battery.
If you find that the generator still wont start after pouring in gasoline take off the air filter and grab a can of carburetor cleaner. Most problems with generators occur from improper use. Crank up the generator.
Use a multimeter to check if there is any voltage present at all. How to Troubleshoot Brushless Generator Armatures Step 1. To test a capacitor it must first be removed from the generator and discharged.
Once youve identified a symptom that looks familiar we can show you the cause of the problem. Youll find 2 wires marked F and F-. You should always ensure water or other contaminants are not in the fuel or in the units filtration or delivery systems.
Check the temperature of the generator. Honda Generator Problems Causes. The generator wont start.
Most people only check the fuel levels not knowing that the other two are equally important for the proper functioning of the diesel generator. If there is then its a good indication that the problem is not within the generator. Check the Control BoxIf the circuit breaker seems to be working fine the next step is to check your control box.
The first step in generator troubleshooting is to browse the Repair Clinic list of symptoms. This is a safety feature. The generator was the predecessor to the alternator in both cars and farm equipment.
Generator Running but No Power. Additionally you should always check the coolant lubricant and fuel levels before starting your generator. The armature connects to the flywheel and the stator.
Test 1 Check AC Output Voltage Frequency Connect the test leads of an AC voltmeter or a volt-ohm- millimeter VOM into a generator receptacleAlso connect an AC frequency meterDisconnect any electrical loads. Possible causes for a Honda generator not starting are. In this video I show you how I fixed it.
Be careful when removing the wire leads that a short is not created across the capacitors terminals. Make sure the cleaner has a straw at the end. Perhaps its belching plumes of white smoke.
Find the armature in the brushless generator. The simplest solution is to replace the fuel filter. If its too high it will cease to function.
If it doesnt spin then the power supply to the armature is. Each supplies electricity to recharge starting batteries and run accessories but an alternator produces electricity by spinning a magnetic field magnets inside a stable bundle of wires whereas a generator produces electricity by spinning the wire inside the magnetic field. These are the most common Honda generator problems we see.
However like any power equipment they can still experience issues. To discharge use a screwdriver with an insulated handle to cross the terminals on the capacitor this will result in a loud pop and a spark. Check if the armature spins when the engine starts.
If the fuel filter is clogged the generator cant get a steady supply of fuel. How to Troubleshoot Propane Generator Problems Step 1.
The timing components are removed in a HG repair. The head gaskets w head rebuild was done roughly 20k miles ago by a mechanic with no Subaru experience ex brother in-law situation.

Driving with leaky head gaskets will ultimately cause more engine damage and a higher repair bill in the long run.

Subaru outback head gasket replacement. Here are some of the most common signs of a blown head gasket. Outback Head Gasket Repair Cost. Maybe a couple hundred.
They usually do a recheck after the road test to ensure the head gasket is running smoothly and the vehicle is safe to return to the owner. Subaru Outback Cylinder Head Gasket Replacement RepairSmith offers upfront and competitive pricing. Any cures yet for cooling systemhead gasket problem - 2002 Subaru Outback.
Seals should be part of the HG repair even the cam and crank seals. Subaru Head Gasket Replacement Service Information serving San Francisco CA Common Auto Services at Carlsen Subaru. From past experiences Id bet on head gasket failure.
This gives us time to repair road test and recheck the vehicle. RoughChoppy Idle-When a head gasket blows it will lower. Well know problem with that vehicle.
Drop it off at our shop and pick it up a few hours later or save time and have our Delivery mechanics come to you. Most of the symptoms of a blown head gasket are obvious since the way that the engine runs is usually affected. Step-by-step instructions on how to replace the head gaskets intake manifold gaskets exhaust gaskets valve cover gaskets timing belt water pump thermos.
Its now leaking oil from the oil returns and I suspect he either didnt follow the torque tightening procedure accurately used the wrong headbolts with the type of head gasket or the block surface wasn. CR says the 2001-2009 Subaru Forester 2001-2009 Subaru Outback 2006-2008 Subaru Impreza and the 2006 Subaru Baja are more likely to need the head gaskets replaced than other models. I think the shop you have it at is adding too much labor.
We get questions about head gasket issues with late 07 and up Subaru 4 cylinders even though Subaru claims the problems were limited to early 00s models. This is part 1 of a 5 part multi-part series I recorded replacing the head gaskets on a 2003 Subaru Outback 25L 2458CC H4 FI VIN. Depending on what you find it could lead to a complete valve job.
The repair of a Subaru head gasket will take approximately 2 days when you take it to a technician. The only additional cost would be the belt pulleys water pump and thermostat. Blown Head Gasket Symptoms.
In addition this head gasket can withstand high and low temperatures to provide optimum reliability. Unfortunately there really are no typical costs for a head gasket replacement on your SubaruThe variables once the heads are removed are many. Driving with a blown head gasket is not advisable.
In most cases a Subaru head gasket replacement takes two full days. Learned from experience Subaru tech told me after a 2500 dollar repair that I paid for that head gasket go out on my Subaru Outback around 150000 miles so be careful if your getting close to that not under warranty at all at 150000 miles plus I had Subaru do mine at 178000 miles and now have. The average cost for Subaru Outback Cylinder Head Gasket Replacement is 2151.
SCITOO Head Gasket Bolts This kit is a set replacement for Subaru Baja Forester Impreza Saab and Legacy. Every so often we run into a parts problem and the repair could take longer. Head Gasket Replacement Theres only one piece of good news that comes with a blown head gasket - but well work hard to make it the best possible news for you at the Carlsen Subaru service department.
Frankly Im not satisfied Subaru has ever resolved the head gasket issue completely on the 4 cylinder motors. The longer the issue persists the worse it gets. This gives the specialist time to repair and road test the vehicle.
The leak wasnt too bad so damage is minimal. This Subaru drove over 100 miles with a leaky head gasket. Ask your advisor about our loaner car program if you need a car while yours is being fixed.
1400 in addition to head gasket repair is ridiculous. It is engineered from high standard and premium materials to provide efficient services and also very reliable. Outback Bad Head Gasket Causes.
They just dont seem to have problems with the 6 cylinders. Once it is apart timimg belt water pump replacement is often a needed option.
9 Acrylic Blending Techniques. Paint a base coat in one of your main colors.
:max_bytes(150000):strip_icc()/blending-colors-1c-56a6e5cc5f9b58b7d0e5621f.jpg) How To Blend Two Or More Paint Colors
How To Blend Two Or More Paint Colors
Wet-on-WetThe first thing you need to do is to wet your canvas using a damp paintbrush.
How to blend acrylic paint. Wet On Wet Circular Blending. Your paintbrush should have. How to Blend Acrylic Paint Method 1of 3.
Start with a damp brush. The colors slide over the water film in the wood instead of grabbing too quickly on dry wood. 2 Interactive Acrylics Will Allow You to.
Increase Transparency of Paint Colors and Reapply One Color Add acrylic glazing liquid to one of the paint colors and mix well. Blending acrylic or craft paints on basswood is so much easier when the wood is saturated with water as the pretreatment step. 1 Whittle Fish body with diamond scales.
Blending is one of the trickier acrylic painting techniques to master. Select at least two colors to blend together using horizontal strokes. Acrylic paints come in a wide variety of forms.
Blending Wet Paint with Wet Paint. Blending is a tricky painting technique to mast. Materials Needed the Best Acrylic Paint Brands.
Trying the Wet-on-Dry Paint Method. Artist quality paints have a more saturated pigment and include much less filler than student or craft quality paints. Narrated demonstration on how to blend acrylic paints.
How to draw faces animals figures people and more. In this tutorial you will learn how to mix your own colors the best method for acrylic blending technique. Acrylic Paint for Miniatures.
1 Use Slow Drying Acrylics for Oil Like Blending. Blending is a tricky painting. Using oil paintsacrylic paints pastels painting in pastels lessons for beginners advanced lessons for intermediate and professionals.
16 x 20 stretched canvas acrylic paints. Select at least two colors to blend together starting at a circle and. Wet-on-DryFor this technique use a base coat to paint over the canvas and allow it to completely dry.
How to transition from one color to anotherMaterials used. The key is to keep your surface wet with paint so that you can make multiple passes with your brush to combine the colors just how you want them. The bare-bones essentials for acrylic painting include a palette a palette knife for blending brushes that are marked as approved for acrylic paint a canvas Griffin says that a gesso-primed canvas or wood panel is best a rag or paper towels and then soap and water for cleanup.
Both paint colors must be wet for optimal blendingOften referred to as wet-on-wet blending. How To Blend Acrylic Paint Effectively On Canvas 1. Blended colors need to cross into one anotherIf there is one thing I see lots of beginner artists struggle with is.
Stroke back and forth rapidly up and down the area until you get a nice gradient from your colour to white. Apply the colors a bit further from the edge you are blending. An easel will also come in handy.
Soak your brush in water for a few minutes. Wet On Wet Horizontal Blending. Httpamznto239e8YlOil Paint I Use.
It may seem like a lot of paint at first but to blend a smooth background like a sky you need a large 1 inch flat brush loaded up with paint. You can learn to blend your own colors using artist quality also called professional quality tube acrylic paints. Apply the colors a bit further from the edge you are blending.
Wet on Wet Double Load Technique. First paint in a layer of white then using a filbert brush add in your colour here were using blue along the bottom of the area you want blended. Blending in Acrylics With Bob Rankin.
The easy 3-step guide for creating smoother gradual blends with acrylic paint 1.