2008-11 VOLVO S40 FRONT BUMPER COVER DOES NOT INCLUDE LOWER SPOILER Regular price. Volvo XC70 front left driver BUMPER BRACKET mount support 01-04 OEM V70XC Fits.
 2008 10 Volvo Xc70 Front Bumper Cover
Bumper Cover Clip 2007-09 without s60r without headlamp washers.

Volvo xc70 front bumper. Bumper Cover Clip 2007-09 without s60r without headlamp washers. Buy Volvo XC70 Grille Front. 2001-04 without s60r t.
Our replacement bumpers and components are the affordable way to get original equipment quality fit and appearance. Part 1 of 21. Designed using state-of-the-art technology and with customers in mind this product by Alzare will.
01-04 VOLVO XC70 FRONT BUMPER COVER WITH GRILLEFOGLIGHT REINFORCEMENT BROWN. OEM Rear Bumper Volvo XC70 V70 2005 05 2006 06 2007 07 30655505. Mount Bracket Washer 2007-09 without s60r without headlamp washers type 1.
2002 Volvo V70 998. 2001-2004 OEM Volvo V70 XC70 FRONT BUMPER ALUMINUM SKID PLATE BUMPER GUARD Fits. 2001-04 without s60r type 1.
2003 Volvo XC70 8925. Repair your Volvo XC70 for less. Volvo XC70 2008 Front Bumper Reinforcement by Alzare.
In this video I will show you the following. Replace bumper covers will come in handy if you need to replace your scratched dinged or collision damaged cover to restore your prized. VOLVO OEM 10-16 XC60-License Plate Bracket Mount Holder 31391625 Fits.
2008-10 VOLVO XC70 FRONT BUMPER COVER. For Vehicles without Collision Warning System CMbB Without Warning - OEM Volvo Part 31353616. 32 4DR XC70 Without FOAM 1-Year FREE Warranty.
2010 Volvo XC70 39500. 2011 Volvo XC70 3087. Bumper Comes Primed Ready To Paint.
2005-06 without s60r without headlamp washers type 1. Same quality as OE for less money Designed with the latest software and manufactured with modern tooling. Search online our Volvo XC70 Bumpers Components inventory.
Expertly crafted from premium materials Designed to match rigorous quality standards. VOLVO OEM 08-16 XC70 Front Bumper-Tow Hook Eye Cap Cover 30678696 Fits. Buy here Volvo XC70 Rear Bumper Cover Volvo XC70 Step Bumper Face Bar or Volvo XC70 Bumper Step Pad and get a lifetime warranty.
2003 Volvo XC70 1400. This product is made of high-quality materials to serve you for years to come. 2011 Volvo XC70 11572.
Genuine Volvo Side Cover 31378966 Fits. 2002 Volvo V70 3559. IJDMTOY No Drill Front Bumper Tow Hook License Plate Mounting Bracket Adapter Kit Compatible With 2015-up 2nd Gen Volvo XC90 2017-up XC60 and S90 37 out of 5 stars 11 2669 26.
Volvo XC70 2011 Front Bumper Cover by Replace. 2005-06 without s60r without headlamp washers. Mount Bracket Screw 2001-04 without s60r type 2.
FRONT BUMPER Volvo V70 2001 01 2002 02 2003 03 2004 04 Black 1043468 Fits. This is an original used OEM Bumper Bar Front thats guaranteed to fit a Volvo XC70 with the applicable vehicle manufacturers specifications. Repairing headlight washer wiring in the bum.
01-07 OEM Volvo V70XC XC70 Front Bumper Cover tow cap cover plug eye lid Fits. 2012 VOLVO S60 REAR BUMPER COVER. OEM 2009-2016 Volvo XC70 32T5T6 wExhaust Cut Outs wSensor Holes Front Bumper Fits.
If the front of your Volvo XC70 has seen better days we can help restore its appearance with quality replacement front bumpers covers face bars and more. Welcome to the largest Volvo XC70 Front Bumper and Related Parts store. 2005-07 without park assist without v70r.
1998-04 VOLVO C70 REAR BUMPER COVER. Free shipping on many items Browse your favorite brands affordable prices. 2004-07 with s60r type 2.
01-04 OEM Volvo V70XC XC70 REAR Bumper Cover tow cap cover plug eye lid Fits. How to remove the front bumper cover on my 09 XC702. 2005-09 without s60r without reverse sensors.
2005-06 without s60r without headlamp washers.
You should be able to find a rearview mirror adhesive kit. Gorilla Epoxy Rear View Mirror Glue.
 The Best Rear View Mirror Glues Review In 2020 Car Bibles
Two-part mixing glues - This consists of both a resin and a hardener.
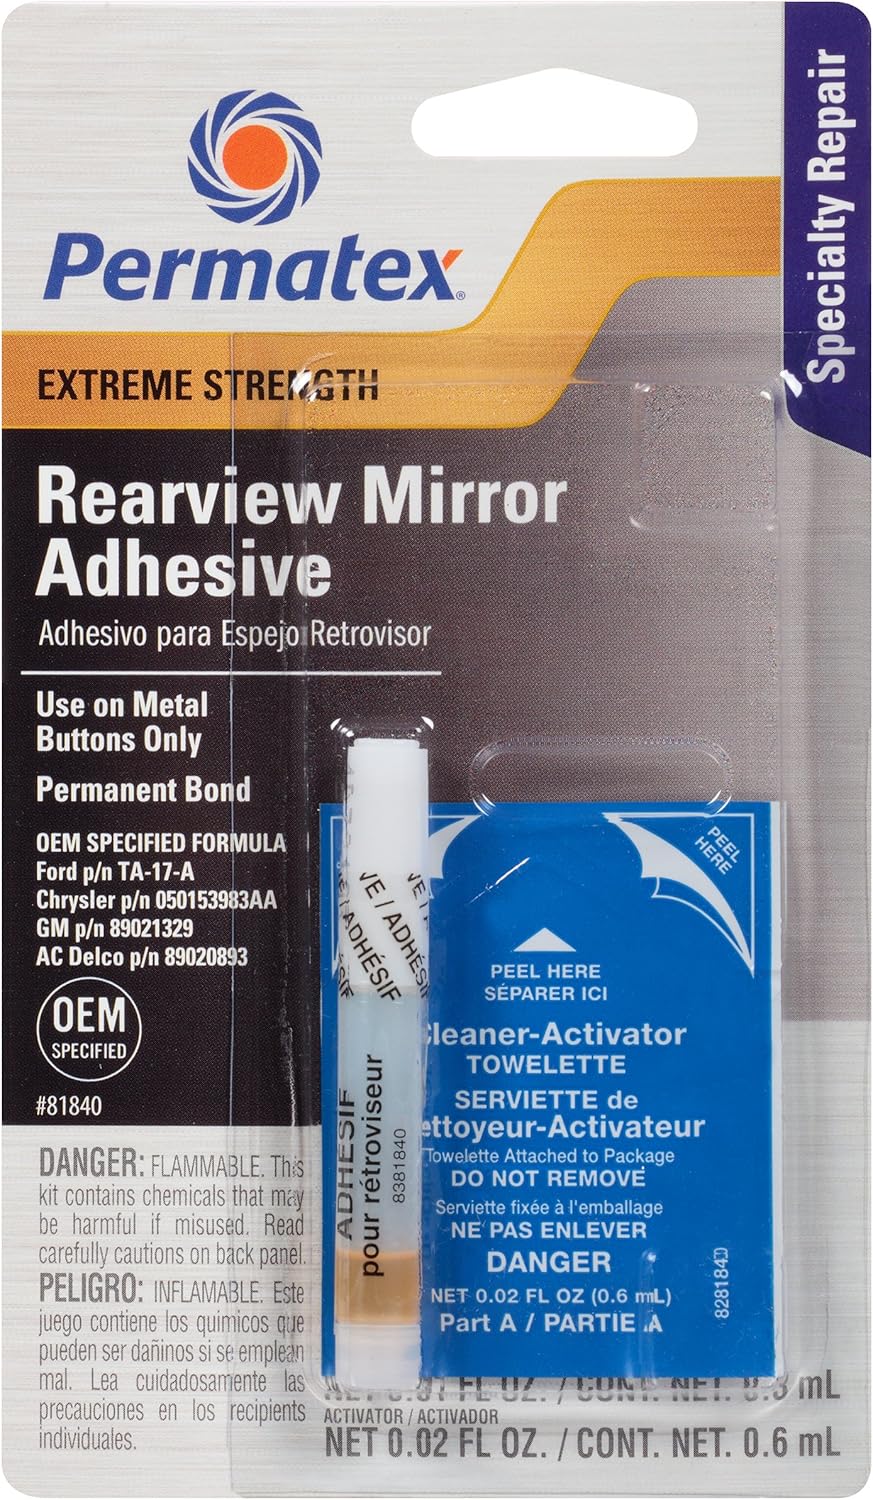
Car rear view mirror glue. Ideal for glass mounted phone and radio aerials. Shop for Rear View Mirrors in Car Customization. Loctite 37438 Rear View Mirror Adhesive Kit.
Details about Universal Car Truck Mirror Interior Rear View Mirror Suction Rearview Mirror US. Apart from that you can also go for Auto Vox Wireless Reverse Camera Kit if the budget is not an issue. Here youll find very clear instructions on how to re-glue and re-attach your rearview mirror back onto your windshield.
KITBEST Rear View Mirror Anti Glare Rearview Mirror Universal Car interior Rearview Mirrors with Suction Cup Antiglare Car Inside Mirror for Car SUV CRV and Trucks - 965 245mm 43 out of 5 stars 170. The jolting and side to side movement that your rearview mirror takes is a weak point for typical super glue. 2pcs Convex Adhesive Round Rear View Blind Spot Mirror Universal for Car.
Rearview mirror glue has the strength to withstand this type of jostling. Features and Benefits of Loctite Rear-view Mirror Adhesive Kit. Buy products such as Pilot Automotive MI-009 8 8 DayNight Mirror at Walmart and save.
100 quality and Brand new. In composition they are similar to the above two but comes in clear color. Some car manufacturers prefer merely gluing the rear view mirror to the windshield.
Different Kinds of Rear View Mirror Glue. Will Gorilla Super Glue Work on a Rearview Mirror. Best Rear View Mirror Glue.
Get it as soon as Thu Jan 7. The glue is generally a mirror adhesive that holds the mirror firmly in place without any scope of the glue melting away. Use a scraper or just a razor blade to remove the old glue.
The driving angle can be adjust 360 degrees. The Rugged Ridge Rear View Mirror Glue is a very potent adhesive that does permanently mount metal mirror buttons to windscreens in just a matter of seconds. Which Glue to Use on Rearview Mirror.
Single non-mixing glues - Resin and hardener are already premixed. Scrape the inside windshield glass and the mounting button thoroughly with a new razor blade in order to remove all the old glue. Your order may be eligible for Ship to Home and shipping is free on all online orders of 3500.
The mirror will probably stay up there for the life of the car. Link to the glue is below. Reattaching your rearview mirror requires something stronger than Elmers glue.
Small round rear view mirror Enlarge horizon eradicate the blind spot effectively. Luckily everything youll need is at the neighborhood auto parts store. Permatex 81844 Professional Rear View Mirror Glue.
This will be easier if the glass is coldso do it before warming the. Wontolf Rear View Mirror Anti-glare Suction Cup Rear View Mirror Universal Interior Wide Angle Rearview Mirror Eliminate Blind Spots for Car Truck SUV 95240mm 44 out of 5 stars 284. You can also order one online if you dont mind the day or so wait.
You can purchase one of these kits for just a few dollars at most establishments. Clear liquid rear view mirror glues - This type of glue is specially designed for rear view mirrors. Super Glue will hold the mirror for a short time but it is not the long term answer to your problems.
The complete kit comes with mixing sticks sandpaper alcohol pad and epoxy pouch. Klingon Rear View Mirror Button Kit. 3M 08752 Rear View Mirror Adhesive.
Worktech Adhesives. Glass can be easily scratched so keep the razor as close to parallel with the glass as possible. Rear View Mirror Adhesive bonds rear view mirrors as well as latches emblems and small antenna mounts.
They typically contain a powerful adhesive and a small tube of activator solution which helps the adhesive bond faster. Check here for special coupons and promotions. Order Mirror Glue for your vehicle and pick it up in storemake your purchase find a store near you and get directions.
4 or more for 1077ea. Always scrape in a direction away from you. Amazons Choice for car rear view mirror glue.
Loctite Rear-view Mirror Adhesive Kit. If you are getting confused which are the best glues available then according to many other professionals and me Loctite 37438 Rearview Mirror Adhesive Kit and Rugged Ridge 1102002 Rear View Mirror are the best option to buy. VersaChem 11109 Rear View Mirror Glue.
Detach the mounting button from the mirror bracket. Pick up a rear view mirror repair kit at your local auto supply store. When it comes to removing the rear view mirror you could prefer blow-drying it or could even apply a heat gun to the mirrors borders.
The best glue for reinstalling your rear view mirror is a two-part epoxy like the product Rear View Mirror Adhesive This product can be found at your local auto parts store or retail superstore like Walmart. The Loctite Rear-view Mirror Adhesive Kit compensates for differential thermal expansion of parts and is therefore also recommended for metal vent window handles and hinges. Universal Car Truck Mirror Interior Rear View Mirror Suction Rearview Mirror US.
Provides fuel economy and reduces fuel emission. Green Line is a hybrid getting its power from a combination of a 24-liter.
 Saturn Vue Gas Cap 2008 2010 New Oem Gm 20882859 Ebay
1-17 of 17 Results.
Saturn vue gas cap. 2006 Saturn Vue Fuel Cap. The gas cap on your Saturn Vue is designed to keep your fuel in your vehicle and keep debris from getting into the fuel system. The Vue Saturn fuel tank cap securely fastens the fuel tank entry point so gasoline can stay pressurized within the rear tank.
This plastic fuel cap is compatible with a range of vehicle makes and models. ACDelco 3 Duralast 3 This is a test. If your Saturn Vue smells like gas you should treat it as though you have a fuel leak until you for sure there isnt one.
Stant Fuel Tank Cap. The ACDelco GM Original Equipment Regular Fuel Cap is a threaded cap that seals your vehicles fuel tank filler and is a GM-recommended replacement for your vehicles original component. Saturn Vue 2008 Fuel Tank Cap by Stant.
Made from sturdy and long life materials. Its an inexpensive part that can be replaced easily. We currently carry 4 Gas Cap products to choose from for your 2006 Saturn Vue and our inventory prices range from as little as 1599 up to 1999.
1-6 of 6 Results. Your Saturn Vue will be happy to know that the search for the right Gas Cap products youve been looking for is over. Threaded Pressure Vacuum Type for Emission Control Warranty.
Anytime dirt dust or other pollutants get into your fuel tank they can become sucked up by the fuel pump and clog up the fuel filter. STANT 10841 OEM Type Fuel Gas Cap For Fuel Tank - OE Replacement Genuine Fits. Protects vehicle occupants from gasoline vapors.
They make two gas caps for the 04 Vue depending on the flapper inside the filler neck. Here are the most common Vue P0455 fixes. 1-6 of 6 Results.
Saturn Vue Fuel Cap. Check here for special coupons and promotions. 90-day Stant limited warranty Anticipated Ship Out Time.
The large really is referring to how much pressure is being lost. Check if this fits your vehicle. ACDelco 7 Duralast 10 This is a test.
Same day - 1 business day Quantity Sold. Duralast Fuel Cap 6836T 18. Cap Diameter 1-4964 in.
Order Fuel Cap for your 2008 Saturn Vue and pick it up in storemake your purchase find a store near you and get directions. Saturn Vue Gas Cap. 1-17 of 17 Results.
The cap features a threaded system that fits snugly around grooves in the fuel tank so it stays attached. DIYSAVE10 Online Ship-to-Home Orders Only. Most Common P0455 Fixes.
If you look and its a plastic one then you need the correct cap for that one if its metal then you need the correct cap for that one. Check if this fits your vehicle. Saturn Vue 45 out of 5 stars 113 product ratings113 product ratings - STANT 10841 OEM Type Fuel Gas Cap For Fuel Tank - OE Replacement Genuine 875.
Stant OEM Replacement fuel cap model number 10838. But there are other less likely causes as well. This may result in poor performance and bad fuel efficiency.
A breakaway groove helps keep the cap in place in the event of an impact. SCITOO Aluminum Gas Cap Fuel Filler Door Cover Fits For ChevroletFor BuickFor SaturnFor GMCFor CadillacFor PontiacFor IsuzuFor HummerFor SaabFor Suzuki l4 l5 l6 V6 V8 Gas Cap Fuel Tank Cover 1499 14. A defective fuel cap can cause your vehicle to fail an emissions test and allow up to 22 gallons of gasoline to evaporate in one year wasting your money and polluting the environment.
The best part is our Saturn Vue Gas Cap products start from as little as 1324. Your order may be eligible for Ship to Home and shipping is free on all online orders of 3500. DIYSAVE10 Online Ship-to-Home Orders Only.
1-916 x 2-164 in. STANT FUEL TANK CAP NON-LOCKING NON-VENTED BLACK -- 2-34 in. 2009 Saturn Vue Hybrid 4 Cyl 24L ELECTRICGAS GAS Product Details Notes.
Theyre the antidote to blandness. The smell of gas is typically going to be caused by a bad gas cap evaporative emissions system overfilling the gas tank or an actual fuel leak. Advance Auto Parts has 5 different Gas Cap for your vehicle ready for shipping or in-store pick up.
On top of low prices Advance Auto Parts offers 2 different trusted brands of Gas Cap products for the 2006 Saturn Vue. The fuel cap has a rubber gasket that provides a liquid-tight seal to keep fuel in and water and dirt out. Problem was corrected from then on.
Duralast Fuel Cap 5909 22. While the trouble code may state that there is a large leak in the EVAP system of your Saturn Vue the actual leak will most likely still look rather small. 2006 Saturn Vue Fuel Cap.
Add visual interest and bright detail to your Saturn Vue with a chrome or polished gas cap fuel door or fuel door cover.
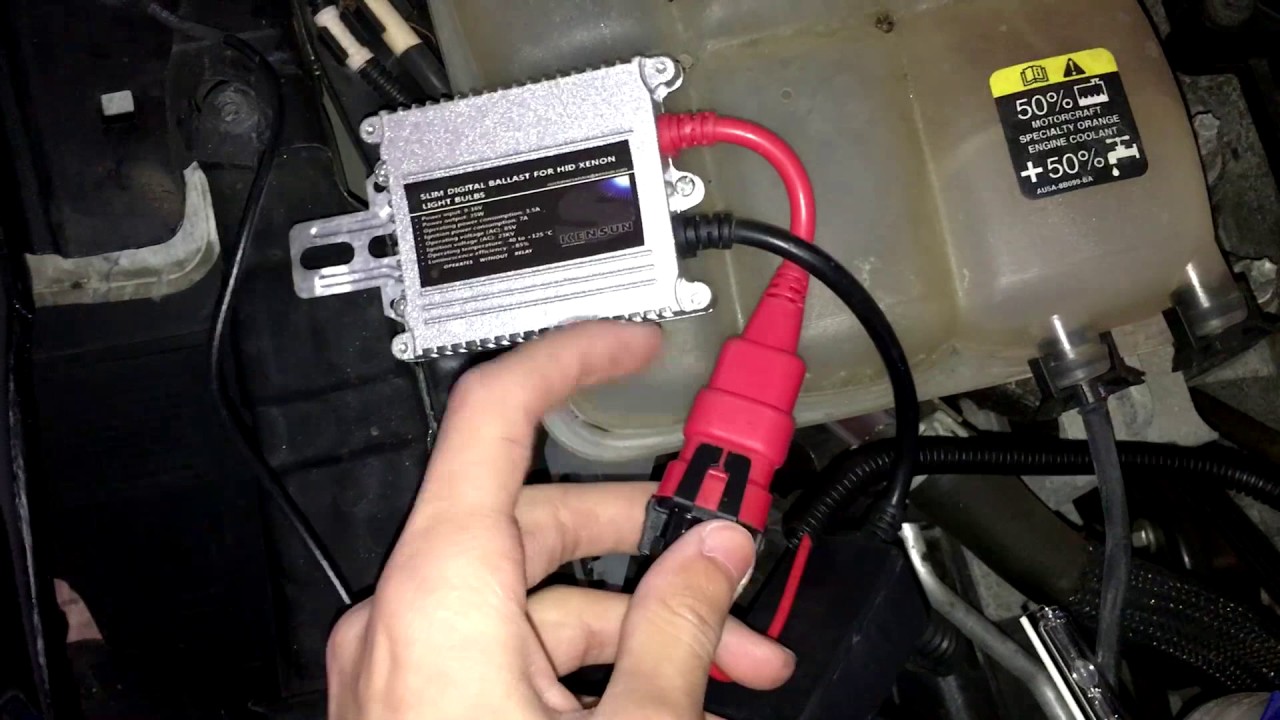
HID lights provide a superior lighting experience and cover a wider part of the road ahead than traditional halogen headlights. They should have wires already connected to them ready to.
 How To Install Hid Headlights With Relay Harness Youtube
Insert the xenon light into the headlight housing.
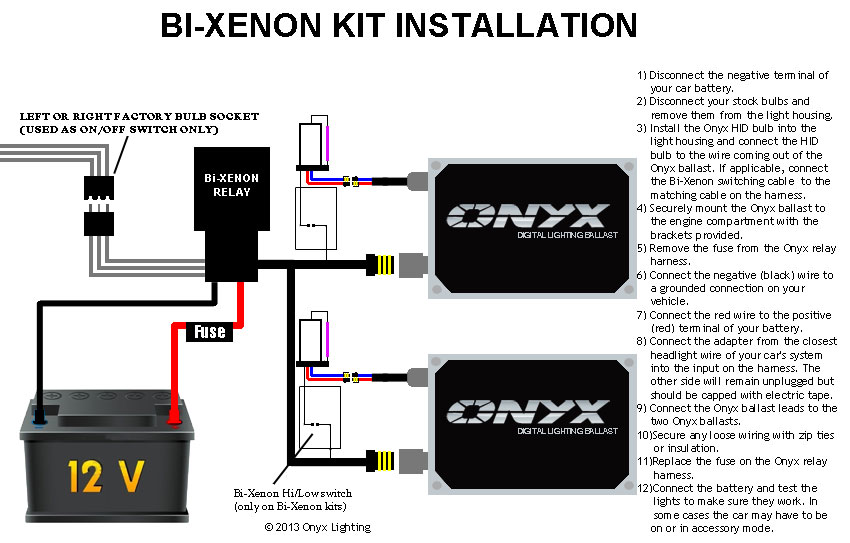
How to install xenon headlights. Loosen the negative battery terminal nut with a crescent wrench. Lift the negative battery cable off the. Install the ignitor by placing it on the bulb and locking it in place.
Xenon is one type of HID high intensity discharge bulb. Go to any car accessories store and. Plug in your bulbs twist the bulbs into place and then lock down your dust caps.
Xenon bulbs are brighter and last much longer compared to the other bulbs available in the market today. Step 11 Marking a spot for your Ballasts. If you did you can always use rubbing alcohol to clean.
HID lights are often called Xenon lamps. Bi-Xenon HighLow HID Bulbs. Remove the positive battery cable in the same way you just.
Make sure it is sitting properly and is pressed all the way. They are also designed to last longer than halogen lights. The Installation Process The installation process is designed to be as straightforward as possible and each kit comes with complete step-by-step instructions for fitting out your car.
A few other advantages are the luminous efficacy the decreased power consumption and the increased longevity. How to Install Xenon Headlights Step 1. In this article well look at what xenon headlights are how they work and the pros and cons of installing them in your car.
Wire the BallastFirst you have to wire the ballast. How to Install Bi-Xenon E-Code Headlights. Prop open the hood with the hood support rod.
Here is how you can replace xenon headlights in a few easy steps. You have to be gentle when removing the plastic cap and remember not to touch the bulb. The installation process should take you around 30 minutes for each headlight allowing enough time to switch out your previous headlights.
This diagram shows a simple installation diagram for all the following bulbs If your bulb is not listed here check HERE for our list of Single beam bulbs. With a little knowledge and certain tips you will have a fairly easy job replacing them. This article will guide you through the process step-by-step.
It is estimated that the average true lifespan of a xenon headlight is. Xenon headlights provide better and brighter illumination than conventional halogen headlights. All our xenon HID headlight products are incredibly easy to install.
But for the uninitiated this type of vehicle lighting can be very unfamiliar. The HID bulbs have a couple of channels that need to line up properly in the headlight assembly. One of the main advantages to install xenon headlights is the added safety allowed by the more usable light when compared to regular Halogen headlights.
Instead of using a heated filament Xenon headlights use gas. Advantages of HID lights. Dual Beam HID Install Wiring Guide.
Want to replace your old Xenon headlight bulbs with bi-xenon ones and give your car a more modern look. Lock the bulb into the headlight. If your car features xenon headlights you should be able to replace them if needed.
Passenger Side Step 14 Optional Drill Hole in Weather Stripping. Xenon lights are brighter have a lower operating temperature and last longer. Purchase a Xenon KitTo install the xenon headlights you need a kit.
When it comes to installing Bi-Xenon Plug and Play HID Headlights here is the How-To for. Step 13 Attach your Ballasts to Firewall. Learn how to install your LED and HID headlight conversion kits using our step-by-step guide and installation tutorial.
Step 12 Peeling back your 3M and Preparing your Ballasts. How to Install Bi-Xenon HID Headlights Step 1. Turn off your vehicle.
Also keep in mind that HID bulbs can be a bit pricier and professional installation may be recommended. Shop HID light kitsUS. 9003 9004 9007 9008 H4 H13.
Xenon HID Headlight Bulbs Installation Guides. Check out our bulb-specific installation guides. If the bulb came out with the ignitor then install the bulb on the ignitor instead.
Lifetime Warranty and Free Shipping. The lifetime of HID lights is around 2000 hours.
Check the VL 2dr Coupe price the Z24 2dr Coupe price or any other 1991 Chevrolet Cavalier price with. They were made starting in 1981 for the 1982 model year so they can be 39 years old now although this 1991 Chevrolet Cavalier RS is only 29 years old.
 Used 1991 Chevrolet Cavalier Coupe Review Edmunds
CHEVROLET Custom Door Guard emblems 80s vintage Rally aftermarket accessory.
1991 chevrolet cavalier z24. Search pre-owned 1991 Chevrolet Cavalier Z24 Coupe FWD listings to find the best local deals. 1989 Chevy Cavalier Z24 Convertible with a 5 speed manual and the fuel injected 28 V6 engine. This one can be found here on craigslist in Strasburg Pennsylvania and the seller is asking 2500.
Everything works except AC. Join millions of people using Oodle to find unique used cars for sale certified pre-owned car listings and new car classifieds. 1991 Chevrolet Cavalier 1019.
Browse interior and exterior photos for 1991 Chevrolet Cavalier. 1991 Chevrolet Cavalier For Sale. Get both manufacturer and user submitted pics.
1991 Chevrolet Cavalier Z24 Prices Founded in 1911 by William C. And if we do theyre normally a Z24 andor a convertible model. 17 city 26 highway mpg.
Bump the key and go starts first time every time regardless of weather. Torque RPM 3200. 1982 Chevrolet Chevy Cavalier Sedan - Classic Vintage Advertisement Ad H39.
1991 Chevrolet Cavalier Z24 - Coupe 31L V6 Manual. 1500 Check Availability. Tambien compartimos asesoramientos legales resenas pruebas de autos Chevrolet.
Details about 1991 CHEVROLET CHEVY CAVALIER Z-24 Postcard Automobile Advertising - Unused. Driven all summer without issue over 5000 miles in a few months. 0-60 mph 824 sec.
Chevrolet has earned its reputation by offering consumers durable and affordable vehicles within its vast and complete lineup from sub-compacts to heavy-duty trucks. We use cookies to offer you a better browsing experience analyse site traffic personalise content and serve targeted ads. How much is a 1991 Chevrolet Cavalier.
The Chevrolet Cavalier is a line of small cars produced for the model years 1982 through 2005 by Chevrolet and then later reintroduced in 2016 for the Chinese MarketAs a rebadged variant of General Motors J-cars the Cavalier was manufactured alongside the Cadillac Cimarron Buick Skyhawk Oldsmobile Firenza and Pontiac J20002000Sunbird at GMs South Gate Assembly and Janesville Assembly. Available styles include RS 4dr Wagon RS 2dr. 1999 Chev Z24 Cavalier 750 Cert Clean Title Rolling Chassis SFI 254C Cert Mild Steel full tube chassis Current 750 IHRA Cert Expires Aug 2022 Recent 750 NHRA Cert Expired Dec 2020 - 1 Stock Wheelbase GM Bolt Pattern Mid Plate Tabs for Front Motor Plate Recent 2600lbs WIron Block LSPowerglide 550s 18 Mile 850s 14 Mile 159MPH Car has been 780s With BBCNosPowerGlide Includes.
Horsepower RPM 4200. 1991 Chevrolet Cavalier Reviews and Model Information. Get trim configuration info and pricing about the 1991 Chevrolet Cavalier 2dr Coupe Z24 and find inventory near you.
NOS 1991-1994 Chevrolet Cavalier Z24 RS Floor Console Ashtray GM 22551377 dp. 695 previous price 695 299 shipping. Save 972 on a 1991 Chevrolet Cavalier Z24 Coupe FWD near you.
The Used 1991 Chevrolet Cavalier is offered in the following submodels. Transmission 5-speed manual. Edmunds provides free instant appraisal values.
Z24 convertible nice clean original car well kept same owner since 1998. Drive type Front wheel drive. By using our site you consent to our use of cookies.
76-93 GM Chevy Pontiac Headlight Head Light Lamp Bucket Adjuster Spring 4pc F Fits. Based on the average price for a 2004 Chevrolet Cavalier for sale in the United States this is a good deal for this vehicle. See 88 pics for 1991 Chevrolet Cavalier.
1991 Chevrolet Cavalier 2dr Coupe Z24 Specifications features and model information. Durant and Swiss-born Louis Chevrolet and a division of General Motors Chevrolet is an iconic US car manufacturer. See prices photos and find dealers near you.
Classics on Autotrader has listings for new and used Chevrolet Cavalier Classics for sale near you. We analyze millions of used cars daily. Dont miss whats happening in your neighborhood.
Find 1990 to 1991 Chevrolet Cavaliers for Sale on Oodle Classifieds. Cavalier Sedan Cavalier Coupe Cavalier Convertible Cavalier Wagon. 1991 Chevrolet Cavalier Pictures.
Get information and pricing about the 1991 Chevrolet Cavalier read reviews and articles and find inventory near you. 1986 Chevrolet Cavalier Z24 Camaro- Original Advertisement Print Art Car Ad J721. Base engine size 310 L.
Detailed features and specs for the Used 2005 Chevrolet Silverado 1500 SS including fuel. Sun roof introduced on Silverado SS 2006.
 Chevrolet Silverado Ss Classic Silverado Ss Classic History New Silverado Ss Classics And Used Silverado Ss Classic Values Nadaguides
2005 Chevrolet Silverado SS.
2005 silverado ss specs. Taking its name from the top trim level from the Chevrolet CK series the Silverado is offered as a series of full-size pickup trucks chassis cab trucks and medium-duty trucks. EPA Fuel Economy Est MPG City. Search pre-owned 2005 Chevrolet Silverado SS listings to find the best local deals.
Get detailed information on the 2005 Chevrolet Silverado 1500 including specifications and data that includes dimensions engine specs warranty standard features options and more. We analyze millions of used cars daily. By all accounts it was nicer to drive and easier to live with than high-performance rivals like the Ford SVT Lightning and the Dodge RAM SRT-10 even if those two trucks were much faster.
The Silverado SS also received a sporty suspension upgrade and all-wheel drive and inside it was comfortable even with the sporty suspension. 2005 Chevy Silverado - Photos 2005 Chevrolet Reviews 2005 Chevy Silverado - Price Quote. See 2005 Chevrolet Silverado SS Model Specs Features and Configurations for Ext Cab 1435 WB Ext Cab 1435 WB 4WD.
The Chevrolet Silverado is a range of trucks manufactured by General Motors under the Chevrolet brand. Used 2005 Chevrolet Silverado 1500 SS Overview. The Used 2005 Chevrolet Silverado 1500 SS is offered in the following styles.
Research Chevrolet Silverado truck. Research 2005 Chevrolet Silverado SS Extended Cab SS 2WD prices used values Silverado SS Extended Cab SS 2WD pricing specs and more. 4dr Extended Cab SS AWD SB 60L 8cyl 4A and 4dr Extended Cab SS Rwd.
2005 RWD Chevrolet Silverado SS review. Shop millions of cars from over 21000 dealers and find the perfect car. Price as tested 36780.
Base price incl dest. 2005 Silverado 1500 specs horsepower torque engine size wheelbase MPG and pricing by trim level. SS 4x2 Extended Cab 65 ft.
Introduced for the 1999 model year the Silverado is the successor to the long-running Chevrolet CK model line. Save 5971 on a 2005 Chevrolet Silverado SS near you. The 2005 Chevrolet Silverado 1500 SS 4 Dr STD Extended Cab SB RWD has a 60 L 345 hp V8.
2005 Chevrolet Silverado 1500 SS Extended Cab Pickup 60L V8 4-speed Automatic 66 ft. Interior available with cloth andor a bench seat Chevrolet Silverado 1500 SS doing a burnout during Motor Trends testing. Avaialble only as a Crew Cab with a 6-foot 6-inch bed instead of the standard 1500 Crew Cabs 5-foot 8-inch bed the 1500HD hauls 3073 pounds with 2WD 2766 pounds with 4WD and tows 10200.
Vegetable oil a common household item will remove stubborn glue that is stuck to your hands or fingers. The following techniques can safely get super glue off of the skin.

Add some more water and rub the salt into the glue to get super glue off your hands.
Remove crazy glue from hands. Heres another way you can get super glue off your fingers. Then lift away the super glue by peeling it back with a spoon or spatula. Therefore we recommend our patented.
Use about one drop of liquid hand or. Olive oil or margarine are effective natural treatments. Peeling apart stuck skin.
Rub on your skin for roughly 20 seconds or until glue comes off. Gently rub a small amount of acetone onto the bonded area of skin. Pour some acetone nail polish remover into a small cup or bowl or on a cloth or towel depending on the area youre.
Just mix 1-part lemon juice to 1-part water. Do not touch it while it is still sticky. Make a circular motion until the glue is eliminated.
The acetone will. Easy Way to Remove Super Glue From Your Fingers. Soaking in warm soapy water.
Step 4 - Quickly rub it over the hands since acetone dries easily. Apply warm water and soap to the area where the glue is present and see if that works. It is one of the best products for removing super glue from your skin fingers nails or hair.
Wait until the glue dries into a thin solid before attempting to peel it off. Dip your super glued fingers in some water and then a pile of salt. How to Remove Krazy Glue From Your Skin.
Wiggle your fingers around gently to make sure that the lotion gets in and directly touches the glue. Removing glue with oil. If you are applying the lotion from the glue stick in between your fingers.
Gently massage that area with your fingers for 10 minutes. Using clean fingernails or tweezers grasp the. Check out another amazing use for salt that doesnt involve cooking.
Nail polish remover or acetone. While you rub the area the glue will slightly start losing its bond from the skin when this happens move onto removing that until your skin free from the glue. Step 5 - Wash and dry your hands to remove the.
The grease helps to loosen the glue. Apply petroleum jelly on your skin. Wash your hands to clean with warm water and soap to remove any residual glue.
Dip your fingers that have super glue on them in water then put a small pile of salt on the super glue add some more water on the salt and rub the salt firmly in to the glue for about 1 minute it should look like a white paste. Fill a sink or pail with enough soapy water to immerse your fingers in. Soaking the affected area in warm soapy water can help to remove super glue from the skin.
If soap and water does not work then you should try the acetone. Now rub the glue with your fingertips or a scratcher tool that is free from harming the skin. Remove any clothing the glue has gotten onto.
Retrieve a small dish and pour a ½ tablespoon vegetable oil. Nail polish remover acetone based. The best thing is not to get it on your skin in the first place.
Massage the hand lotion in the dried super glue with your fingers in a circular motion. If you can try to gently peel your skin apart as if. Dont Try This At HomeHeres how to remove super glue off your skin this method is not recommended for removal off other thingsobjects.
Leave it on for 5 minutes. Select the oil type. Then dry the hands.
How to remove the transmission on a 1999 Ford Ranger. When you research the Tag code it is 5R55E which says fits from 1997-2004.
 Diagram In Pictures Database 1998 Ford Ranger Transmission Diagram Just Download Or Read Transmission Diagram Online Casalamm Edu Mx
You can usually catch the problem before it gets there by.

98 ford ranger transmission. Assembled 4WD Length 28687-Inches. FORD RANGER Transmission Cross Reference and Interchange Chart Use The Transmission Cross Reference and Interchange Chart To Find Transmission Compatibility Look up a trasnmission by model number and view vehicle applications and compatibility. Ford Ranger Automatic Transmission USA Built 1998 High Temp Automatic Transmission Fluid by Red Line.
The Ford Ranger is a compact pickup truck produced between 1982 and 2011. Like Red Line D4 ATF but with more viscosity for serious demands like towing and RVs. Ford Ranger automatic transmission parts are key to this and replacing them with durable components from AutoZone keeps your pick-up going for the long haul.
1998 Ford Ranger Transmission Assembly 12 parts in stock Select Option. Toyo Koygo and Mitsubishi manuals also were used. Adapter Length 1150-Inches.
Or search for a vehicle by make and model to display applicable transmissions. No Core Charge on Most. This procedure took about an hour.
We were told by salvage yard that we can ONLY replace it with another 1998 Ford Ranger transmission NO OTHER YEAR. 25 liter 4 cylinder engine. This is a complete used OEM Manual Transmission thats guaranteed to fit the 1998 Ford Ranger manufacturers specifications.
The Ford Ranger shares many components with the Mazda compact trucks including the M50D five-speed manual transmission with overdrive. Transmission Depot Has Been Serving Our Local Online Community for Over 30 Yrs. Find your perfect car with Edmunds expert reviews car comparisons and pricing tools.
With eight different combinations of. It has a stamped metal pan on the bottom much like an automatic transmission and the main case is tapered toward the rear. Automatic Transmission 6-183 30L 2WD Fits 98 RANGER 241532 Fits.
Mazda B3000 is the same junk. Encompassing two generations the Ford Ranger is a flexible truck that can perform a huge range of different tasks and the transmission is an important part of how it functions. Ford Expedition Lincoln Navigator 2009 Ford F-Series 2011 Ford Mustang V6 GT 2011 Ford Territory 2011 Ford Ranger Note.
This transmission has been inspected and ready to ship. This is a fully synchronized 5-Speed manual transmission with a fifth gear overdrive. This was a 2005.
The C3 is a weak transmission that was only intended for light duty 4-cylinder applications and small V6s. When reliability and OE performance is a must turn to this ATP product designed to provide a precise fit OE quality and function. This transmission was replaced by the A4LD in 1985.
1998 1999 200 2001 2002 2003 2004 2005 2006 2007 20. Global excluding USA 2007present 6F50 6-speed transaxle Van Dyke Transmission. 1998 Ford Ranger transmission problems with 32 complaints from Ranger owners.
How to fix or replace a 5R55E transmission on a 2WD 30L. C3 The Ford C3 is a light duty 3-speed automatic transmission that was available in the 1983-1984 2WD Ford Ranger. Our 1998 Ford Ranger has a transmission that needs to be replaced.
If youre seeing fluid leaks or you smell burning transmission fluid then a Ranger automatic transmission repair is necessary. Save up to 10792 on one of 1661 used 1998 Ford Rangers near you. This is a 5 speed manual with 2WD.
Ford Ranger Complete Auto Transmissions. Automatic Transmission 4 Cyl 153 cid 25L Automatic Transmission 6 Cyl 183 cid 30L 4x2 Automatic Transmission 6 Cyl 183 cid 30L 4x4 Automatic Transmission 6 Cyl 245 cid 40L 5R55E 4x2 Automatic Transmission 6 Cyl 245 cid 40L 5R55E 4x4 Manual Transmission 4x2 4 Cyl 153 cid 25L Manual Transmission 4x2 6 Cyl 183 cid 30L Manual Transmission 4x2 6 Cyl 245 cid 40L Manual. OE quality at an affordable price OE fit and function.
The worst complaints are od light flashing with harsh shifting transmission failure and whines in reverse. Quality Reman Transmissions and Transmissions Parts for Ford Chevy Dodge GMC Jeep Lincoln Pontiac Olds and More. Ford Ranger Automatic Transmission 1998 Automatic Transmission Shifter Cable by ATP.
This transmission unit includes a transmission case valve body tail shaft and housing torque converter automatic only and all internal lubricated parts.
So what causes engine oil leaks. Bad Rings or Valve Seals.
 Engine Oil Leak Causes Bluedevil Products
Oil leaks can be caused by a variety of factors the main factor being incorrect pressure within the compressor and turbine housings.
What causes oil leaks. Repair or replace the oil cooler. An engine gasket is a seal that ensures that lubricants do not leak. Brown fluid will indicate an engine oil leak.
If the oil catches fire or the engine fails while you are driving there is potential for injury to yourself and others. The other less common causes of oil leaks are an oil pan leak oil seals or bad connections. If any of the oil leaks out it can lead to engine damage.
Heres the most common cause of oil leaks degraded gaskets. 5 Reasons Your Car Might Be Losing or Leaking Oil 1. The gasket is probably the most common cause of oil leaks especially in older vehicles or vehicles that are used frequently have a high number of miles.
The valve gasket joins the engine block and oil pan. This results in the excess oil being burnt causing blue smoke to be omitted from the vehicles exhaust when driving. There are two common causes for a leak from the oil pan to occur.
Preventing the oil from leaking out is a variety of gaskets and seals. The pan itself may leak if it sustains impact damage from an accident or road debris. Creating a seal that allows the transfer of fluids without them leaking where they dont belong.
The most common cause of an oil leak is due to a degraded engine gasket. Some oil coolers circulate oil inside a chamber that is filled with coolant. Your vehicles engine relies on motor oil that is recirculated throughout the engine to keep everything running smooth.
Simply put gaskets are your engines last line of defense for preventing leaks. One way to check for an oil leak is to look at your oil dip stick on a regular basis. Damaged Oil Gaskets or Pans.
Otherwise it could cause enough oil to leak out where major damage to your engine could occur. Gaskets connect different metal parts. You need to recognize the symptoms of this issue so that you can replace the gasket immediately and resolve this issue.
An oil filter removes contaminants from engine oil. As a result the oil will leak out potentially leading to significant engine damage. Alongside putting the wrong oil in a diesel engine a worn valve stem oil seal gasket is a common cause of oil leaks allowing excess oil to enter the engine combustion chamber.
This allows for the exchange of heat between the two systems. Going too long between oil changes causes oil to break down and become contaminated. If the liquid is green or orange and has a sweet smell coolant is the culprit.
Oil leaks can cause catastrophic damage to the bearing systems and occur within seconds of the turbocharger commencing operation. Inside the heart of your engine is the combustion chamber where all the magic happens. As a result oil will begin to leak from the gasket as it tries to circulate between the engine block and the oil pan.
Also the rubber materials that are supposed to seal off of your engine block might have decomposed over time. Sometimes a leak in the oil line inside this chamber can cause oil to leach into your cooling system. When there is a break in the gasket you will begin to lose vehicle fluids.
But What Causes Oil To Leak Exactly. When you drive an older car a blown head gasket could be a common reason for the oil leaking from your car. Over time the pressure in the seal increases which can cause leaks and failures especially if sludge the oil that breaks down over time is built up.
Over time gaskets will degrade causing the seals to weaken. The Valve Gasket This is probably the most common cause of oil leaks especially in vehicles with high mileage. While its a much more common occurrence after a DIY or shade-tree gasket change even.
This could cause the oil to leak from the top of the engine block. Contaminated oil attacks and degrade gaskets and seals which results in oil leaks. Your vehicles oil pans and gaskets can easily be damaged by road debris since they are.
The most common cause of oil leaks is lack of maintenance. In such a scenario the damage will usually create a hole or crack in the oil pan. A small leak can turn into a large leak which can lead to engine failure Oil leaking onto the ground pollutes the environment Oil on the ground is a slipping hazard especially in a garage.
Should you find a puddle under the engine look a little closer. Were glad you asked. If your filler cap covering where you put oil into the engine is missing loose or broken then the pressure of the engine could cause oil to spill out when the vehicle is running.
In most cases you will leak motor oil. It may happen that one of the gaskets that keep oil inside is Improperly installed. If your oil drops over time chances are you have an oil leak.
Check out some of the most common causes of oil leaks below. A worn-out gasket or impact damage. If the liquid is red its probably transmission fluid.
You have an oil filter that is either loose or that was not installed properly when it was first put on You have a drain plug at the bottom of your oil pan that is loose or that has worn down over time You have a oil pan that has been.
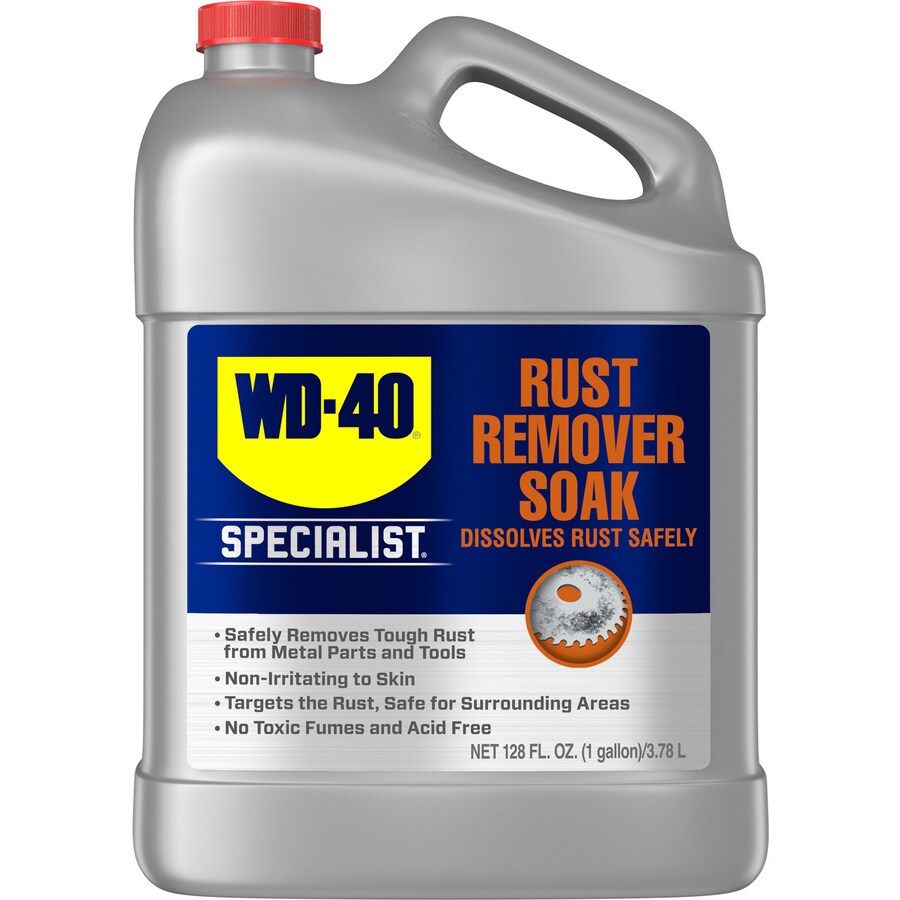
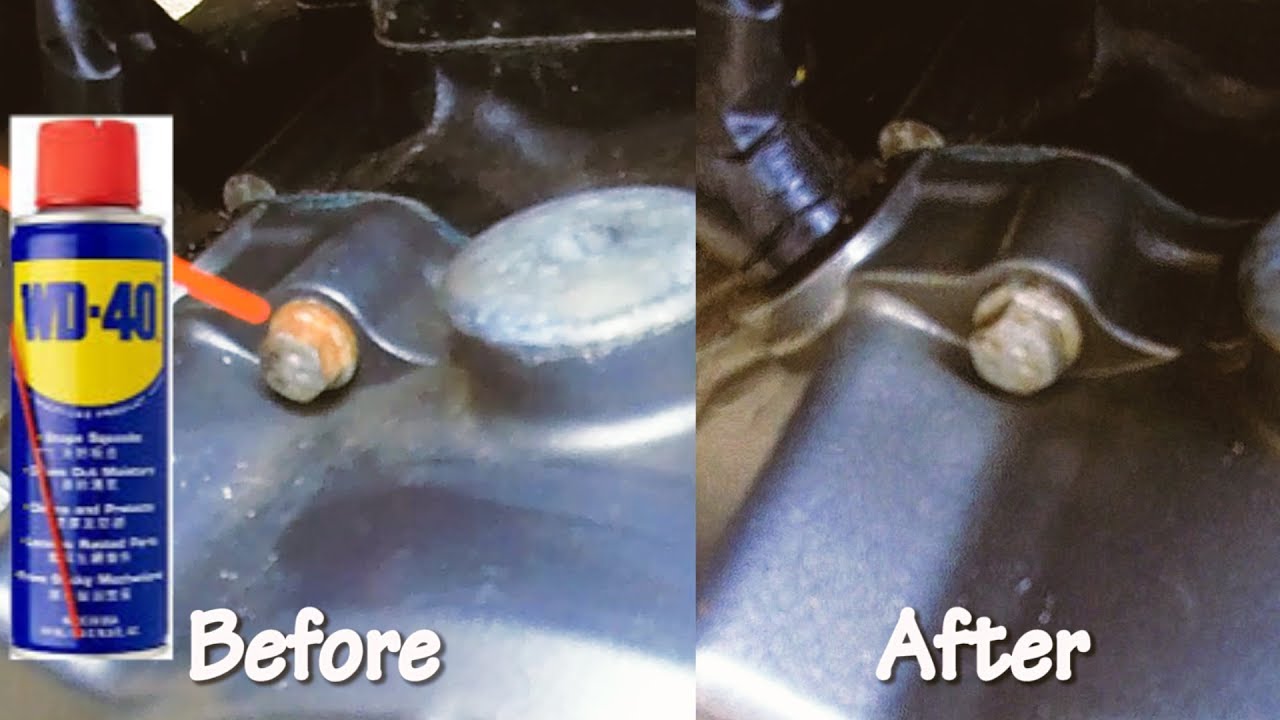
It restores surfaces to bare metal without scrapping chipping or scrubbing. WD-40 Specialist Rust Remover Soak quickly dissolves rust and restores tools equipment and surfaces to bare metal without chipping scraping or scrubbing.
Did you know that WD-40 Multi-Use-Product can be used as a rust stain remover spray.

Wd 40 remove rust. Rust Treatment Using WD-40. Great for removing rust from tools metal cast iron chrome parts and more without harming paint gaskets trim or other surrounding parts. Simply soak the item in the desired WD-40 for a predetermined amount of time then rinse or scrub the rust away.
A rust removing soak that safely removes tough rust from metal parts and tools. Using WD-40 for rust removal is one of the best rust treatments as it is so simple and quick. WD-40 Specialist Rust Remover Soak quickly dissolves rust and restores tools equipment and surfaces to bare metal without chipping scraping or scrubbing.
Apply WD-40 regularly to metal items to help prevent the rust coming back. First spray the rusted item with WD-40 Multi-Use Product. Rust treatment of metal objects in our homes and outside is an investment.
WD-40 is designed to loosen the bonds between rust and the metal surface it has adhered to by penetrating the porous layer of rust and using its lubricating properties to loosen it. WD-40 Specialist Rust Remover Soak - Fast Acting Rust Dissolver. WD-40 wont damage the paint on your car unlike other rust removers that contain harsh chemicals.
As a result the product has many valuable uses. Originally recorded February 14 2017As a general rule I hate using WD-40 for anything. WD-40 Specialist Rust Remover Soak dissolves rust quickly without harming surrounding parts trim gaskets or paint.
Yes the same one youve probably used to lubricate the hinges on the bathroom door. The good news is that you can remove rust from your bathroom quickly and easily with WD-40 Multi-Use Product. You probably have a can sitting in your garage right now.
For light rust leave parts in for 1-hour to 3-hours and for heavy rust leave parts in overnight. You might think it is costing you money in the beginning. To prevent the rust from coming back apply WD-40 to protect your.
But think of it as how it saves you heavy expenses on replacing the metal components and fixtures if they are corroded. WD-40 is a great rust remover as it breaks down the bond between the metal and the rust. The name stands for Water Displacement 40th formula as it was the 40th attempt at the product by chemist Norm Larsen who created it in 1953 according to the WD-40 website.
Everybody knows WD-40 is the go-to product for silencing squeaks displacing moisture preventing rust and loosening stuck parts. Its pretty useless as a lubricant though it works for hedge clipp. It provides non-drying protection that stays where you spray it so when you want to store parts or tools and not worry about rust when you go to use them apply the Long-Term Corrosion Inhibitor to prevent rust forming within that time.
Get it as soon as Fri Aug 28. Rust is a pesky thing to encounter but luckily it can be removed with the use of the WD-40 multi-use product or the WD-40 Rust Remover Soak. Just test a small area first to ensure this method doesnt cause any damage to your metal.
This should remove the majority of the rust. To remove surface rust simply spray it on the rusted surface leave it for around ten minutes and let it get to work on the surface rust. WD-40 Multi-Use-Product can be used to remove rust and to protect items from rust.
Just soak the item and scrub it with a wire brush. To remove rust from the infected area just spray your WD-40 onto the rust and wait about 10 minutes. WD-40 Specialist Corrosion Inhibitor is an anti-rust spray ideal for preventative maintenance and use in extreme environments such as high humidity.
1 Gallon Pack of 1 45 out of 5 stars 412. Great for removing rust from tools metal cast iron chrome parts and more without harming paint gaskets trim or other surrounding parts. You will need to ensure that you use enough to soak the area then allow it to sit for 10 minutes.
Just test a small area first to ensure this method doesnt cause any damage. In those 10 minutes the WD-40 is quickly breaking down the rust thats built up on the surface area. A rust removing soak that safely removes tough rust from metal parts and tools.
Removing rust is important and you need to do it as soon as possible. WD-40 Specialist Rust Remover Soak quickly dissolves rust and restores tools equipment and surfaces to bare metal without chipping scraping or scrubbing. Great for removing rust from tools metal cast iron chrome parts and more without harming paint gaskets trim or other surrounding parts.
You can also us WD-40 Specialist Penetrant to help remove rust. Simply spray the item with WD-40 and scrub it with a clean wire brush. This can be used to clean metal bike chains clean rust off furniture and much more.
FREE Shipping on your first order shipped by Amazon. He was trying to make a formula to displace water and prevent corrosion. Just spray a little on the rust stain wait a few minutes and start scrubbing with a mild abrasive.
LED strip lighting is popular among many Architects and Lighting Designers due to the improvements in efficiency color options and brightness. Make sure that it is evenly installed and no dirt is covering the light though a little bit of grass does create an interesting shadow effect.
 7 Things To Know Before Buying And Installing 12v Led Strip Lights
There are many types of Lepro LED strip lights and your kitchen may need different types from other places.
How to install led light strips. Measure the length and size of the strip lights your kitchen needs and buy accordingly. Lay the strip on a flat service and find the point where youll be making the fold. Screw the wireless touch pads bracket to the wall and install the switch and cover plate.
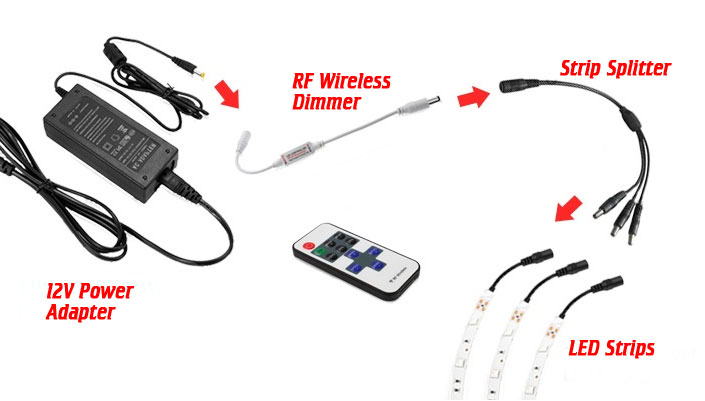
Re-stick LED Strips Using Mounting Putty Most people use mounting putties as a versatile alternative to glue nails and staples. Use the light strips with longer length cables in most cases. Use two-conductor power wire to connect your additional controller to the power.
Also sometimes the LED lights come with an adhesive backing so this just needs to be reinforced with either glue or double sided tape. Here I use Lepro LED strip lights as an example to teach you about installing LED strip lights under kitchen cabinets. Lay out all the products to create a mock installation to make sure you have all the supplies necessary Unroll the LED strip lights from the plastic reel Attach the.
Slide the end of the. LED lighting can add a cool modern aesthetic to any entertainment space. Then cut the strip along the nearest dotted line to avoid.
A DIY How To video demonstrating the steps to install LED strip or tape lighting so. The best way to fit the LED strip light onto the AV awning is to use either super glue double sided tape or if the lights have been purchased with drilling holes drilling these onto the metal in the awning. Before adhering any strip lights clean the surface of the area you will be placing the lights on.
Drill a hole in the top of the cabinet large enough for the power cord to fit through. The biggest draw is how easy they are to install. Flexible LED strip lights are used all over the world in various industrial commercial and residential projects.
Take it to the next level with LED strips But if youre not in the market for a new case inexpensive modular LED light strips are the way to go. Heres everything you need to know to buy and install them. To use it to re-stick your LED light.
Use a sharp knife to make a slit along the black lines between the light and the end of the LED strip. They can be placed. This video shows how to install under cabinet LED Flexible strip lights.
Peel the top layer off to expose the ends. Peel and stick the LEDs to the under-side of the cabinet above the sink. Dry and clean the surface.
Start installing the lights by peeling the backing off the end where the power cord will connect. Great locations are under the dashboard for the front 2 and either on the front or rear of the seats. How to Install LED Strip Lights.
We started on one end of the kitchen cabinet and attached the adhesive side of the LED light strip to the top of the cabinet. To install outdoor LED strips around flowerbeds place the strip light along the perimeter and tuck it slightly into the ground. Drill a hole in the top of your cabinets above where your power supply is located.
You can put a 90-degree fold in a strip light using the following steps. To install LED strip lighting first run the strip across your chosen surface to work out how much you need.
Pour some contact cement inside a small container. Gluing The Headlining Back In Place.

The steam cleaner will melt the glue in the headliner and help it to reattach to its frame.

How to repair interior car roof liner. Start from the back of the car. This method works every time and holds the liner up for years. A car roof liner or headliner is what makes the interior of the car aesthetically pleasing and comfortable.
Want to start an online business but dont know how. In this video I show you how to fix your cars headlineraka that droopy fabric covering the ceiling of your carFor more car tips subscribe to my channe. Use The Steam Cleaner And Paint Roller Combo.
We show you how to fix a sagging headliner. Headliner adhesive is the glue used to attach headliner fabric to the headliner in your car. Allow it to become tacky and then press it to the ceiling smoothing the wrinkles.
Headliner adhesive is used to fix headliner fabric that is sagging or damaged. How to fix a sagging headliner without removing itRepair cars sagging headliner Simple Fast without Adhesive and only with twist pinsBUY TWIST PINS HERE. If small patches of the liner have simply.
You can buy liquid and spray adhesives and they all vary in quality and price. Click the link to get help starting your own online business. The simplest way to reattach car roof lining back to its place is by gluing.
Place the piece flat against the roof and press removing any wrinkles with your hand. How Much Does Headliner Repair Cost. Heres a couple of hacks you can try to stop your roof lining from sagging.
If the headlining on the car has only sagged partially for example around the edges you could use glue to re-attach it. HighFree 60 pcs Car Roof Repair Rivets Headliner Repair Button Auto Roof Snap Rivets Retainer for Interior Ceiling Cloth Fixing Repair Buckle with Installation Tool Grey Grid 44 out of 5 stars 95 1089 10. Doing the job yourselfHeres some good 3M headliner adhesive.
Httpsamznto2wsxYr0A big thanks to Headliners O. Liquid adhesives are used with a spray gun whereas aerosols can be applied directly from the. This trick works best when the fabric sags around the edges.
Ensure that the glue you use is purposely for attaching car upholstery fabric. After that the paint roller will assist the fabric to set up evenly without any crease or wrinkle. Donate to help support my channel.
Dip the brush into the glue and paint it onto the roof. Once this section is stuck to the ceiling lightly spray the next foot-long section. It is actually the material that covers the roof of the car.
Turning a Saggy Situation into a Sticky Situation The simplest way to repair that detached fabric is to simply find a way to reattach it. It works best if the fabric is sagging partially in the edges. Its best to use specialist headlining adhesive in a spray can to ensure that the glue is distributed evenly.
PaypalmediyhomeandautoSagging separating tearing away or drooping fabric headliner in your car truck van or SUV. Made mainly from polyurethane a roof liner for the car actually has three layers. When people think about repairing their vehicles headliner they often worry theyre about to get into hundreds of dollars worth of an expense.
Place the fabric in the car and press the sprayed section into place on the ceiling. For the lining to evenly adhere back it is recommendable to use a spray-on glue. How to fix cars Headliner with Carpet tape --- EASY CHEAP NO GLUE or Sprayi checked to see to how much it would cost to fix this professionally and it was.
Pull the liner tight against the roof. It is a common misconception but you can get your headliner repaired for as little as 50 to 55 assuming you have an hour and a screwdriver to spare.
Rust-Oleum Rust Reformer instantly bonds with rust and transforms it to a non-rusting flat-black paintable surface and prevents future rust. If it sticks it is probably rust coming through the thin brass plate.
 Remove Rust From Your Bike Using Wd 40 Pulsar Ns200 Youtube
Use the WD-40 Specialist Industrial-Strength Degreaser to clean off even the most stubborn dirt grease and grime from your car parts.

Wd40 to remove rust. Our powerful formulas remove practically anything and leaves tools and parts grime free and protected from rust and corrosion. Evapo-Rust is reusable 1 gal. The oxalic acid in potatoes helps remove the buildup of rust.
Remove Dirt Grease and Grime. Rust forms when metal comes into contact with moisture and oxygen so rust in showers toilets and bathroom sinks is common. Rust-Oleum Automotive 248658 1025-Ounce Rust Reformer Spray About Rust Reformer Spray.
WD-40 Specialist Industrial-Strength Cleaner Degreaser Power clean and degrease engines workshops and more with our new WD-40 Specialist Industrial-Strength Cleaner Degreaser. Polypropylene Polyethylene Polyester all types Nylon Amorphous. WD-40 is designed to loosen the bonds between rust and the metal surface it has adhered to by penetrating the porous layer of rust and using its lubricating properties to loosen it.
It saves you the effort of sanding rust all the way down to bare metal. To remove surface rust simply spray it on the rusted surface leave it for around ten minutes and let it get to work on the surface rust. A long-lasting rust preventative that protects metal parts A long-lasting rust preventative that protects metal parts blocking rust and corrosion for up to 1 year outdoors or 2 years indoors.
A light penetrating oil such as WD40 CLR or CRC can be used instead and is typically the cheaper option. How to remove rust from your bathroom No matter how clean you keep your bathroom it is a wet area and therefore the odd rust stain will appear from time to time. Just like there are many metals there are many plastics that are very different from one another.
Evapo-Rust Removes even heavy rust completely is non-toxic non-corrosive is safe on skin and eyes. Rinse and spray a polyurethane sealer. Do the magnet test.
Make sure that you take all necessary precautions before using a chemical remover to remove rust from a metallic object. This will remove light surface rust and will also help prevent more rust from forming. WD-40 is engineered to provide superior lubrication and protect agains rust and corrosion.
WD-40 is a thin petroleum-based liquid usually applied via a aerosol can specifically designed to dissolve and remove rust and to prevent rust and corrosion by protecting metal with a thin coat of fine oil. A good place to begin is simply scrubbing the rusty surface with steel wool sandpaper a wire brush or even a crumpled up ball of tin foil. Simply soak the item in the desired WD-40 for a predetermined amount of time then rinse or scrub the rust away.
6 Easy Ways To Remove Rust. Extend the life of your engines parts tools and toys with WD-40 lubricants cleaners and corrosion inhibitors. That product is of course WD-40 a favorite of garage mechanics and DIYers since the late 1950s.
Whether you need the original blue and yellow can with thousands of uses or a WD-40 Specialist penetrating oil lubricant cleaner or solution to protect against or remove rust weve got you covered. In 1969 the Rocket Chemical Company was renamed after its only product WD-40. Be careful when stabbing the potato Remove the knife from the potato and scrub away the.
Rust is a pesky thing to encounter but luckily it can be removed with the use of the WD-40 multi-use product or the WD-40 Rust Remover Soak. Use a lemon thats been sprinkled with salt and go over the entire area until gone. Get the job done right with a range of products WD-40 Multi-Use Product WD-40 Specialist and WD-40 BIKE and live life hands on.
Before you attempt to remove the rust on the chrome clean dirt and debris from the metal using soapy water or with car wash soap if cleaning painted car parts. Overall plastics can be divided into two basic groups. Citric Acid Powder available at drug stores or grocery stores as a health food supplement or a baking ingredient Warm Wat.
This should remove the majority of the rust. To help restore a license plate that is beginning to rust spray it with WD-40 and wipe with a clean rag. Get WD-40 tips now at our official website.
If it doesnt it has corroded brass doesnt rust so use a brass polish to remove. WD-40 Specialist Corrosion Inhibitor is an anti-rust spray ideal for preventative maintenance and use in extreme environments such as high humidity. Simply stab the knife into potato and wait a day or overnight.
To prevent rust in the first place spray and wipe down with WD40 before storing. Remove Stickers Decals Bugs and Bird Dropping. This method is especially useful for smaller rusted items such as knives.
This helps you locate and access rusty areas more easily. Will remove 286 g of rust or will de-rust about 20 sq. WD-40 was first used to protect the outer skin of the Atlas Missile from rust and corrosion.
Removing Rust With Citric Acid. Instead of using a knife or razor blade to remove stickers decals or any other material stuck to your car use WD-40 first. This is one of the easiest safest and least abrasive ways to remove surface rust from old steel tools.
They should make industrial sized cans of it for car preservation. There are two ways you can use a potato to remove rust. Ft depending on the thickness of the rust.
When it was discovered to have many household uses Larsen repackaged WD-40 into aerosol cans for consumer use and the product was sold to the general public in 1958. No you will scratch the brass. Chemical rust removers are usually made using oxalic or phosphoric acid and therefore are hazardous for the skin so should be used safely.
Preparation Tips on How to Wax a Car with a Buffer Materials Equipment. How to Wax a Car With a Buffer Learning how to polish a car with a buffer greatly reduces the amount of total waxing time and gives your car the same showroom gleam it had when you saw first saw it.
 How To Wax A Car Profperly With A Buffer Wax Like A Professional
The buffer should have a wax applicator pad.
How to wax a car with a buffer. Now swap the buffers wax applicator for a microfiber cloth and if you can a special wax remover microfiber. Attach the wax applicator to the buffer pad of your machine buffer. Do not turn on the buffer yet.
Car polish is a mildly abrasive liquid applied before wax to enhance the paints smoothness and sheen. Turn on the buffer and allow it to glide across the section you are waxing. Apply the wax in a circular motion.
It is very important not to turn on the buffer just yet. Then take a clean microfiber towel and use circular motions to remove the dried wax. FINISHING STEPS Step 1.
This will save you time and energy on the waxing process. Apply the polish to a soft cloth or the pad of your orbital buffer and rub it in a circular motion on the car. The best kind of buffer to use would be random orbital buffers as they spread the compound simultaneously in 2 different ways.
Many people dont realize the importance of waxing their car to protect it. Use this to buff off the dried wax using long smooth strokes. Final Pro Tips Wax a Car With a Buffer Always use a clean polishing pad every time you use your buffer Store pads in an airtight container or sealable plastic bag to prevent contamination After use wash the pads well in hot water Or if you prefer you can buy new pads whenever you plan to polish.
Once you are happy with the coverage you can quickly move on to the next section of the car. Put the wax applicator over the pad on your buffer. Attach it to the buffer and put a small amount of wax on the center of the pad.
Apply the first layer of wax gently with the buffer still off. Allow the wax the dry for a couple of minutes then use your sander or buffer with a buffing pad to buff the surface smooth. Switch on the polisher to a slow speed setting and work the wax over the paintwork in a sweeping motion using very light pressure making sure even and full coverage on the surface.
When you have a finished a section wait for approximately 10 minutes until the wax has set fully. What Is Car Wax. Start by applying gentle pressure to the cloth and using a circular motion to remove the majority of the wax.
Once wax is thoroughly spread over a single area of your vehicle turn on the machine and allow it to gently glide and buff the wax. If youre using an orbital buffer turn it on after youve used the pad to rub some of the polish on the car to prevent splattering. Apply the wax to the orbital pad before you turn the buffer on as these tools can be used on both the buffing stage and applying stage.
This may seem like common sense especially given how. Now Get Ready to Wax Your Car with a Buffer First thoroughly wash your vehicle to remove all of the dirt. Then without turning on the buffer apply wax to your car using vertical or horizontal linear movements.
Lastly turn the buffer on and use it to apply wax gently all over your cars surface. Having all the items you need beforehand will save you from stopping halfway through the job to.
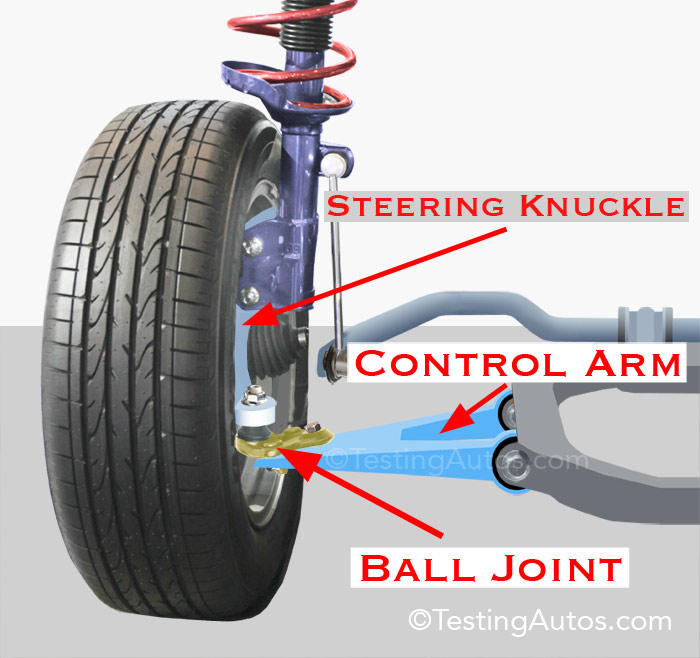
Ball joints can even break if theyre in poor condition. If a ball joint starts to loosen youll hear clunking sounds from the front as the joint rattles in the socket.
 When Do The Ball Joints Need To Be Replaced
When you have a bad lower ball joint you will be able to feel vibrations in the steering wheel or from.

How do ball joints go bad. Ball joints can lock up at times. If both the edges are wearing at an equal rate then problem is probably not with the ball joints but due to under-inflation of the tires. Some are serviceable meaning they can be greased and lubricated periodically while others on most newer vehicles are sealed and the grease from the factory is meant to last the life of the joint.
Need Ball Joints. When a ball joint locks up the movement that it absorbs does not. A symptom of a faulty lower ball joint that people experience on a regular basis is clunking sounds.
Test if this is your problem by driving down a straight road. If you should notice the problems below you should consult a professional on the same. The damaged ball joints might become loose in the sockets and lead to increased vibration when the car is moving.
I also quickly show you how to. The ball joints allow the suspension of your vehicle to move up and down while at the same time allow the wheels to turn left and right. How to check ball joints and ball joint noise.
Excessive Vibration From the Front of the Vehicle. Most ball joints on later vehicles are sealed and do not require any grease. The first indication of wearing ball joints can be very subtle and develop slowly enough that you may not.
Get them Here httpamznto1lyvhZAThis is just a simple test to see if your ball joints are bad. The joint can either break by detaching from the socket or the socket itself can break. If the inner or outer edges of your cars front tires wear faster than the remaining tire tread then you can take it as a sure sign of bad ball joints.
One of the most common symptoms of a problem with suspension ball joints. Since most ball joint parts are made of steel they might corrode anyway if they are exposed to high moisture environments. This was a request video made awhile a.
How to Know When Ball Joints Are Bad Driving. Bad Lower Ball Joint Symptoms 1 Vibrations. The vibration often comes about as a result of the compromised ball joint on either side of the vehicle.
Ball joints come from the factory with two different designs. Failure to do so will put you and others at risk of misfortunes. As the ball and socket wear together the normally close tolerance between them will increase and the ball joint will become loose over time.
While ball joints may last 70000 miles or more they dont last forever. Another sign of compromised ball joints would be excessive vibration from the car suspension. One sign of a.
Drive the vehicle on a public road at the speed limit and pay close attention to the engine steering and overall. Uneven wear of your tires can be an important sign of bad ball joints. 2 Bad Front-End Alignment.
If the wheels are still properly aligned the car should drive straight. Well it all comes down to wearing off over time. Over time a cars ball joints may wear down.
Take your car out for a drive. Heres how to check. Learn how to diagnose a bad ball joint for both an upper and lower control arm.
They are vulnerable to damage from rough road conditions as well as ordinary wear and tear. Loud banging or popping noises are a primary indicator of bad ball joints but the type and degree of the noise. There are still some that should be greased every time the oil and filter is changed.
Now without sufficient lubricants parts corrode. If a ball joint breaks your wheel is free to move in any direction. Loosen the lug nuts.
Another symptom of problematic ball joints is excessive vibration. So another answer to the question why do ball joints go bad is because they simply wear due to the street and weather conditions. A failed ball joint can allow the wheels to move in whatever direction inertia takes them and they will stay.
And thats highly likely. Either type of break can cause serious expensive damage to your car or truck. Clunking Noises From the Front Suspension.
Generally speaking you should expect to have to have your ball joints replaced between 70000 to 150000 miles of driving. As ball joints wear out they become loose in the socket and rattle and knock as the suspension travels up and down over the road. Symptoms of a Bad or Failing Ball Joint Front 1.
Drive over speed bumps. The best way to tell if you have bad ball joints is to be on the watch for telling signs. Turn the steering wheel.
Ball joints are always working any time that you are driving and they are not permanent fixtures in your vehicle. Let the steering wheel go and see what the car does. Worn ball joints may knock or clunk when traveling on rough roads.
Youll notice misalignment because the car will keep veering to one side. What Are the Dangers of a Bad Ball Joint. Their actual lifespan will depend on your driving habits road conditions and exposure to road splash and salt.
Jack up the car and place wheel chocks behind.
The Lucas engine oil additive raises your oil pressure while reducing oil consumption and engine noise. Top 10 Best Oil Additives 2021 1.
 Best Oil Additive Youtube
Why we like it.

The best engine oil additive. Lucas oil additive is a US-made product popular among car owners. Sea Foam sf-16 Motor Treatment 16 oz. Free shipping for many products.
Motor Honey Oil Stabilizer manufactured by Casite is a leading oil additive that is available in almost any automotive parts store. It is one of the best oil additives that work with both. Best Line is a premium additive that coats all.
Most of the companys products are specialized to clean and lubricate the engine parts. XL Nanolube Engine Oil Additive comes in an 8 oz bottle and is one of our favorite products on the list. 1 Sea Foam SF16 Sea Foam SF16 is an environmentally friendly oil additive which is registered with the Environmental Protection Agency.
Fortunately this engine oil additive can work well in any diesel or gas engine. The Best Oil Additive For Older Engines The Best Oil Additives for Older Engines. This comes with 16oz with larger packs for a bulk deal available exclusively through Amazon.
Since it is 100 petroleum based it will be good for both your engine and the outside surroundings. Motor or engine oil flush is an engine oil cleaner that is used to remove sludge build up from the engine. With this oil additive youre guaranteed to get the most out of the unit.
Lucas Oil Stop Leak is more than just a gasket fix and thats why we call it the best. It can be used both in automotive and marine engines. It is different from many other additives in that it does not stay in the engine during operation.
Whether your car is imported or. Wiki researchers have been writing reviews of the latest oil additives since 2016. Find many great new used options and get the best deals for Lucas Engine Break-In Oil Additive 10063 16oz at the best online prices at eBay.
InterDynamics Certified AC Pro Car Air Conditioner Leak Detector Dye UV Dye for Oil and Fuel. This results in an extensively quiet operation that many customers love. Cera Tec Friction Modifier from Liqui Moly is an anti-wear additive that can be used in engine oil as well as some manual transmission fluids.
The Best Oil Additive 1Sea Foam sf16. It quiets the engine down reconditions oil and unlike many additives you dont have to make sure to drain it out after a while. This product uses ceramic compounds to line all of the.
LUCAS LUC10130 Synthetic Oil Stabilizer. Sea Foam is the most popular oil additive on the market up to now. Outfitted primarily for diesel engines Archoil comes in a 16oz container bringing a volley of.
Lucas LUC10130 Synthetic Oil Stabilizer is said to increase the. Best Oil Additives for Older Engines 1. Rust inhibitors detergents and dispersants help reduce rust and sludge build up inside the engine to keep your oil flowing smoothly.
Why we like it. AI Innovations LUC10002 Lucas. Casite claims that Motor Honey will restore lost horsepower and fuel economy associated with wear of engine components.
Marvel MM13R Mystery Oil. XL Nanonlube is expensive but well worth the price for it eliminates dry engine starts and permanent engine damage. Below are the top oil additives to stop car engine knocking especially for older engines.
Liqui Moly 2009 Anti-Friction Oil Treatment. Liqui Moly 2009 Anti-Friction Oil Treatment is a. When you turn off the engine the oil drips from the engines moving parts.
Best Line Oil Additive Engine Treatment. Engine Oil Fluid Additives. This oil additive is known to renew all seals without the occurrence of corrosion or damage.
Currently the best oil additive is the Lucas Pure Synthetic Stabilizer. Its top-rated oil additive. Best Sellers in Engine Oil Fluid Additives.
As a 100 percent petroleum product which has registered in EPA it will give the best cleaning power to you. Red Line Editors Choice for Conventional Motor Oils. 3Liqui Moly Cera Tec Friction.
Sea Foam Motor Treatment is one of the highest selling oil additives in America. You will be surprised to find out that Marvel MM13R Mystery Oil was used in WWII on. The benefit of doing it with AMSOIL is that the superior performance of the engine oil is fully tested and published in public data rather than having a mediocre name-brand oil in the truck with an expensive additive every standard-drain-interval oil change.
Lucas Oil Editors Choice for Synthetic Motor Oils. The Red Line 81403 Engine Break-In Oil. Archoil AR9100 Oil Additive 16oz for All Vehicles - Powerstroke Cold Starts Eliminates Injector.
Front Ceramic Brake Pads Kits 4pcs fit for Ford ExplorerRanger for Mazda B2300 98-01 for Mazda B2500 95-04 for Mazda B3000 95-09 for Mazda B4000 97-01 for Mercury Mountaineer 46 out of 5 stars3 24992499 Get it as soon as Fri Jan 29. Detroit Axle - 286mm FRONT Brake Kit Rotors Pads wHardware Kit Brake Kit CLEANER FLUID for 4WD 1995-2001 Ford Explorer - 1998-2002 Ranger - 1998-2002 Mazda B Series - 97-01 Mountaineer 43 out of 5 stars 24.
 2019 2020 Ford Ranger Power Stop Z16 Ceramic Front Brake Pads 16 2216
1-5 of 5 Results.

Brake pads ford ranger. Check here for special coupons and promotions. Check here for special coupons and promotions. An upgrade from factory pads AutoZones Ford Ranger brake pads maintain short shopping distances and produce less dust than factory ones.
Our prices are unbeatable and best yet all our products ship to your door one hundred percent free. Responsible for the majority of your vehicles braking performance a new set of brake pads for Ranger trucks restores your rides stopping power to its full extent. Your order may be eligible for Ship to Home and shipping is free on all online orders of 3500.
The brake rotors on a Ranger or other Ford trucks and SUVs do not have to be replaced as often as the pads unless the rotors have incurred scoring or warping damage. Order Brake PadsShoes for your 2001 Ford Ranger and pick it up in storemake your purchase find a store near you and get directions. 3 3 product ratings - New OEM Ford Ranger Front Brake Pads 2003-2009 Motorcraft BR-11438.
The only way to tell is to remove your front tires and inspect your pads. This video does not include the full details on how to replace the wheel. 2002 Ford Ranger Brake Pads.
Custom brake pads for your Ranger are easy to locate with our simple and easy-to-use vehicle selector. If they appear thin and worn down or if you see metal exposed and the braking surface gone then you definitely need new pads. BRF-16- BRF-41- DG1Z-2001-A DG1Z-2001-D Description.
Full Set of 8 Front Rear Brake Pads Fits Ford Ranger Explorer Fits. Ford Ranger 2020 Z36 Extreme Truck and Tow Carbon-Fiber Ceramic Front Brake Pads by Power Stop. 2022 Ford Ranger Testing Ahead of Rumored Year-End Arrival The upcoming Ranger is slotted to compete with segment competitors such as the Jeep Gladiator and Toyota Tacoma.
Quality Ford disc pads and brake shoes are tested and refined to help provide performance in stopping distance durability noise brake vibration and more. Buy online and pick up in store or get fast free delivery on qualified orders. If you suspect that the brake pads on your 2003 Ford Ranger need replacement you may hear squealing or grinding when you apply the brakes.
As the brake pads wear down the copper from the brake dust gets washed into streams and rivers harming the wildlife that January 15 2021 Spotted. Your order may be eligible for Ship to Home and shipping is free on all online orders of 3500. Video tutorial on how to replace the front brakes on a Ford Ranger 2wd with no ABS.
If you drive your truck like a truck by hauling loads or towing then you need the extra stopping power of Power Stops Z36 Truck and. When it comes to your Ford Ranger you want parts and products from only trusted brands. Duralast 1 Duralast Gold 2 Duralast Max 2 This is a test.
1-5 of 5 Results. Replacing the pads on the Ranger can be done right in the comfort of your own front or back yard. Disc Pads and Brake Shoes.
Shop AutoZone for 2002 Ford Ranger Brake Pads. Front Pads Disc Brake Pad Set Kit - Brake Lining More Names Replaces. They also help restore original-equipment performance.
The best part is our Ford Ranger Front Brake Pads products start from as little as 898. About Press Copyright Contact us Creators Advertise Developers Terms Privacy Policy Safety How YouTube works Test new features Press Copyright Contact us Creators. Advance Auto Parts has 54 different Front Brake Pads for your vehicle ready for shipping or in-store pick up.
Order Brake Pads for your 1993 Ford Ranger and pick it up in storemake your purchase find a store near you and get directions.
Tire pressure drops with the. Its a safety issue.
 5 Reasons Why Treating Your Winter Tires As All Seasons Is Dangerous Openroad Auto Group
There you have it.
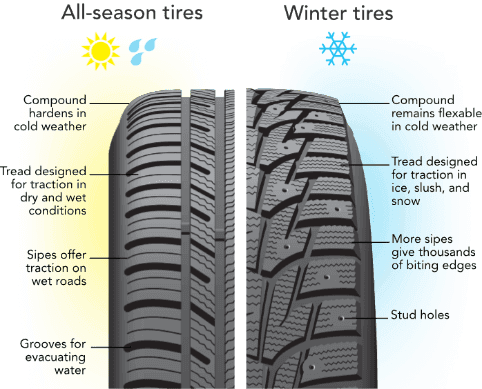
Driving winter tires in the summer. In this review of all-season tires for winter driving Consumer Reports casts a spotlight on tires that excel for snow traction and ice braking in five categories. Imagine if you needed to make a quick maneuver and your tires were soft and squishy. Whether youre driving on winter tires or all-seasons make sure theyre at the right tire pressure for your vehicle the numbers on the sticker inside the door.
The 2021 Mercedes Maybach S-Class. When faced with near- and below-freezing temperatures drivers should leave their summer performance tire-equipped vehicle at home and drive a vehicle equipped with all-season or winter tires. Summer and all-season tires are built to withstand warm temperatures providing long wear life.
Winter tires have soft tread compounds designed for winter use. When you have Les Schwab tires on wheels well do it for free. Reduction in fuel economy.
In one test a car wearing summer rubber took 47 feet to stop from only 10 mph while the car wearing winter tires managed. The wheels would turn and youd have some traction at lower speeds. For a race tire it might be 40 Fahrenheit.
The Risks of Driving Your Winter Tires in Summer Winter tires are designed work best in the cold and are less effective at dissipating heat so the risks of. Think About Your Summer Tires in the Winter grip on the track. The risks of aquaplaning also rise since winter tire treads dont shed water as effectively as those of summer or all-season tires.
When we took a Focus ST to Putnam Park outside Indy and ran it on both summer and. Tire engineers call it glass transition temperature. Winter tires all-season-tires and summer tires differ in the pliability and durability of their rubber at different temperatures.
But more and more people are after swapping summer tires for winter tires driving their luxury cars during a time of year when snow slush and ice sometimes cover the roadways and highways. In winter weather summer tires have poor acceleration. Tire Rack has done extensive testing on summer tires performance on ice.
Changing to summer tires. Swapping out winter tires for all-season or performance tires twice a year is easy. Winter tires or snow tires will outperform them on snowy roads.
CAA-Quebec conducted a study aimed at assessing the effectiveness of winter tires used in summer in comparison with that of all-season tires used during the same period. New-age luxury at its absolute finest. If you use winter tires in summer another thing to know is that youll end up paying more for fuel.
On warm pavement the rolling resistance of a winter tire is substantially higher than a summer or all-season tire. While they might look similar at first glance summer and winter tires are not at all the same. That means your tires wont channel snow slush or water as well.
Decreased performance - In warm weather winter tires wont provide the same handling capabilities as summer or all-season tires. Swapping Tires Can Be Easy and Free. Thats because the softer rubber compound changes shape more.
In hot summer weather they will generate an unnecessarily high amount of heat and increase the overall thermal load of the winter tire. Many high-end car owners put their rides away for the winter season. Since the rubber.
The rubber compound is much more flexible which affects how your vehicle handles and feels on the road especially when. This results in durability problems. With this new knowledge make sure to install all-season.
If you do use winter tires in the summer you can expect those tires to have less tread for the following winter. Get them cold enough and every tire will have the grip of a Formica kitchen counter. We may even be able to store your tires at select locations.
When the tread is too warm this will transfer to the tire structure says Bourassa. The Bottom Line on Driving Winter Tires All Year. You wont get the crisp response from a winter tire in warm weather.
Quite a bit would go wrong with your wheels though. Technically you could keep your winter tires on during the summer months and you could drive the car. Summer performance tires feature tread compounds engineered to provide traction in warm to hot ambient temperatures.
However weve found that winter tires have made strides to change the stigma of being unusable in warmer weather. Exposing the rubber in winter tires to heat increases the risk of a blowout which can cause the driver to lose control of the vehicle. If youre interested in pulling up to an event and driving straight out onto the track without having to change your tires the Direzza Sport Z1 Star Spec is one of the best.
The movement in the winter tires tread blocks also make for more movement in the tire and dont provide better grip. All-season performance all. Furthermore summer tires have low rolling resistance resulting in long brake distances on ice or snow.
A winter tire has deep tread with sipes that dig into snow and grip onto ice providing shorter braking times.
2000 thru 2011 Ford Focus. 2003 ford focus sw left rear driver side power window regulator 876a b26a.
 Window Crank Handle 2005 Ford Focus O Reilly Auto Parts
Push tool inward firmly to disengage spring clip.

Ford focus window crank. All you need is a couple of flat head screwdriversMightyMecha. Window Crank part Location. 2017 Ford Focus SEL All Engines One Touch UpDown Anti-Pinch.
2pcs Car Window Winder Crank Handle For Ford Transit Connect MK5 MK6 MK7 Escort Fiesta KA Focus MK1 MK2 Replacement. This is a quick video on how to remove a window crank very easily. Window Winder Crank Handle Gray Fits.
2013 Ford Focus ST All Engines With Manual Window Product Details Location. 42 out of 5 stars 13. How to install and remove ford ranger window crank.
Direct Fit Quantity Sold. Manual Crank Type Recommended Use. ACI 361312 Window Crank Handle.
FORD OEM 00-04 Focus-Window Crank Handle YS4Z6123342ACA Fits. How to install and remove ford ranger window crank. 2001 Ford Focus 35 out of 5 stars 2 product ratings 2 product ratings - Window Winder Crank Handle Gray Fits.
Insert Removal tool between crank handle and door lined up with the crank handle as shown in figure 1. 2004 Ford Focus 35 out of 5 stars 2 2 product ratings - Window Winder Crank Handle Gray for 2000 thru 2011 Ford Focus. Sold individually Anticipated Ship Out Time.
OE Replacement Series. Get it as soon as Thu Oct 8. Same day - 1 business day.
42 out of 5 stars 107. Manual Crank Type Recommended Use. Side Window Crank Handles Gray fits 2008-2011 for Ford Focus4PCS 1355 13.
Window Crank Tool Method. Set of 2 1 Sold individually 1 Shop Ford Focus Window Crank. New Product Fit.
Motorcraft OE Replacement Condition. 2012 Ford Focus Titanium All Engines With Manual Window Product Details Location. For Ford Focus Inside Interior Window Crank Handle Gray Left and Right Side Fits.
2X 45 BLACK BILLET ALUMINUM WINDOW CRANK HANDLE WINDER FOR TRUCK AUTO PICKUP. Dont ask me how but in the process i broke the metal shaft that goes from the crank to the door. I bought this for my partners 2001 Ford Focus ZX3 which is a 2-doorhatch back.
Showing 1-2 of 2 results. Front Power Window Regulator Passenger Side Right RH NEW for 00-07 Ford Focus. Ford Focus Window Crank.
Rear Driver Side Manual Window Regulator Manual Crank Type. I have manual windows so i had to take the crank off. 2000 thru 2011 Ford Focus Fits.
2017 Ford Focus Titanium All Engines One Touch UpDown Anti-Pinch. Just make sure you buy the right regulator for the body style of your car. 2005 Ford Focus 1999.
Motorcraft OE Replacement Condition. 2004 Ford Focus 583. Okay so awhile ago i put some new speakers in my focus.
Here is a quick video on how to remove a manual roll down window handle with no special tools. Dorman 767MX Window Crank Handle for Select Ford Models Black. The window crank post broke off of the old one so had to replace the entire regulator.
Front Driver Side Type. Try to work the rag in between the crank and the door panel. Window Crank Handle Inside Interior Left LH Right RH 2PCS For 08-11 Ford Focus Fits.
Sold individually Anticipated Ship Out Time. Retain Spring clip so you dont lose it. Since then ive tried to JB Weld it 3-4 times with no great success.
Same day - 1 business day. Front Or Rear Driver Or Passenger Side 1 Front Or Rear Driver And Passenger Side 1 Quantity Sold. OE Replacement Series.
2x 12038mm Silvery Window Crank Winder Door Handle Left Right With 6 x fix ring. PT Auto Warehouse FO-1063O - Inside Door Window Crank Handle Chrome with White Knob - Left or Right. Guaranteed to Fit 6261.
The new regulator fit perfectly and all of the holes lined up. Direct Fit Quantity Sold. FORD Focus Window Regulator Repair Clip KIT FRONT LEFT Driver Side 00 07 C17 Fits.
Front Driver Side Type. Window Winder Crank Handle Gray for 2000 thru 2011 Ford Focus Fits. For 2005-2007 Ford Focus Window Crank Handle Dorman 77157PM 2006 Fits.
Select your vehicle year. FREE Shipping on your first order shipped by Amazon. 2003 Ford Focus 922.
41 out of 5 stars. New Product Fit. Automotive 618 6.
2003 Ford Focus 956. 2005 Ford Focus Interior Door Handle. This is something anyone could do in any situation regardless of skill level.
During the times you spend covering the miles in comfort and style look to AutoZone for quality replacement crankshaft kit for Ford Focus. New main and rod bearings to the crank are included when you choose a Focus crankshaft kit from AutoZone and that means eliminating the uncertainty of guessing the correct sizing. 18 1051.
This can build up excessive heat inside the motor and cause serious engine damage. Mine developed a leak after 3 months.
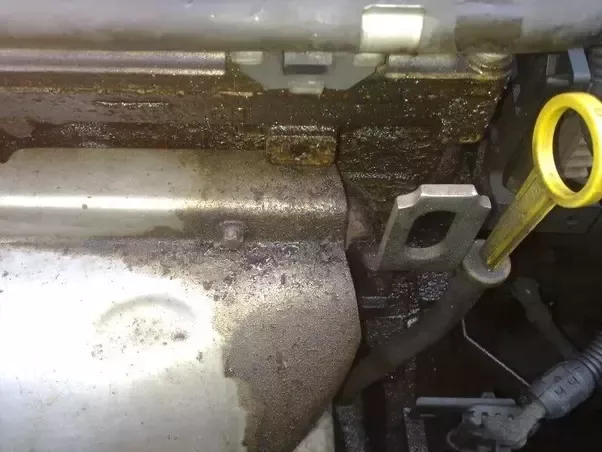 What Are Some Problems With The Valve Cover Gasket Quora
A leaking valve cover gasket can eventually lead to a low engine oil level.
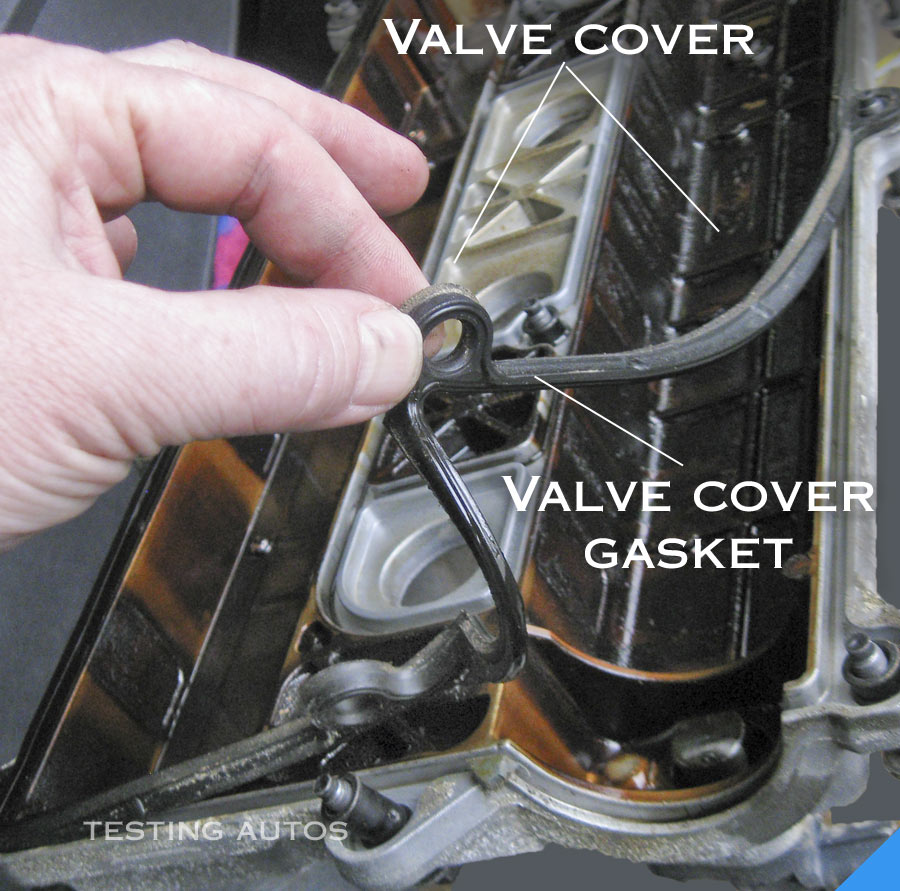
Valve cover gasket leak. Your car may have 1 or 2 valve covers depending on its configuration. Valve cover gasket location inspection. If the engine oil is low it will reduce its ability to properly lubricate internal engine components.
Replace the Old Gasket. Valve cover gasket is leaking Inspection Service Typically made from rubber or cork a valve cover gasket helps seal the gap between the valve cover and the top of the engine. Over time it becomes brittle and will crack due to exposure to dirt.
Peel off the old gasket and clean the valve cover with brake cleaner and clean rags. When oil leaks from the valves covers it will usually land on a hot part of the engine like the exhaust manifold and cause a burning oil smell. When this gasket is in place it prevents oil from leaking out onto the outside of the engine.
Fixing my self replaced valve cover gasket and vacuum pump o ring. For example see this photo. Over time the gasket becomes brittle from the engines heat or the bolts loosen creating an engine oil leak.
What Happens if My Valve Cover Gasket is Leaking. If not replaced in time. It can lead to complete engine failure.
This issue is often discovered during the spark plug replacement. When this occurs it can lose its integrity and leak. Your valve cover gasket may be leaking for a variety of reasons.
Smoke can then waft into the cabin. Debris heat and other elements. A little bit of RTV and I mean a LIGHT bead on the bottom of the gasket let it skin up finger tight the cover bolts let it sit again then torque it down and it has solved the leaks.
Between this valve cover and the cylinder head there is a gasket that keeps engine oil from leaking out. It could be shrunken cracked or rotten or your valve cover itself may be cracked or broken or one of the valve cover bolts may just be loose allowing a little leak. The quickest indication of this problem is when the valve.
2013 f150 oil leak. The valve cover bolts keep the gasket compressed thus preventing leaks. The telltale sign of a valve cover gasket that has lost its seal is an oil-covered valve cover or a burning oil smell when the engine is running.
That leads to a risk of fire though its pretty slim. Sometimes oil leaks from a valve cover gasket are clearly visible. Start the job by removing the decorative plastic cover on the top of the engine if.
Most valve covers will start leaking slowly without any effect on the engine. The valve cover is typically mounted to the cylinder head through a series of bolts and a rubber gasket. If the valve cover becomes loose or if the gasket material fails the oil will begin to leak.
Locating oil leak sources can be tricky. This will cause more friction from the moving components of your engine which generates more heat in there. I also disagree a bit on replacing a valve cover gasket.
However on some cars a leaking valve cover gasket could mean oil leaking onto the exhaust manifold or some other hot item. There could be oil falling onto the exhaust pipes or cylinder head causing the oil to burn excessively. The cover is nice but the replaceable gaskets are hit and miss.
Gaskets can fail over time and you may notice oil leaking oil from or around your valve covers. You can see that oil is seeping out from under the valve cover. So The valve cover gasket is very delicate and prone to oil leaks.
Scotty Kilmer mechanic for the last 46 years and counting shows how to change a valve cover gasket on your engine. Once again this depends on the engine. In some cases a leaking valve cover gasket or O-ring may result in oil getting into the spark plug well.
When this happens frequently it can cause the Engine Oil Light to appear on your dashboard. As oil leaks from the valve cover gasket it leaves the oil pan. Finding Valve Cover Gasket Leaks Is Easier Than You Think.
I have a leak at the turbocharger - Answered by a verified Ford Mechanic. Low Engine Oil When you have an oil leak in your valve cover gasket it means there will be less oil in your engine. During most oil changes the technician will inspect the valve cover to see if there is any leaking oil coming from the valve cover gasket.
Remove the Leaky Valve Gasket Cover. Some engines do not use a gasket but instead they use silicone sealant. They are sealed with a gasket against the cylinder head.
As oil leaks from a valve cover it can contact a hot exhaust manifold and burn. If the leak is severe and you ignore it the engine may run low on oil causing internal damage. OEM are integrated into the valve cover.
The valve cover gasket can leak oil down on to the hot exhaust manifold resulting in a burning smell. One little crack in the valve cover gasket will cause oil to leak through and fall onto other components of the engine.