Complete video instructions to add transmission fluid to a 2002 Mitsubishi Galant ES 24L 4 Cyl. Posted by jadebay2000 on Oct 04 2008.
2002 Mitsubishi Galant DE 4-Door Sedan 24L Automatic Transmission 2002 Chevrolet Malibu 4-Door Sedan 2002 Dodge Stratus SE 4-Door Sedan 2002 Volkswagen Jetta GL 4-Door Sedan Automatic Transmission Customer Ratings 40 out of 5 stars 12 40 out of 5 stars 9.

2002 mitsubishi galant transmission. 2002 Mitsubishi Galant transmission problems with 1 complaints from Galant owners. The average price of a 2002 Mitsubishi Galant transmission fluid change can vary depending on location. The worst complaints are power trainautomatic transmission.
Problem with your 2002 Mitsubishi Galant. Research compare and save listings or contact sellers directly from 116 Galant models in Hayward. Find the engine specs MPG transmission wheels weight performance and more for the 2002 Mitsubishi Galant Sedan 4D ES.
When and how to check fluid level engine should be running. 431 - 101610 Motorcraft Full Synthetic Manual Transmission Fluid 1 Quart. Our list of 9 known complaints reported by owners can help you fix your 2002 Mitsubishi Galant.
We are changing the filter fluid and pan gasket where is the fiter located. Follow these steps to add transmission fluid in a 2002 Mitsubishi Galant ES 24L 4 Cyl. 2002 Mitsubishi Galant Transmission Torque Converter.
2002 Mitsubishi Galant CV Axle 2002 Mitsubishi Galant Repair Manual - Vehicle 2002 Mitsubishi Galant Transmission Mount 2002 Mitsubishi Galant VehicleTransmission Speed Sensor Related Accessories Collision Body Parts and Hardware Motor Oil Transmission Fluid Test Scan and Specialty Tools Filters and PCV Seat Covers Seats and Accessories. We currently carry 6 Automatic Transmission Fluid products to choose from for your 2002 Mitsubishi Galant and our inventory prices range from as little as 799 up to 2999. Get a free detailed estimate for a transmission repair and replacement in your.
Detailed features and specs for the Used 2002 Mitsubishi Galant including fuel economy transmission warranty engine type cylinders drivetrain and more. 2002 Mitsubishi Galant Transmission Oil Cooler Hose. The average price of a 2002 Mitsubishi Galant transmission repair and replacement can vary depending on location.
Transmission filter location2002 mitsubishi galant. Free shipping on many items Browse your favorite brands affordable prices. For both automatic and manual transmissions.
2002 Mitsubishi Galant Transmission Seal. Find the engine specs MPG transmission wheels weight performance and more for the 2002 Mitsubishi Galant Sedan 4D GTZ. AutoZone Locations Vehicle Make Vehicle Model Vehicle VIN Lookup Gift Cards Discounts Coupons Local Store Ad.
Read reviews browse our car inventory. On top of low prices Advance Auto Parts offers 3 different trusted brands of Automatic Transmission Fluid products for the 2002 Mitsubishi Galant. 2002 - 2003 Mitsubishi Galant Automatic Transmission 24L 4 Cylinder 140K Fits.
Mitsubishi Galant 24L 30L 2002 Professional Full Synthetic Dexron VI Automatic Transmission Fluid by ACDelco. ACDelco DEXRON-VI Automatic Transmission Fluid is the most recent release in the well-established DEXRON series of. Mitsubishi Galant 24L 30L USA Built 2002 D4 ATF Full Synthetic Automatic Transmission Fluid by Red Line.
Lets take a closer look. Both of these types of brakes require specialized experience and dont perform well in water or extremely cold conditions.
 Spec Ing Trailer Brakes Know The Uses Know The Laws Trailer Body Builders
While less expensive when buying the trailer electric brakes will require a brake controller at the dash of the tow vehicle adding an expense if the tow vehicle isnt already equipped.
Types of trailer brakes. SAE J560 is typically used on heavy duty trucks and trailers with pneumatic brakes where only the power to the ABS unit and indication of braking by brake light signal is required. Surge brakes require no electrical connection from the towing vehicle. Air-actuated electric brake controller This controller uses the air pressure of the brake system on a vehicle with pneumatic brakes to provide a current to control the electric brakes of a trailer.
But to simplify the conversation there really are just two main types of brake controllers to choose from. Proportional controllers and time-delayed controllers. Types of Travel Trailer Braking Systems Electric Brakes.
Not all trailer brakes are capable of wheel lockup. Trailer brake controllers can be split into two main categories. Time-delayed or stable state brake controllers and proportional ones.
Includes electric brake assemblies hubs drums bearings races seals and mounting. A guide to trailer brakes Override brakes. Trailer axle measures 89 from hub face to hub face and 74 from spring center to spring center.
Using a brake controller while towing a trailer involves setting up the controller adjusting to the load size adjusting braking sensitivity manually activating the trailer brakes and possibly choosing a few personal settings. Electric Over Hydraulic Brakes use an electrically powered actuator that is controlled through the tow vehicles braking system which allows the actuator to create the hydraulic pressure to slow and stop the trailer. The brakes themselves are controlled using air pressure.
Of your wheels the brake type and the aforementioned lengths. Boating enthusiasts would say that hydraulic surge brakes are the simplest to use for boat trailers. Hydraulic Surge Brakes use momentum and resistance.
Hydraulic actuated electric controller. Surge brakes remove safety hazards in the water and with operators who arent familiar with other trailer brake systems. This is thanks to the internal accelerometers that proportional controllers use to monitor your vehicles speed and braking force.
As the vehicle stops the trailer surges forward which allows the actuator to create hydraulic pressure to slow and stop the trailer. Mechanical override brakes use the tow coupling to manually pull a cable connected to the trailers. Disc brakes can replace most drum systems with minimum modifications and offer the following advantages over drum brakes.
A proportional controller uses a sensor to determine the intensity of the tow. The surge brakes use the trailers momentum and own weight which pushes against a hydraulic cylinder when you step on the towing vehicles brakes. In this guide we will unpack how a trailer brake controller works and the steps involved in how to use a brake controller while towing with trailer brakes.
This system functions on pre-determined braking capacity that is set by the user and is based on the weight of the trailer plus the weight of the anticipated cargo. Fundamentally a lot of experts highly recommend them on trailers that are graded for 1500 pounds and beyond. Which Boat Trailer Brake Type Should I Use.
Boat trailer brakes need to be marine grade and the electrical components have to be sealed against water intrusion. The least expensive brakes to install on the trailer are electric drum brakes. Trailer brakes are either disc or drum brakes.
Self-cleaning and lower maintenance. In addition in the US you need to have what is called a breakaway system. Surge type travel trailer brakes.
Dexter Axles Dexter axles are made of high-strength steel and come with spindles and spring seats welded on. Electric brakes and surge brakes. Brakes for boat trailers could be hydraulic electrical or mechanical in form.
Loading conditions brake type wheel and tire size can all affect whether a brake can lock. There are two types of trailer brakes. The rate of your trailer braking is proportional to the rate of your tow vehicle brakes.
The first surge brakes operate on an automatic hydraulic braking system. There are a different types of brake controllers that are currently or previously on the market. The actuating cylinder.
The other types of brakes found in trailers are electric trailer brakes and air brakes. On a travel trailer you will typically find 2 types of brakes. A hard stop is a hard stop and a soft stop is a soft stop every time.
They are automatically applied by the brake controller and can be manually operated by a manual. Better resistance to fade when descending a mountain pass or in stop-and-go traffic. Some states require brakes to be equipped on trailers with a total weight of more than three thousand pounds.
Therefore a surge braking system does not require a brake controller to function. According to the California Department of Motor Vehicles most travel trailers use electric brake. Adjust the controller just to the point of impending brake lockup and wheel skid.
If the trailer brakes lock and slide decrease the gain setting.
QINCHYE 2 Keyless Entry Remote Control Car Key Fob Fits for Nissan Maxima 2000-2003 for Nissan Altima 2000-2005 for Nissan Sentra 2000-2006 for Nissan Xterra 2002-2004 Buttons Replace NI04T 1195 11. Made with 1K plain weave carbon fiber finished off with high gloss clear-coat.
![]() 2000 Nissan Maxima Key Fob Keyless Remote Car Keyfob Control Transmitter Clicker 28268 4z400 Fcc Id Nhvbu427 Pre Owned 261po1
2000 Nissan Maxima Key Fob Keyless Remote Car Keyfob Control Transmitter Clicker 28268 4z400 Fcc Id Nhvbu427 Pre Owned 261po1
It has four buttons.
2000 nissan maxima remote. See the 2000 Nissan Maxima SE in San Rafael CA for 4896 with a VIN of JN1CA31D2YT761901. DIYSAVE10 Online Ship-to-Home Orders Only. Check here for special coupons and promotions.
Nissan Maxima 2000 Carbon Fiber Key Cover by AutoTecknic. 2000 Nissan Maxima We strive to provide convenience to our customers with free keyless entry remote fob programming instructions for every single vehicle that we sell on NorthCoast Keyless. Sometime it just fell asleep but the trunk and panic button works all the time.
Buy Car Key Fob Keyless Entry Remote fits 2000-2001 Nissan Maxima 2000-2001 Infiniti i30 NHVWBU43 Set of 2. If you need the best 2000 Nissan Maxima security system you will easily find it here. Guaranteed High Quality OEM Battery Installed and Ready to Work with Your Vehicle.
Need a new NISSAN MAXIMA keyless remoteSavings up to 75 OFF dealership price. Nissan key fob FCC ID NHVBU427 keyless remote car keyfob 28268-4Z400 control transmitter clicker Pre-Owned 261po - This is ONE 1 Pre-Owned ready to program with ba. Your order may be eligible for Ship to Home and shipping is free on all online orders of 3500.
1-2 of 2 Results. Therefore I concluded that it is not the fob. 1-2 of 2 Results.
Browse our selection of Maxima transponder chip keys key fob controls. Click here to watch the video and learn how to program your keyless remote. Purchase Lightly Used and Save 80 OFF Dealer Prices.
2000 Maxima Keyless entry The functions lockunlock remote fob doesnt work reliability. Turn the key to the OFF position remove keys from the ignition unlock doors using the drivers side power lockunlock switch and open the driver side door. This factory OEM Original Equipment Manufacturer device is a transmitter that operates your vehicles Remote Keyless Entry System.
For 2000-2006 Nissan Maxima Remote Key Transmitter Dorman 54956HM 2001 2002 2003 Fits. This product is guaranteed to work with your 2000 Nissan Maxima Keyless Entry Key Fob Remote system or your money back. Find great deals on eBay for 2000 nissan maxima remote.
Dress up your key with the genuine carbon fiber key cover from AutoTecknic. New Keyless Entry Remote Key Fob for 2000-2001 Nissa Maxima 2000-2001 Infiniti I30 NHVWBU43 Complete key fob with electronics and a battery Price3295 9. 2000 Nissan Maxima 1566.
2000 Nissan Datsun Maxima Remote Keyless Entry. The following vehicle can use this remote when equipped with the factory keyless entry system. Your order may be eligible for Ship to Home and shipping is free on all online orders of 3500.
2000 Nissan Maxima Remote Start System Wiring Whether youre a novice Nissan Maxima enthusiast an expert Nissan Maxima mobile electronics installer or a Nissan Maxima fan with a 2000 Nissan Maxima a remote start wiring diagram can save yourself a lot of time. 2000 Nissan Maxima 5796. Order Starter Solenoid for your 2000 Nissan Maxima and pick it up in storemake your purchase find a store near you and get directions.
1Set Car Remote Control Central Kit Door Lock Locking Keyless Entry System New Fits. FREE Maxima remote programming instructions and videos available on our website up to 2006. LOCK UNLOCK TRUNK and PANIC.
2000 2001 NISSAN MAXIMA. The Nissan logo is engraved on the front of the clicker just above the sturdy key loop which keeps the remote fixed to your keychain. I have tried new battery new fob.
Original Factory Nissan Remote. Order Power Steering Pump for your 2000 Nissan Maxima and pick it up in storemake your purchase find a store near you and get directions. Car Keys Express 1 Remotes Unlimited 1 This is a test.
Purchase a replacement Nissan Maxima Remote key fobs from us and save. 2000 Nissan Datsun Maxima Remote Keyless Entry. Check here for special coupons and promotions.
It is the receiving end inside the car and just the lockunlock features only. CARiD is a great place to find all possible parts and accessories for your vehicle.
Battery Tender Junior Charger and Maintainer. So in theory you might be able to charge the battery that way but it would be slower charging than with an alternator as youd have to limit.
 Best 5 Cigarette Lighter Jump Starters How To Use Them Best Jump Starter Of 2020
So youll appreciate this sleek compact jump starter that lets you power up your car without leaving the drivers seat.

Battery charger through cigarette lighter. Generally speaking cigarette lighter ports are bi-directional thats how memory keepers work. Smart Charger 21 Battery Charging Accessories 12 Battery Terminal 12 Battery Cable 10 Jump Starter 8 Jump Starter and Charger 6 Battery Maintenance Accessories 3 EV Charging 3 Solar Battery MaintainersChargers 3 Traditional Charger 3 Battery Charger 2 Battery Clamp 2 Battery Top Up Water 2 Battery Switch 1. Permanent on Battery Terminals 9 Cigarette Lighter Connections 10 Charging a Battery The different types states of battery charge 4 Stages 11 How to rejuvenate a weak battery 12.
The current from an alternator can go up maybe as high as 50A. It may require setting the ignition switch to accessories The charge rate must be kept low enough not to blow a fuse associated with the lighter socket often 10 Amps. When the Mighty Jump is plugged into the dashboard cigarette lighter it transfers power to the car battery using the internal wiring of the vehicle.
Vocational Technical or Trade Scho. Your car battery can be charged through the 12v socket cigarette lighter socket. The universal comfort indicator has a 40cm cable and fits both 12mm and 21mm sockets.
Fits 12mm and 21mm sockets. 12V 125 Amp Powersport Battery Charger and Maintainer for Motorcycles ATVs UTVs and More - Smart 12 Volt. In case your car is newly manufactured and misses the charger you can always buy it online.
If charging were limited to less than 10 amps would solar panel - charge controller - cigarette lighter outlet work for charging a car battery. Many automobiles have their cigarette lighter outlets wired so that the outlets only work when the automobiles are running. Automatic 12V Powersports Battery Charger and Maintainer for Motorcycle ATVs and More - Smart 12 Volt 750mA Battery Float Chargers - 021-0123 Battery Tender Plus Charger and Maintainer.
Carviya 12V 24V 16 AWG 15A 20A Male Plug Cigarette Lighter Adapter Power Supply Cord with 3M 10FT Cable Wire For Car inverterAi. Yes it is possible to charge the battery through a cigarette lighter socket but there is a couple of caveats. When a shop needs to change your battery they plug one of these into a cigarette lighter port then take the battery out.
If you charge through the cigarette lighter theres no protection other than the fuse which can go from 5A to 20A but the circuit might not take more than 5A for very long. 10FT long SPT-2 16AWG Red Black Heavy Duty 100 Copper Wire. The only negative that this clip-on cable has is the fact that it.
You dont have to open the hood or get a buddy drive up with his or her car. Not a great idea. MOTOPOWER MP69000A 10FT 16AWG Heavy Duty Male to Male Cigarette Lighter Plug Cable Battery Charger Cord with LED Lights and Fuse Protection On Both Plugs Fire Resistant Plugs.
The 12v solar rechargeable battery is known to adopt the monocrystalline silicon solar cell which provides you with a great 20 percent high photoelectric conversion rate. A 12 volt Cigarette lighter plug can do it easily. A car battery is normally charged from the alternator and theres a voltage regulator to prevent overcharging.
This is how you can use the car battery charger through cigarette lighter and charge the battery. If youre a little creative with cables just create something through the ciga. The most common way of connecting a battery charger to a battery for temporary use.
Its also very easy to install this battery charger as the only thing you need to is to insert it in 12v cigar lighter and connect it to the battery with the alligator clip. Additionally you can make use of the cigarette lighter concept to charge all the essentials and make the driving experience comfortable. A power accessory outlet may also be used as a means to trickle charge an automobile battery.
The traditional method to charge a deep cycle battery is with a battery charger. Cigarette lighter battery powered trickle charger marketplace 351 Only. Thats peace of mind thats ready at the jump.
CTEK Comfort Indicator Cigarette Plug Extra Info. The cars circuitry must have the lighter socket live. A 12 volt Cigarette lighter plug can do it easily.
I have a solar panel charger which I connect direct to the battery every 3 weeks or so as it is a 1 amp supply which sits along the full length of the rear parcel shelf with the cable round the side of the rear seat from Maplins use it on all of my cars while not in use yes it does have diode protection so can stay connected over night. Charging your battery with Cigarette Lighter Socket Using your vehicles cigarette lighter socket to charge your deep cycle battery can be considered an emergency measure for a battery that might need charging between journeys. If you solar system can not raise the voltage of your battery to its rated voltage.
Compatible with all CTEX chargers up to 10A. However power accessory outlets are usually hardwired to the battery and are always active. The cigarette lighter works but when I plug in a 12 volt charger for a GPS or Cell Phone it immediately either destroys the charger or blows the fuse in the charger if it has o read more.
6495 previous price 6495. Every used car for sale comes with a free CARFAX Report.
 34k Mile 2001 Mercedes Benz E320 4matic Wagon For Sale On Bat Auctions Closed On August 15 2018 Lot 11 655 Bring A Trailer
5 out of 5 stars Comfort.
2001 e320 mercedes benz. 5 out of 5 stars Interior Design. 2001 Mercedes Benz E class OEM Owners Manual Set E320 E430 E55 AMG Leather kit. White LED Light Door Sills Scuff Plate fit for Mercedes-Benz E-Class W210 W211 Fits.
You will love this 2001 Mercedes-Benz E class. Find the best Mercedes-Benz E-Class E 320 for sale near you. After a face-lift and a raft of new features last year Mercedes most popular model line in North America sees little change for 2001.
6400 previous price 6400 750 shipping. Get 2001 Mercedes-Benz E-Class values consumer reviews safety ratings and find cars for sale near you. Find the best used 2001 Mercedes-Benz E-Class near you.
Get KBB Fair Purchase Price MSRP and dealer invoice price for the 2001 Mercedes-Benz E-Class E 320 AWD Wagon 4D. See pricing for the Used 2001 Mercedes-Benz E-Class E 320 AWD Wagon 4D. Our list of 54 known complaints reported by owners can help you fix your 2001 Mercedes-Benz E320.
View all 31 consumer vehicle reviews for the Used 2001 Mercedes-Benz E-Class E320 Rwd 4dr Sedan 32L 6cyl 5A on Edmunds or submit your own review of the 2001 E-Class. PS My car has 130000 miles on it. Learn more about the 2001 Mercedes-Benz E-Class.
See pricing for the Used 2001 Mercedes-Benz E-Class E 55 AMG Sedan 4D. 5 out of 5 stars Value for the Money. Search from 16 Used Mercedes-Benz E 320 cars for sale including a 2001 Mercedes-Benz E 320 4MATIC Sedan and a 2001 Mercedes-Benz E 320 Sedan.
We have 17 2001 Mercedes-Benz E-Class vehicles for sale that are reported accident free 8 1-Owner cars and 29 personal use cars. 2DIN Rotatable 101 Android 91 HD GPS WIFI Quad-core 2GB32GB Car Stereo Radio Fits. The Used 2001 Mercedes-Benz E-Class Wagon is offered in the following styles.
Save up to 21325 on one of 4608 used 2001 Mercedes-Benz E-Classes near you. 2001 Mercedes-Benz E320 6174. Save 9794 on a 2001 Mercedes-Benz E-Class E 320 near you.
See good deals great deals and more on Used 2001 Mercedes-Benz E 320. Every used car for sale comes with a free CARFAX Report. The E-Class returns as a four-door sedan and a station wagon.
We have 102 Mercedes-Benz E-Class E 320 vehicles for sale that are reported accident free 34 1-Owner cars and 139 personal use cars. Get KBB Fair Purchase Price MSRP and dealer invoice price for the 2001 Mercedes-Benz E-Class E 320 Sedan 4D. Read reviews browse our car.
Detailed features and specs for the Used 2001 Mercedes-Benz E-Class E320 including fuel economy transmission warranty engine type cylinders drivetrain and more. Get KBB Fair Purchase Price MSRP and dealer invoice price for the 2001 Mercedes-Benz E-Class E 55 AMG Sedan 4D. Naturally those are found in all 2001 Mercedes-Benz models as are curtain side airbags the Brake Assist system traction control the ESP electronic stability control system and the Tele Aid.
2004 AMG E55 Mercedes-Benz W211 E320 E500 Light Range Control Module 2118203226. See the 2001 Mercedes-Benz E-Class E320 in Jacksonville FL for 1988 with a VIN of WDBJF65J51B388922. We analyze millions of used cars daily.
Search over 12100 listings to find the best local deals. See pricing for the Used 2001 Mercedes-Benz E-Class E 320 Sedan 4D. E320 Rwd 4dr Wagon 32L 6cyl 5A and E320 4MATIC AWD 4dr Wagon 32L 6cyl 5A.
Find your perfect car with Edmunds expert reviews car comparisons and pricing tools. Problem with your 2001 Mercedes-Benz E320.
As a result the Coil On Plug Ignition System. As with most types of vehicular maintenance youll want to begin the test.
/GettyImages-637294740-5bb95c3146e0fb005132f75d.jpg) Testing An Ignition Coil On A Car
Testing An Ignition Coil On A Car
Take help from your partner or someone else and ask them to start the ignition.
/coil-secondary-57a4f76b5f9b58974a8412eb.jpg)
How to test coil on plug. Remove one spark plug wire from its plug. Remove the spark plug using. Next remove one of the spark plugs wires from the plug itself.
When the key is turned on you should see a bright blue spark at the end of the spark plug. How to perform a spark output check on a coil over plug ignition coil. Replace the 4 ignition coil.
If you back-probe the two-wire coils ground circuit at the PCM connector and look for battery voltage with the engine warmed up but not running KOEO that tells you something about the entire circuit. Turn the vehicle off and open the hood. To test these circuits its not necessary to unplug the ignition coils connector.
Directly on the top of each spark plug. The only safe way to test for spark is to use a spark plug tester tool. Connect your multimeter to the positive terminal or pin of your coil and to the high output terminal that goes to the spark plug.
You will recognize these coils immediately as they sit directly on top of the engines valve or cam cover are bolted down and attach directly to the spark plug via a rubber boot. As Ive already mentioned the type of Coil on Plug ignition coil that well be testing has two wires in its connector. Test the secondary circuit of the ignition coil.
Use a Coil-on-Plug COP Probe. This step involves connecting the positive terminal of your ignition coil to your digital multimeter and then to the high output terminal which runs to the spark plug. Understanding three and four-wire coil circuit design and operation.
The testing of these two circuits is done in part while the engine is being cranked. 1 Remove the Coil-On-Plug COP coil that you need to test. Then start the engine and watch the tester window.
Ignition timing is handled by the ECU based on inputs from various sensors. HOW TO TEST AN IGNITION COIL WARNING. Plus using a spark tester is safer than grounding a plug.
Itll be necessary to disconnect the COP coil from its electrical connector to remove it. Besides risking a severe shock an open plug wire or coil wire will increase the voltage demands on the coil to the point where it may damage the coil. Eliminates the need for distributors and spark plug wires.
A reading over the specification signals that the ignition coil is open which would also indicate a need to replace the coil. Never pull off a plug wire or the coils high voltage output wire to test for a spark. To test the operation of both the ignition coil and the spark plug connect the tester between the spark plug boot and the spark plug.
Hold the plug wire using insulated pliers and allow the bare end of the spark plug to touch a grounded surface. Such an exposed metal area. How to perform a relative compression test.
With the Coil On Plug Ignition System. How to perform a cylinder drop test power balance test to identify a misfiring cylinder. The majority of the ignition coils usually have a secondary resistance of about 6000 to 10000 ohms.
Check engine light P0304 misfire. Involves testing your secondary circuit of the ignition coil. The Coil On Plug Ignition System places an ignition coil.
The following testing instructions assume that you already have a specific cylinder in mind to test. Testing these circuits can be accomplished in several different ways. Test the secondary circuit of the ignition coil.
Many techs will test a coil primary winding with an ohmmeter but that only checks the coil itself when its cold.
CV axles fail often as a result of damaged CV joints which are at either end. See illustrations Pry the inner CV joint out of the transaxle or on models so equipped the intermediate shaft using a large screwdriver or pry bar.
 Amazon Com For Honda Civic 2006 2007 2008 2009 2010 2011 Pair Front Cv Axle Shaft Buyautoparts 90 904642d New Automotive
Order CV Half Shaft for your 1997 Honda Civic and pick it up in storemake your purchase find a store near you and get directions.

Honda civic cv joint replacement. How to replace Honda civic CV joint and rubber boot from start to finish videoDisclaimerDue to factors beyond the control of backstreetmechanic It cannot g. The average cost for a Honda Civic CV joint replacement is between 960 and 995. Your order may be eligible for Ship to Home and shipping is free on all online orders of 3500.
All genuine Honda CV Joints from us are shipped directly from authorized Honda Dealer. Honda Civic CV Axle Shaft Assembly Replacement costs 259 on average. MAXFAVOR CV Joint Axle Assembly Front Pair Set of 2 Premium CV Axles Replacement for Honda Civic Coupe Sedan Standard Trans 18L 30 out of 5 stars 4 12719 127.
Wildly popular since its American debut your Honda Civic still steals the show wherever you drive thanks to for its top-notch quality combined with modest running expenses. Dorman OE Solutions Outer CV Joint Solvent Welded Split Boot Kit. Check here for special coupons and promotions.
Some fluid may leak out of the transaxle when you remove the inner CV joint. Yes i did this in 10 minutes. Ive run across a 1981 Honda Civic where the inner CV Joint latched inside the transaxle with thin snap rings Once you drained the motor oil from the transmission just simply pry the end from the transmission box and the spline would slide out with the ring on the end to the internally connected of a 1996 Isuzu Rodeo where you.
This range does not include taxes and fees and does not factor in your unique location. Related repairs may also be needed. The average cost for CV boot replacement is between 336 and 383.
A Honda CV Joint needs to be kept in good working condition in your vehicle. The removal of the cv joint replacenent of rubber boot and refit of cv joint on 1997 honda civicDisclaimerDue to factors beyond the control of backstreetmech. Honda Civic CV Axle.
Either the two CV joints on a drive axle can be replaced separately if necessary. SET-A1664250-F A1 Cardone Set of 2 CV Joint Axle Shaft Assembly New LH RH Pair. CV Axle Assembly Front Right GSP NCV36569 fits 06-15 Honda Civic.
This range does not include taxes and fees and does not factor in your unique location. A CV joint replacement cost will generally be the same or more as having the axle shaft replaced and this cost will depend on it being a single or a double replacement. Related repairs may also be needed.
That involves removing the axle removing the axle boot and then the joint installing a new joint new grease and the boot then reinstalling the axle in the vehicle. Labor costs are estimated between 135 and 170 while parts are priced at 825. CV axles have an inner joint and an outer joint.
Honda Civic 2005 OE Solutions Outer Quick Type Polyurethane CV Joint Solvent Welded Split Boot Kit by Dorman. The CV Joint Boots provide various methods of eliminating the removal of the CV joint during installation. The online catalog we provide will get you through the ordering process safely and securely.
Labor costs are estimated between 173 and 218 while parts are priced between 163 and 165. Without any editing the raw video was actually less than 10 minutes excluding having the bolt loosened earlier with an impact e. Support the outer end of the drive axle with a piece of wire to avoid unnecessary strain on the inner CV joint.
CV Axle Assembly Front Left GSP NCV36568 fits 06-15 Honda Civic. CV Axle Shaft Assembly Replacement Estimate for Honda Civic. Replacement axle shafts can be purchased for between 96 to 214 each while the cost can be between 168 to 799 when both parts and labor are involved.
For the cost reasons this is almost never done. AUTOSAVER88 Front Lower Control Arm Compatible with 2001-2005 Acura EL and 2001-2005 Honda Civic Sedan Coupe - wBall Joint Tie Rod End and Stabilizer Link ATCAA025 45 out of 5 stars 133 10999. Ensure your drive shaft is functioning at its optimum level by replacing your Civic CV axle at AutoZone.
Following is a breakdown of the labor and parts estimates.
When changing the front differential fluid it will cost you anywhere from 70 to 130. This includes the estimated labor costs of around 40 to 60 and the estimated parts costs which are from 30 to 70.
Front And Rear Diff Fluid Change Toyota 4runner Forum Largest 4runner Forum
Jack up rear of the vehicle using proper jack points.
Changing front differential fluid. Using the J1C1109 front VW Touareg differential fluid begin filling the front differential through the fill port on the front side of the differential. Change Rear Differential Fluid on a Polaris ATV. Place a container beneath the differential.
This would involve repair work related to adjusting the backlash and replacing the oil seal of a differential. Check your transmission fluid levels to see if the reservoir is too low and causing gears to grind and slip. How to Change Front and Rear Differential Fluid 1.
How often you should change front and rear differential fluid depends on your vehicle driving conditions and differential fluid quality. Diff oil is changed pretty easy on the 2018 with CVT. Take off bottom bolt drain put back bolt.
The fluid of the rear differential wont need to be. Draining the Differential 1. Super easy the worst part was knocking the old washers loose.
This Is What Happens If You NEVER CHANGE YOUR FRONT DIFFERENTIAL FLUIDIn this video I drain and replace the front differential fluid in my 1995 GMC Suburba. Allow the fluid to drain. How often do I need to replace the differential fluid.
Chock the front wheels. The last step to wrap up your driveline fluid change is replacing the fluid on the Polaris ATV rear differential. Differential fluid can be changed in various ways depending on the vehicle as well as the tools the repair shop has on hand to drain and refill the fluid.
Fill and check plugs are 8mm drain is T70. Locate the fill lower and drain upper bolts on the left side of the differential. Park on a flat surface and set the parking brake.
If you drive your truck primarily on the highway in temperate conditions and rarely tow or haul you likely dont need to change front or rear differential fluid very often. This is still cheaper than having to replace an entire differential which would be between 1000 and 2000. As for changing the rear differential fluid the estimated overall cost is a little more at a range of 80 to 150.
Take off gromit on top fill till oil starts coming out hole put gromit back. Remove the fill bolt before draining the fluid. Thats a vague answer but its true.
Please Like Comment and Share. The differential or gear oil may be in need of replacement after reaching levels too low for proper operation of the transmission. This means you will have new front differential fluid and a new transaxle installed at the same time.
Most manufacturers recommend that the differential fluid be changed every 30000 to 60000 miles. But if you tow a trailer or haul supplies frequently and the temperature fluctuates as wildly as your health insurance premium then you. Make sure you have your drain pan container handy in order to catch the flow of fluid.
Use a hand or socket wrench of the appropriate size to turn the drain bolt counter-clockwise. Make sure you have a sealable container to catch the old differential. Front differential rear differential and limited slip differential LSD all require gear oil to lubricate and keep the differential drive components cool.
The differential fluid is a thick dense fluid designed to keep the differential lubricated as it compensates for all of the turns that the vehicle makes. 140w for back 85 or 90 in the front for the 57 verify the weights for your pennstar. But if you need to completely rebuild a differential then your repair costs will be between 400 and 800.
The front differential fluid in your Chevy should be changed about once every 60000 to 70000 miles. If one of the bearings in your differential becomes loose or if thin differential fluid is causing metal on metal grinding and untimely wear you might. Set on jack stands.
Fill the differential with fluid until you see the differential fluid flow from the fill port. If your differential. In fact you may be looking at changing it every 15000 to 20000 miles.
Some of the more modern shops will possibly own an extractor that will not only remove the old fluid but will also refill with new fluid. During the fluid changing process you will need to have the transaxle replaced as well. DIFFERENTIAL PROBLEMS AND SYMPTOMS.
Lower the Chevy down onto the jack stands. It is a messy job and should be done by a licensed mechanic. Easy to do flat on the ground.
Search amazon for - Slippery Pete Fluid Pump for GALLON BOTTLES or quarts depending on what you gear fluid order. Fill and drain are 10mm hex. Step 1 Jack up the front end of your Chevy and put jack stands in place under the front frame.
The exhaust is on the left side so there is easy access to the fill plug. If your vehicle has a transaxle and front and rear differentials then the front differential fluid may need to be changed a lot sooner than 25000 miles. Remove the drain bolt.
Fluid changes in the front gear case transmission and rear differential detailed here.
Bedding in your brakes helps transfer an even layer of brake pad material onto the brake rotor which assists in smoother brake operation and improved braking power. 30 gradual stops from 30 mph with 30 seconds in between each stop for the brakes to cool.
 Remmen Brakes Bedding In Your Pads The Brake Report
The reason not all manufacturers cure the brakes first is that its best for the brake pads to be broken in by the rotors that will be on the intended vehicle.
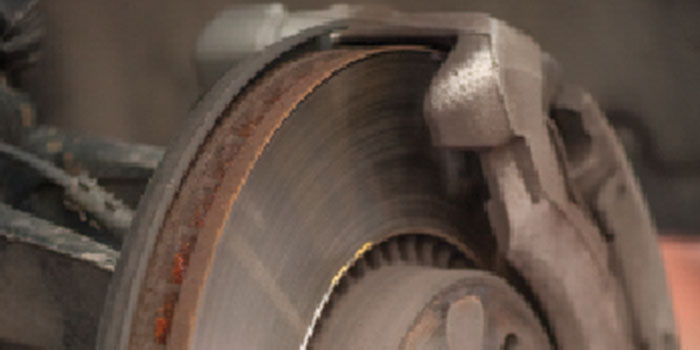
Breaking in new brake pads. Scientists have discovered that toxicity toxic dust and metal particles from worn-out brake pads could have the same harmful impact compact on our bodies as diesel emissions. This is typically caused by an uneven transfer film on the rotor surface or an uneven surface on the rotor not allowing that transfer film to develop evenly. So even if your mechanic doesnt do it your pads will get broken in quickly from normal driving.
The gray film is material from the pads transferring onto the rotor face and the blue tint indicates that the rotor has reached the proper break-in temperature. This is often misdiagnosed as a warped rotor. This is normal due to break-in period.
All caliper pins are new and greased pads greased when it touches caliper bracket all bolts torqued to correct lbs calipers slide easily pistons arent stuck. Breaking in new ceramic brake pads is an important procedure that is needed to maximize their performance according to experts. Both the pads and the brake pins should be cleaned and lubricated.
Some brakes such as big brake kits or new pads installed onto old rotors may require a second bed-in cycle. Brake Pad Pre Burnish. This layer looks similar to a shiny smooth glaze on the surface of the brake rotor.
The content contained in this article is for entertainment and informational purposes only and should not be used in lieu of seeking professional advice from a certified technician or mechanic. Learn more about quality brake parts find your car part or find where to buy your auto part today. These are good signs that you have bedded your brakes properly.
It is very important that this initial layer of friction material is evenly distributed. Your first ride out on your new brake pads will have a major impact on your brakes performance in the future. Bad rotors can RUIN your pads.
Bedding in commonly known as breaking in new brake pads and rotors is necessary for new brakes to work properly. Many brake experts recommend breaking in new brake pads with a 30-30-30 procedure. And if you arent careful that impact will not be good.
Known by some as the bedding-in process breaking in the pads should be done any time new ceramic brake pads are installed or when purchasing a new car. Well as the first solution you can try sanding the rotors a bit and then try pairing the new pads with them. When you are breaking in your brake pads it transfers an even layer of brake pad material onto the brake rotors due to the gradually increased heat from the friction.
95 of brake fade and noise complaints come from poor discrotor condition where the pads touch only at the outer and inner edges and have no chance to deliver an effective brake. Bedding-in new pads and rotors should be done carefully and slowly. Luckily for you we know a thing or two about bedding your brake pads.
It will take approximately 400-500 miles of moderate driving for the new brake pads to be fully embedded into the rotors which will then give optimal performance. The process works to put a layer of material onto the friction surface of the rotor from the brake pad. Once those brake pads and rotors are mounted it is essential to properly break them in.
When manufacturers do this youll spend less time breaking in your new pads. The reason for a proper break-in is to establish an even layer of friction material deposited on the rotors from the brake pads. Youll just have lousy brakes until they do.
You may even hear squeaking sounds see smoke or smell an odor. Many times if pads are run too hard too fast the pad surface can heavily transfer think literally melt onto the rotor when the car is parked which causes an uneven area of pad material deposited on the brake rotor. Brake Pad Post Burnish.
Again new Discsrotors is the solution or a Pro Cut on car Brake lathe re alignment. This procedure will prevent the pads from getting too hot until the resins have fully cured. When changing the pads I got a small amount of caliper grease on the pads and thought I was spraying brake cleaner on the pads but accidentally sprayed the bolt loosener Blaster on.
This can be done by making some sudden stops and in a few stops both things blend well together. Bedding in your brakes is just an industry term to explain breaking in your new brakes. And it never takes more than a few miles to completely break in new pads.
The brake pads are put under extreme heat and pressure for a brief time to force a layer of friction on the first 1 to 2 mm of the brake. This vibration is known as brake judder or brake shimmy. There is a newly-found menace manacle on the roads that could be harming our health - brake pads from road vehicular vehicles.
Once you drive again new pad material is then deposited on top of and around this extra deposit creating an un-even surface on the rotor.
Roaring or Grinding Noise from the Tire Area. Well in this situation you can hear some faint echoing or humming sound from the right back.
 5 Symptoms Of Bad Front Rear Wheel Bearings And Replacement Cost In 2021
Steering Wheel Shakes Steering wheel shakes happen for a variety of reasons.

Bad rear wheel bearing symptoms. Top 5 Bad Wheel Bearing Symptoms 1 Uneven Tire Wear. Symptoms of a Worn Wheel Hub Bearing Snapping clicking or popping. The most common and most easily identifiable symptom of a bad wheel bearing is an audible.
When wheel bearings wear out they tend to wear out unevenly from the rest of them. 5 Signs of a Bad Rear Wheel Bearings. 2 - Problems Braking.
The bad wheel bearing is worst and needs to be replaced immediately. First and foremost listen. A car that feels loose as you drive it.
Generally but not always the noise will be louder during low-speed turns. You may also notice a shaking steering wheel. 4 - Steering Wheel Problems.
5 - Loose Wheels. 1 - Extremely Worn-Out Tires. Looseness can be difficult to.
A failing wheel bearing will start to make noise. Due to the loss of lubrication the bearing will make a low pitched growling or rumbling noise as the vehicle is moving. Here are the most common symptoms that you can expect to happen if your differential goes bad.
Snapping or clicking noises. This can indicate a worn or damaged outer CV-joint. You may be driving along one day and find that your car will suddenly slow down on its own.
3 - Odd Noises. At first glance it might seem like the tire has gone out of balance. Here are a few other sounds and symptoms of bad wheel hub bearings.
This typically means theres a mechanical damage to a wheel-end system. Typically this means there is mechanical damage in a wheel-end system. Some symptoms of bad bearings can be identified while driving.
This is sometimes also caused by a damaged CV joint but can also be due to worn wheel bearings if you hear a clicking noise when turning. It could mean a loss of integrity. 3 Steering Wheel.
One of the first things people notice is noise which can be varied. Listed below are a few of the symptoms that car owners should be aware that will alert them to a bad or failing wheel hub assembly. In relation to the bearing or wheel hub it often suggests the lack of clamp or bearing with mechanical damage that is severe.
5 Wobble andor wheel vibrations While these symptoms can often be connected with worn tires suspension or wheel components it could be a severe chassis misalignment too. Some common bad wheel bearing symptoms 1. Top 5 Bad Wheel Bearing Symptoms 1 Shakiness.
Wheel looseness or also called wheel play is another common symptom of a bad wheel bearing. When wheel bearings arent able to. Here are just a few things to keep in mind.
There are many individual mechanical problems that can lead to abnormal tire wear including under. 2 Grinding Noise. Another revealing sign of bad wheel bearings.
Are you doing the steering or is the car driving where it wants to. Its very difficult to detect a failing wheel bearing because it. A common symptom of bad wheel bearings is when your tires have a loud grinding noise coming from.
Roaring sound coming from the tire wheel area Typically when a wheel hub assembly goes bad its actually the wheel bearing inside the single assembly that is damaged. Unusual Sounds That rear wheel bearing noise youre hearing isnt your imagination. So if your tires appear to be.
If your vehicle exhibits any of the symptoms below your wheel bearings may need replacement. A snapping popping or clicking sound indicates that you are driving with bad wheel bearing. Other signs of a bad wheel bearing include feeling a lack of responsiveness in steering and sometimes even a pulling.
However it also can be related to. If the wheel bearings are damaged then you are going to experience a lot of shakiness and vibrations. Symptoms of Bad or Failing Wheel Bearings 1.
In short bad wheel bearings are intensely uncomfortable. Grinding when the vehicle is in motion. Humming rumbling or.
But what if you are in the middle of a deserted place where you can do nothing but to drive ahead. Keep in mind that bearings will give different signs of failure as the severity of the problem progresses so early identification is key to damage reduction. Bad Front or Rear Differential Symptoms There are a few noticeable signs that will present themselves if your front andor rear differentials start to wear out or get damaged.
2 Car Slows Down. As the bearing begins to wear down they become loose inside the wheel hub and spindle which makes your vehicle feel loose while steering. Humming or growling noises.
One common symptom of bad rear wheel bearings is extreme wear on your vehicles tires. Sectionalizing whether a bad wheel bearing is on the passenger or drivers side of a vehicleDonate to my channel - thanks.
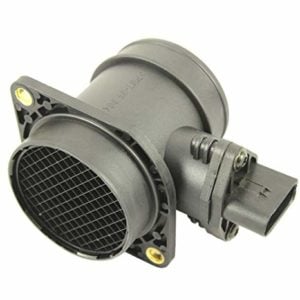
How much does a new Mazda air flow sensor cost. Mass Air Flow Sensor Replacement Cost Comparison.
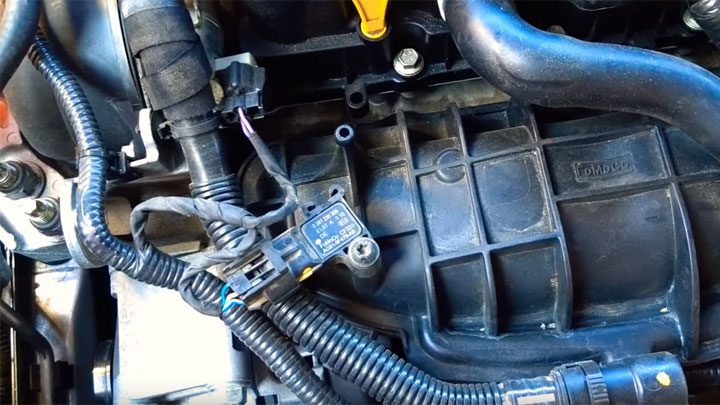 7 Symptoms Of A Bad Map Sensor And Replacement Cost In 2021
The average price for a new mass air flow sensor cost is around 100.
Maf sensor replacement cost. Typically labor costs for a sensor replacement are around 150. At the dealership it will cost anywhere from 200 to 300. If it is obviously filthy it may just need a good cleaning rather than replacement.
For a 2011 Chevrolet Cruze with a 18 liter engine the labor to replace the sensor is 4 of an hour. If you are going to replace the MAF yourself then Id always recommend buying an OEM mass air flow sensor. The mass air flow MAF sensor part of your vehicles electronic fuel injection system is responsible for calculating the total amount of air entering the engine.
Mass Air Flow Sensor - Compatible with Chevy Cadillac GMC other GM Vehicles - Silverado Suburban Tahoe Yukon XL Sierra Escalade ESV 53L 60L 48 - Replaces 25168491 AF10043 25318411. MAF Sensor Replacement Cost A Mass Air Flow Sensor is not so cheap but it is not very expensive either. All cars take air from the outside and pass it into the engine through the air filter.
This range does not include taxes and fees and does not factor in your unique location. Use MAF sensor cleaner only to clean the sensor allow 10 minutes for it to dry then put back together and see if that resolves your issues. A faulty MAF sensor can cause your vehicle to run too rich or run too lean.
Order Mass Air Flow SensorMeter for your vehicle and pick it up in storemake your purchase find a store near you and get directions. Replacing a mass air flow sensor is fairly straight forward so most of the cost comes from the cost of the part and not the labor. Barometric Pressure Sensor A Circuit.
The average cost for mass airflow sensor replacement is between 292 and 403. A third party component can be as good as or better than the original. Price range for all vehicles 228 A mass airflow sensor or MAF for short is found almost exclusively on fuel injected engines.
Therefore on average you are expected to pay 200 to 400 in total for a mass air flow sensor replacement. The engine control unit uses data from the MAF sensor to calculate the correct mixture of air and fuel that the engine needs. Between 100 to 200.
To get your mass air flow sensor replaced you will pay about 300 on average. Mass Air Flow Sensor Labor and Part Costs. FREE Shipping on eligible orders See Details.
Your order may be eligible for Ship to Home and shipping is free on all online orders of 3500. Inspect the MAF sensor. The labor should cost you around 60 while parts are about 240.
Mass Airflow Sensor Replacement Cost. The true cost will depend on the make and model of your vehicle as well as whether the new MAF sensor is OEM or aftermarket. Labor costs are estimated between 38 and 48 while parts are priced between 254 and 356.
Your mechanics labor costs also likely vary based on a few factors including how difficult it is to access your sensors. Youll notice if the tailpipes eject black smoke or when the engine runs rough or backfires. Many sensors nonetheless cost between 20 and 100.
The parts cost should be between 50 and 320 while the labor costs will be anywhere from 30 to 70. MASS AIR FLOW SENSOR REPLACEMENT COST Replacing the mass airflow sensor should cost 300 or less for parts and labor for most civilian cars trucks and SUVs. Online the MAF sensor can be bought for as low as 50.
It measures the amount of. The prices vary based on where you go for servicing and what kind of car you have. The replacement cost of a mass air flow sensor can be anywhere from 80 to 390 if having a mechanic do it for you.
Dont just assume aftermarket parts are low quality. Mass Airflow Sensor Part. It is not a complex job so pricing is dictated mostly by the price of the actual replacement sensor.
In this guide you will learn about Chevy Mass Air Flow MAF sensor problems common symptoms and how to replace the MAF sensor on a Chevy. On average for most vehicles it costs about 250 to replace a MAF sensor. When purchasing a mass air flow sensor you have the option of an original manufacturer part or an aftermarket part.
You could get one for 120 300 to which you should add labor costs of 80 100. Related repairs may also be needed. The mass airflow sensor is a round tunnel made of plastic with a sensor attached inside.
The average cost for a MAP Sensor Replacement is between 156 and 188 but can vary from car to car. Check here for special coupons and promotions. If not continue to Step 5.
A replacement mass air flow sensor can cost anywhere from 20 to 600. For some specific examples on common vehicles using 100 an hour as a labor rate. The mass airflow sensor measures the amount of air entering the engine.
Can I replace the MAF on a Mazda myself. A MAF is an electronic device that runs between your vehicles airbox and intake manifold. OBD codes related to MAP Sensor Replacement P2226.
Bolt Torque Spec Chart for Chevy Big Block Chevy Fastener Type Torque Specs Main cap bolt 396-427 2-bolt 95 ft-lbs. Cylinder head bolts long 75 ft-lbs.
 Small Block Chevrolet V8 Engine Specs Torque Specs Cylinder Numbering Firing Order Distributor Rotation Sb Chevy 267 3 Engineering Chevy Chevy Motors
Lbs and finally 90 ft.
Chevy head bolt torque. 30 ftlbs then 60 ft. This engine had three sizes of bolts referred to as short medium and long. Bolts or Parts Lube or Sealer Torque to.
Big Block Chevy Head Bolt Torque Specifications. Main cap bolt 396-454 4-bolt innerouter 110 ft-lbs. GM 50L-305ci-V8 Engine Torque Specs.
Powered by phpBB phpBB Group. Re-torque the head while the engine is still warm. Torque down the head with at least three sequences.
Over 6000 Automotive Torque Specs. Long Head Bolts 75 - 80 FtLbs. Reusing stretched T-T-Y head bolts can cause improper or uneven torque damaged engine threads and broken bolts any of which could lead to head gasket failure.
Short Head Bolts 65 - 68 FtLbs. These bolts are torque to yield so they are not reusable. Connecting rod bolt 50 ft-lbs.
It is important to use new bolts and proper torquing procedures during reassembly. 38 Outer Main Caps 4 bolt Engine Oil 40 ft-lbs. 50 torque OK lets just say 35 FtLbs then final round at specs.
Some People do only 1 or 2 steps to reach the final torque. The best way to do that is to loosen each bolt ½ a turn. Tighten the cylinder head bolts a final pass to an additional 180degrees.
I would also add make sure you torque the bolts in steps. All the rest are 59lbft then 90 then 60. Torque sequence as followsFirst Pass torque to 22 ftlbsSecond pass tighten short bolts 55 degrees medium bolts 65.
Bring the head up to operating temperature without driving it. For Head Studs or aftermarket bolts CHECK YOUR INSTRUCTIONS SBC studs are available in a ton of. GM switched to torque-to-yield TTY bolts in 1996 which require a slightly different approach.
Some head bolts can be reused while others cant. 716 Outer Main Caps 4 bolt Engine Oil 65 ft-lbs. 53l l83 head bolt torque specs.
Do a first round hand tight second round at. Many modern engines use Torque-To-Yield TTY bolts which cant be reused. 716 Inner Main Caps 4 bolt Engine Oil 70 ft-lbs.
Cylinder head bolt removal sequence-16L engine Fig. Posted on Sep 07 2010 Helpful 0. Cylinder head bolts short 65-68 ft-lbs.
Always torque bolts in three equal increments. Cylinder head bolt torque sequence-16L engine Access our Aveo 2004-2005 Cylinder Head Repair Guide Removal and Installation by creating an account or signing into your AutoZone Rewards account. Different styles depending on heads and stud diameters.
These bolts achieve clamping force by stretching during the torque. Then shut it off. Get every little bit of coolant out of the bolt holes or you will break the bolts.
The rocker arm bolts are 168-in. Tighten the cylinder head bolts a first pass to 35Nm26lbft. The long cylinder head bolts required 22 foot-pounds of torque and a 75-degree rotation.
All 1995 and earlier LT-series engines use the same head bolt torque 65 ft-lb and tightening sequence as the original small block. For TTY bolts you lubricate the threads torque the bolt to a specified setting and then turn the bolt a certain number of degrees past that torque setting. The second step requires using an angle meter and does not have a specific torque setting.
Step 3 65 FtLbs. The BoxWrench Engine Specs Database is a community resource for mechanics of all skill levels to. Connecting rod bolt 67-73 ft-lbs.
99 chevy malibu v6 31 engine head bolt torque is-- 98 through 2001 is step1- 37 foot lbs step 2- rotate an additional 90 degrees 14 turn. The medium-head bolts need 22 foot-pounds of torque and a 65-degree rotation. Bolting down the heads in this episode.
Left head Allen head bolt Is 59 lbft then 90 and the 40. The short bolts required 22 foot-pounds of torque and then a 55-degree rotation. Verify your engine specs with a service manual for your year and model.
Search Car Torque Specifications by Engine or Model. In some cases the stretching approaches the bolts elastic limit permanently stretching them. 716 Main Caps 2 bolt Engine Oil 70 ft-lbs.
Refill the reservoir with fresh brake fluid as shown. So whats the problem with a little moisture.
 How To Change Brake Fluid In A Car Youtube
This will allow the brake fluid to pour from the container in a controlled and easily directed fashion.

Where do you put brake fluid. Unscrew the cap of the reservoir. The brake booster is on the drivers side of your vehicle usually up near the firewall. When it comes to refilling your brake fluid defer to these instructions.
Changing brake fluid starts when you use a baster to suck out the dark brown brake fluid brake and power steering fluids are incompatible so use a different baster for each. Most brake fluid types are hygroscopic they absorb moisture from the atmosphere. Even if your vehicles car manufacturer doesnt recommend when you should change your brake fluid you should still do it AT LEAST every 3 years.
Open the reservoir attached to the clutch master cylinder and pour brake fluid in until it reaches the full line. It may have brake fluid dirtdebris or both on it and needs to be clean before you put it back on. The swelled-up effects in most rubber seals are amplified which leads to some leakage.
Lastly if youre topping off a low brake fluid reservoir only use brake fluid from a fresh container. Leaving it around is no good for the environment. Your brakes wont work if the fluid level is too low.
How to add brake fluid Park the vehicle in a level area - Make sure the vehicle is stationary and on a level surface. Brake fluid is typically stored in a translucent plastic reservoir so you can see the fluid level without removing the cap. The following are some common consequences when you put brake fluid in the power steering intentionally or unintentionally.
Brake fluid should be stored in a sealed container and your brake fluid reservoir cap shouldnt be left open for extended periods. Dont Wait Too Long Change Your Brake Fluid. How to Put in Brake Fluid.
Locate the brake fluid reservoir -. When you hit the brake pedal in your 2005 Buick Rendezvous it pumps brake fluid down to your brakes which increases the pressure to make your car slow down. Add brake fluid until the level is just below the MAXFull mark.
The fluid has a bad smell and also affect the. At the drum brakes the fluid is forced into the wheel cylinder then pushes the brake shoes against the drum to stop at the wheel. You dont want to open the cap unless youre replacing the fluid because exposing the reservoir to air can draw moisture into the hydraulics system.
If your fluid is below the MIN line carefully pry the reservoir cap off and then add brake fluid until the level is just under the MAX line. If you dont have enough brake fluid in the brake fluid reservoir air can get in your brake lines and your Trailblazer wont stop properly. When you hit the brake pedal in your 2005 Chevrolet Trailblazer it pumps brake fluid down to your brakes which increases the pressure to make your car slow down.
At the disk brakes the fluid is forced into a caliper. Note that most brake fluid reservoirs will have instructions printed on top of the cap. Using a completely clean towel or a lint-free cloth clean the inside of the reservoir cap.
If you dont have enough brake fluid in the brake fluid reservoir air can get in your brake lines and your Rendezvous wont stop properly. You will need to remove the plastic cover to access the reservoir. The brake fluid reservoir is attached to the brake master cylinder from the outside this looks like a small metal block or tube near the back of the engine.
Brake fluid starts to go bad almost immediately. Add the recommended brake fluid. And if you do switch the fluid yourself make sure you dispose of the old stuff safely.
Check brake fluid level on BMW 3-Series. Effects of Putting Brake Fluid in the PowerSteering. Poke a hole in the seal on the mouth of the brake fluid then tear a larger hole on the opposite side.
Squirt it into a recycling bottle. Depress the brake pedal 20 to 30 times - Some manufacturers specify that this be done if the vehicle has anti-lock. Allowing the vehicle to.
Luckily regular fluids are inexpensive. Haynes the worlds leading publisher of car manuals shows you how easy it is to top it up. Determine the current brake fluid level by looking at the maximum and minimum marks on the reservoirs side.
And the caliper presses the fluid against a piston that squeezes the brake pads against the disk and forces the wheel to slow or stop. You might be able to tell its time for a change by looking to see if the fluid is still fresh in the brake fluid reservoir usually sitting on top of the master cylinder under the hood of your. Just in front of that sitting on and connected to the brake master cylinder is the brake fluid reservoir usually a plastic canister like the one shown here.
The brake fluid reservoir is below the plastic cover on the drivers side.
Canada Limited for Chevrolet Motor Division whenever it appears in this manual. This repair manual is comprised of installation general maintenance tune-up servicing safety measures and repair work.
 Chevrolet Aveo 2009 2010 2011 Service Repair Workshop Maintenance Factory Manual Ebay
Color manuals on repair and operation of the car Chevrolet Aveo 2002-2012 body sedan and hatchback.
2004 chevy aveo repair manual. Please keep this manual in your vehicle so it will be there if you ever need it when youre on the road. Chevrolet Aveo T250 2005-2011 Factory Service Repair Manual Fits. The petrol engine of 16 l.
If you sell the vehicle please leave this manual in it so the new owner can use it. This downloadable repair manual software covers the Chevrolet Aveo and is perfect for any do-it-yourselfer. It is an alphabetical list of what is in the manual and the page number where it can be found.
Chevrolet Aveo Workshop repair and owners manuals for all years and models. CHEVROLET AVEO OWNERS MANUAL 2004-2007 DOWNLOAD 04 Chevrolet Aveo 2004 Owners Manual. Together in the owner manual to explain things.
Chevrolet Aveo 2004 2005 and 2006 factory manual is especially planned to cater the requirements of our customers. 2006 Chevrolet Aveo Service Repair Manuals for factory Chilton Haynes service workshop repair manuals. Chevrolet Aveo 04-11 Repair Manual Haynes 24013 NEW.
You are buying a 2002-2006 Chevrolet Aveo Factory Service Workshop Manual. Chevrolet Aveo 2004-2010 Service Repair Manual. If the vehicle is sold leave this manual in the vehicle.
Free expert DIY tips support troubleshooting help repair advice for all Aveo Cars Trucks. Box 07130 Detroit MI 48207 Litho in USA. Step by Step Instructions.
Covers all vehicle information such as servicing maintenance repairs and rebuild information for engine gearbox suspension axles steering braking system body panels interior components exterior fittings electrical system with wiring diagrams troubleshooting and diagnostic advice. Chevrolet Aveo 2002-2006 Workshop Service Repair Manual. The petrol engine of 16 l.
Our company has gained trust of customers through quality production and comprehensive service manuals. Our 2004 Chevrolet Aveo repair manuals include all the information you need to repair or service your 2004 Aveo including diagnostic trouble codes descriptions probable causes step-by-step routines specifications and a troubleshooting guide. Keep this manual in the vehicle so it will be there if it is needed while you are on the road.
Its a pretty good manual with all the specs. Recent 2004 Chevrolet Aveo questions problems answers. 10 10 product ratings - Chevrolet Aveo Repair Manual.
Once you select 2004 Aveo it will download a service manual onto your computer. Factory Service Manual Workshop Manual for the Chevrolet Aveo chassis code T200 built between 2004 and 2006. Canadian Owners A French language copy of this manual can be obtained from your dealer or from.
Index A good place to quickly locate information about the vehicle is the Index in the back of the manual. Get detailed instructions illustrations wiring schematics diagnostic codes more for your 2005 Chevrolet Aveo. Chevrolet Aveo 04-11 Repair Manual Haynes 24013 NEW.
This is the very same manual that your local GM dealer technician uses in repairingservicing your vehicle. Free PDF download for thousands of cars and trucks. Complete list of Chevrolet Aveo auto service repair manuals.
Old paper repair manuals just dont compare. OEM SERVICE AND REPAIR MANUAL SOFTWARE FOR THE 2004 CHEVROLET AVEO. Now you can get your repair manual in a convenient digital format.
05AVEO A First Edition 2004 General Motors Corporation. Complete Shop Repair Set GM Factory Authentic Technical Service Information GMP04-A-1 GMP04-A-2 GMP04-A-3 Paperback January 1 2005 by GM General Motors Corporation Author. The disc is no good after that but you can copy the manual to another cd.
16 V 115 hp. 2004 CHEVY CHEVROLET Aveo Owners Manual. Owner manual for the 2004 model year Chevrolet Aveo.
04AVEO A First Edition. 2006 Chevrolet Aveo workshop repair manual PDF. 2004 Aveo automobile pdf manual download.
Factory-Authorized Online 2005 Chevrolet Aveo Repair Manual. Chevrolet Aveo 2002 - 2010 Service repair manual. If you need a repair manual for your Chevrolet youve come to the right place.
View and Download Chevrolet 2004 Aveo owners manual online. Chevrolet Aveo 2004 Owner Manual 334 Pages Free Chevrolet Aveo 2006 Owner Manual 362 Pages Free Chevrolet Aveo Misc Document. 2004 Chevrolet Aveo Service Manual Volume 1 2 3.
This manual covers every service and repair imaginable from oil changes to rebuilding the transmission.
This rear seat upholstery matches the very popular front Procar Rally Series seats. Procar 81266 - Procar Seat Adapter Brackets.
 Buy 1966 Mustang Parts Online Mustangs Plus Buy Mustang Parts Online
It comes equipped with an automatic transmission 289 V8-engine an.
1966 ford mustang seats. Procar 81266 - Procar Seat Adapter Brackets. The SC Sport Seat is designed for the everyday driver and gives you excellent lumbar support for extreme comfort along with the look of luxury. These 1966 Mustang Seat Covers are made with durable vinyl and built to last through even the toughest conditions.
2015-2020 Ford Mustang Leather Bucket Coupe Resto Mod Retro Fit Seat Set OEM Fits. Scott Drake 66CP-S-FULL-BK - Scott Drake Standard Seat Upholstery. Results 1 - 25 of 1592 25 Records Per Page Default Sort.
1966 Ford Mustang Production Sales Numbers. Scott Drake 66CP-S-FULL-BK - Scott Drake Standard Seat Upholstery. More listings are added daily.
Ford Mustang 1966 SC Sport Seat by Cerullo. 1966 Mustang Convertible Standard Interior Rear Seat Upholstery - Black. Restoration Parts Source RPS car parts for new vintage and classic GM Ford and Mopar vehicles.
Made with Standard or Deluxe Upholstery Sierra Grain Vinyl. A total of 607568 Mustangs were sold in 1966. Upgrade the rear seat of your classic 1965-1966 Mustang to match your front rally seats with this Procar Rally Series Rear Seat Upholstery from CJ Pony Parts.
The SC Sport Seat features an adjustable. 1966 Mustang Shelby Seat Covers. We have an extensive parts library and cataloging system to help you locate that hard to find NOS new old stock or a quality reproduction part.
Door handles and window cranks remain unchanged. The inside door panels have a horizontal line pattern opposed to the vertical pattern found on the 65 models. Seat Brackets Driver or Passenger Side Steel Black Ford Each.
Add your review - Matches Original Style - Complete Replacement Bucket Seats. Results 1 - 25 of 1436 25 Records Per Page Default Sort. Filter Results 1966 FORD MUSTANG Individual Parts.
1966 Ford Mustang CoupeThis 1966 Ford Mustang Coupe C-Code is available in yellow with black racing stripes and a black interior. 1966 FORD MUSTANG Seat Upholstery. 1966 Ford Mustang 9599.
To stay comfortable and in control updating your 1966 Mustang seats is a vital part of ride satisfaction. Sport seat covers are also offered on this page. At CJ Pony Parts we have a wide variety of 1966 Mustang seats and seat repair kits available to help you keep sitting pretty.
Reproduction original style rear seat upholstery for various. Pro-Series OE-Style Sport Low Back Seats - 1966 Mustang. Diving down deeper the standard interior hardtop made up almost 70 of total sales and was the clear combination that most buyers wanted.
Ford Mustang 1966 LeMans Racing Seat by Cobra Seats. TMI Pro Series - Highback Bucket Seats Brackets for 1964 - 1970 Mustang Fits. RPS works with the major classic parts manufactures in the country including Scott Drake GoodMark Dynacorn and many others.
1966 Mustang Convertible Standard Interior Rear Seat Upholstery - Black 1966 models with standard interior features Sierra grain vinyl with Rosette inserts. 1966 FORD MUSTANG Seats. 1966 Mustang Seats The drivers seat may just be the most important part of any classic Mustang.
Product Description Procar Rally Series Rear Seat Upholstery for 1965-1966 Mustangs. Filter Results 1966 FORD MUSTANG Individual Parts. Mustang seats have a woven pattern whereas the 1965 seats were smooth.
1966 Ford Mustang GT TMI Products Bucket Seats Restoration Installing New Upholstery Also Provides An Opportunity For Frame Inspection Repairs And New Foam Donald Farr Former Editor Mustang Monthly. The 1966 fastback has a new and different style of seat latch for the folding rear seat option. The Classic Car Interior 1966 Mustang Seat Covers are designed to replicate the original equipment production and will install easily over existing seat foam.
Ford Mustang 49995 2003 2004 Ford Mustang Cobra SVT Terminator Convertible Front Rear Seats Suede Fits. Fox Body Mustang 1979-1993. Over 80 of the cars sold had the hardtop body with almost 5 being fastbacks and 12 being convertibles.
The Cobra LeMans Seat has been designed using timeless lines with a retro twist ideal for custom retro interiors or simply to refresh. The replacement seat covers offered on this page are only for the Ford Mustang models with low-back bucket seats for the 1966 model year. 1966 Ford Mustang 128745.
They are manufactured by TMI Products and are available in several upholstery options. 1965 1966 Ford Mustang Seat Side Molding Pair 2 Pieces Stainless Steel Dii Fits. The 1966 Mustang Seat Covers are manufactured right here in the United States just steps away from the Classic Car Interior headquarters.
Pick Up Trucks Fox Body Mustang 1979-1993.
Most states will simply suspend your smog certification until you get a new one installed. While it can signal a faulty catalytic converter it can also mean that the oxygen sensor is bad.
 Can You Drive Without A Catalytic Converter In The Garage With Carparts Com
Your vehicle must have a working catalytic converter to ensure a high fuel economy good acceleration and to pass the emission test.
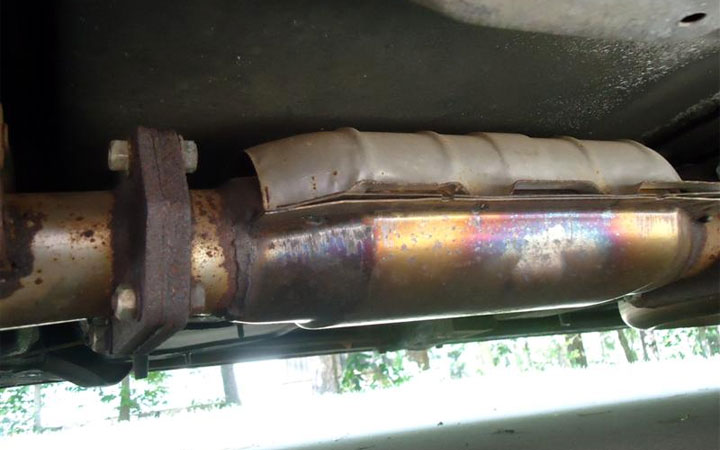
Do you have to have a catalytic converter. Yes every passenger vehicle sold in the past 35 years is required to have a cat the catalytic converter used in the exhaust system to reduce harmful emissions and allow the vehicle to pass. Removing the catalytic converter is illegal but getting caught without one isnt. Like any other components the catalytic converter can break over time of use usually around ten years period.
Your mechanic told you that you need a new catalytic converter and it will cost you 900. 3 A car will not function well without a catalytic converter and small problems could eventually lead to engine failure. It soon became law for all petrol engines manufactured in the US and Europe to have catalytic converters fitted to meet standards.
The catalytic converter which is often referred to simply as a cat is an emissions control device located in your cars exhaust. How Do Catalytic Converters Work. Decreasing or increasing the number of catalytic converters compared to the OE configuration is prohibited.
As you can see catalytic converter laws are not confusing but they are strict. Grab Steel Wool Some catalytic converters have corrosion on them so you may have to scrub some of the rust off to find a serial number Really Theres NO Number. Removing your catalytic converter is not a safe or legal option as the EPA designated it a required component in 1975.
Some cats just dont have a serial number and thats ok. What is a Catalytic Converter. If you decide to have a professional replace your catalytic converter expect to pay anywhere from around 500 to upwards of 2000.
If your car came with a catalytic converter youre looking at fines of up to 10000 for removing it. Also most states do not require that off-road vehicles and motorcycles have catalytic converters installed. Today federal and state laws require its presence on nearly all vehicles.
7 The Converter Warranty Card is completed the installer must. Exactly how much the job costs will depend on many factors including the type of vehicle you have. Catalytic converters are expensive.
They do this by taking the gases. - Fill out the warranty card. The catalytic converter in motor vehicles is an anti-pollution device that chemically converts toxic byproducts of fuel combustion into gases that occur naturally.
Since its a critical emissions component the EPA forbids the sale and installation of any used catalytic converter that hasnt been refurbished and certified by an approved manufacturer. The catalytic converter breaks down harmful compounds. Inside the converter precious metals create a type of chemical reaction called a catalyst reaction.
However if one is installed it is against federal catalytic converter law to remove it. 4 Not to mention the harmful emissions being released into the atmosphere. - All vehicles are manufactured with a part called a catalytic converter which helps limit how much pollution it puts into the air.
First introduced in the 1970s the catalytic converter quickly became standard issue equipment on most vehicles. Your cars catalytic converter is an essential component for reducing the toxic emissions that cause air pollution and climate change. You may find it helpful to use a diagnostic scan tool to determine if another repair is in order.
A car alarm that goes off when it detects vibration will likely send thieves running before they have a chance to do much damage-If you have had your catalytic converter stolen contact local law. Even worse you need to have an annual inspection soon and your vehicle wont pass unless you get your catalytic converter repaired. The catalytic converter is installed on a one-for-one basis a new converter is installed for each OE converter being replaced.
The catalytic converter is an emission control device found in the exhaust system. Toxic gases from the engine flow through the cat where they are transformed into harmless CO2 and water. The catalytic converter would tell you that it is about to fail soon by showing some signs.
Some drivers believe that removing the converter will improve performance while others may seek to replace the converter with a section of ordinary exhaust pipe to avoid the cost of replacing a failed converter. The United States requires all vehicles on the road to have them. The diesel cars with their diesel particulate filters have also been made compulsory.
If you are searching for a serial number on your cat and cant find one there are a few things you can do. Catalytic converters - which are fitted to all petrol cars manufactured from 1993 - are there to reduce the harmful pollutants emitted from vehicle exhaust pipes.
Mitsubishi Mirage 2014 Service Manual. 1993-1996 Mitsubishi Mirage Electrical Service Shop Manual Vol-2.
 Mitsubishi Mirage Workshop Manuals Free Download Carmanualshub Com
Mitsubishi Galant 1993-2001 Service Manuals Collection.

Mitsubishi mirage repair manual. Contact your Mitsubishi Motors dealer or a repair facility of your choice for assis-tance. Same day - 1 business day Quantity Sold. Mitsubishi Mirage is a subcompact car manufactured by Mitsubishi Motors from 1978 to 2002 and production has been revived since 2012.
5-73 Illuminates and intermittent sounds Park your vehicle in a safe place and stop the engine. 1998 Mitsubishi Mirage Service Repair Manual Volume 2. How to download an Mitsubishi Workshop Service or Owners Manual for free.
In the table below you can see 0 Mirage Workshop Manuals0 Mirage Owners Manuals and 20 Miscellaneous Mitsubishi Mirage downloads. Mitsubishi Mirage 2014 MY Owners Manual. 68 MB 1990 - 2000 Mitsubishi Mirage Mitsubishi Galant Mitsubishi Diamantae - Service Manual FSM Repair Manual Workshop Manual ZIP - PDF Format.
10 Feet SILICONE VACUUM HOSE AIR DRESS UP 23468mm Fit MITSUBISHI by AB88 Fits. 1989 - 1993 Mitsubishi Galant Service Manual Download Now. 1999 Mitsubishi Galant Electrical Wiring Diagram Download Download Now.
Mitsubishi Mirage 2015 MY Owners Manual. 2000 Mitsubishi Mirage Factory Service. 1999-05--Mitsubishi--Mirage--4 Cylinders A 15L MFI SOHC--32635101.
Retailer price terms and vehicle availability may vary. On the next page select the specific PDF that you want to access. The Mitsubishi Mirage in hatchback bodies produced between 1987 and 2002 were classified as small cars while the sedan and station wagon along with the Mitsubishi Lancer were part of the compact class.
Mitsubishi workshop manual Service and owners manual for repair and maintenance of Mitsubishi Mirage cars equipped with gasoline engines of 15 16 18 20 24 liters. 2004 Mitsubishi Outlander 2WD. This is a vehicle specific repair manual Anticipated Ship Out Time.
We have 37 Mitsubishi Mirage manuals covering a total of 28 years of production. Mitsubishi Mirage Auto Repair Manuals. Excludes destinationhandling tax title license etc.
This manual is your number one source for repair and service information. Mitsubishi MIRAGE Service Manual 300 pages. ChiltonDIY online Mirage repair manuals cover automotive service and repairs from diagnostic trouble codes and probable causes electronic engine controls and maintenance schedules to brake and suspension issues wiring diagrams and engine repairs tune-up procedures specifications clutch and gearbox diagrams and more.
CVT should be maintained and serviced by Open the reservoir cap and check the level of an authorized Mitsubishi Motors dealer or a N00938200181 washer fluid. Automobile Mitsubishi Mirage 1990 General Information And Maintenance 47 pages Automobile Mitsubishi MIRAGE 2014 Owners Handbook Manual 16 pages Automobile Mitsubishi Miev Owners Handbook Manual. Mitsubishi Mirage 2014-2015 Repair Manual.
This top-grade product is expertly made in compliance with stringent industry standards to offer a fusion of a well-balanced design and high. Related Manuals for Mitsubishi Mirage. 2014 Mitsubishi Mirage Service Repair Manuals for factory Chilton Haynes service workshop repair manuals.
1997 - 2000 Mitsubishi Mirage DE All Engines Product Details Notes. 2 May not represent all manuals that apply to your vehicle. Contact your Mitsubishi Motors dealer or a repair facility of your choice for assis-tance.
Download Now Mitsubishi Mirage 2012-2016 Workshop Repair Service Manual Download Now. 2003 Mitsubishi Montero Factory Workshop Manual Download Now. This high-quality and genuine service and repair manual of 2015 Mitsubishi Mirage is 100 complete and intact with no MissingCorrupt pagessections to freak you out.
See your Mitsubishi retailer for details. Its specifically produced for the do-it-yourself-er as well as the experienced mechanic. Our most popular manual is the Mitsubishi - Mirage - Owners Manual - 2014 - 2014.
See your local Mitsubishi retailer for details. Auto Repair Manual Books. More than one vehicle 899 to 1599.
Auto Repair Manuals on CD. Chilton Total Car Care series offers do-it-yourselfers of all levels TOTAL maintenance service and repair information in an easy-to-use format. Repair Manual by Chilton.
Service and owners manual wiring diagrams for Mitsubishi Mirage cars free download. Click on your Mitsubishi car below for example the Other Model. 5-14 Oil pressure warning light.
Mitsubishi Mirage 1998 Mitsubishi GalantMirageDiamante Repair Manual by Chilton. 1991 Mitsubishi Space Runner - Space Wagon Service Manual Download Now. Repair facility of your choice to obtain the Whenever the manual transaxle oil level is The washer fluid level should be kept approx- best performance and longest life.
1 Manufacturers Suggested Retail Price. 2014 Mitsubishi Mirage workshop repair manual PDF. Mitsubishi Mirage Service and Repair Manuals Every Manual available online - found by our community and shared for FREE.
Here were showing you how to remove a windshield. Simply apply a dot of toothpaste and rub it all over the scratched area.
 Windscreen Repair Polishing Kit Wiper Blade Damage And Light Scratches Remover Youtube
Repeat the process as needed.

Fix a scratched windshield. Once you have purchased the kit you will need to make sure that it includes a rubbing compound that has cerium oxide in it. To repair a scratched windshield you will need to get an auto glass repair kit. Then wipe the excess toothpaste with a damp cloth and see if there has been an improvement to the scratch.
Using an acrylic scratch remover to fill in a light scuff or crack is the easiest answer to your problem of how to remove scratches from windshield. Your days of worrying about unsightly glass cracks in your view are over with this all-new Windshield Scratch Repair Liquid that fixes up any minor blemishes restoring safe driving visibility to your windshield. You have to apply this liquid to the affected areas and rub with a wet microfiber cloth or a super fine sandpaper 600-grit or more.
White toothpaste that has baking soda as an ingredient is your best option for scratch removal. Squeeze the cloth until no more excess moisture drips from it. Hold your finger vertically.
DIY Scratched windshield glass repair fix. The pros use nothing less and for good reason. An auto glass repair shop can fix a scratched windshield.
The first thing a repair shop will do is determine the depth of the scratch. Whether you just purchased a new vehicle or are having your old tint replaced I highly suggest you supervise the job and remind the tinter to be very careful with your autos. Any debris on the cloth including dirt or lint will rub off on the glass and cause an uneven abrasion or more scratchesStep 3 Squeeze a dot of toothpaste.
How to Remove Scratches from a Windshield Determine the Depth of the Scratch. It acts as a sealant that fills in the grooves left by scratches. Yes you read that correctly clear acrylic nail polish is useful as a windshield scratch remover.
Allow the glass to dry before attempting to fix the scratchStep 2 Dampen a microfiber cloth. As a general rule of thumb if you can run your finger over the scratch and your finger does not stop or become stuck over the scratch the scratch is superficial and can be polished or buffed out. Washing and Protecting the Windshield 1.
If your nail catches youve got. Place the rubbing compound into the scratch--the compound should look like toothpaste and be easy to apply. Rinse all of the soap residue or glass cleaner with water and dry the window before applying the rubbing compound to the scratch.
Wash the windshield with a glass cleaner then dry it completely. This kit has everything you need to fix the windshield. Wash off the glass using a clean cloth making sure the glass is clear of all debris.
As the repair progresses it can become difficult to see where the glass was scratched. 4 Step Guide to Remove Scratches from Windshield Step 1 Use your fingernail to check how deep the scratch is. Hold a clean lint-free cloth under a faucet of lukewarm water.
It is important to find out how deep the scratch is. Run your fingernail along the scratched area of your. Try running a fingernail over.
The process of how to fix a scratched windshield calls for an auto glass repair kit. Based on personal experience you can also get really bad scratches from a window tinters cutter or X-acto knife. Step 2 Purchase a glass repair kit.
Get Ready with the Materials. With the Gforce Max distortion-free glass scratch removal is not only possible its also easy and fast. Head over to your local auto repair and part shop or order a windshield repair kit.
Drive with confidence when you have this handy repair kit in your possession and save valuable time and money that youd otherwise spend. Another way of getting your glass scratched up is through improper or poor cleaning. Clean off all dirt and debris before attempting to.
Run your finger over the scratch to see how deep it is. DIY Scratched windshield glass repair fix. In this video I show the way I get scratches out of my windshield.
There are several different way to do this however this is the way I found works the best. Always use a microfiber towel when wiping your windshield and windows. Baking Soda And White Toothpaste.
So you always know where you should be working mark the scratched area. Step 3 Clean. Wash the windshield thoroughly with soap and water in order to clean it.
Step 1 Clean off the glass. Not only is it clear but when it dries it solidifies and when used correctly leaves behind a scratch-free surface. The easiest way to do this is by outlining the scratch with a dry-erase marker on the opposite undamaged side of the glass.